
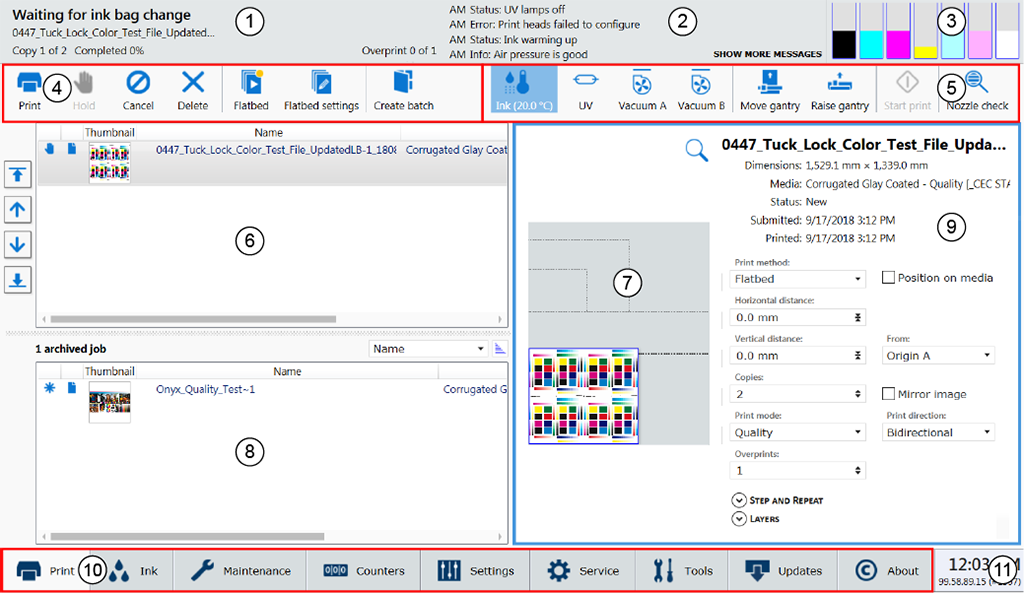
Print Job Control is the first module displayed when the printer software is loaded. From this module you can manage all aspects of working with print jobs and also control many features of the printer. The table "Job Control Panels" documents the numbered call-outs and the rest of this section explains each of these areas in more detail.
The Print Job Control display is divided into functional and status areas. The functional areas supports all operator input necessary to operate, maintain and service the printer. The status areas are used to report image and printer status.
|
Component |
Function |
|---|---|
|
1) Job and Printer Status |
Displays the status and progress of print jobs. |
|
2) Printer Messages Panel |
Displays the last four lines of the log - click on [SHOW MORE MESSAGES] to see more of the log. |
|
3) Ink System Status |
Ink System Status icon - click to view an ink status report. |
|
4) Command Toolbar left |
Displays icons for actions related to the print jobs and control of the printer table. |
|
5) Command Toolbar right |
Displays icons for ink temperature, lamp control, vacuum pump A & B, move the gantry, start/pause print jobs, and print a nozzle check. |
|
6) Active Jobs List |
Displays a list of all Active print jobs. |
|
7) Job Placement Preview |
Displays the selected print job(s) with a preview that shows the placement of that job on the printer. |
|
8) Inactive Jobs |
Displays a list of all Inactive print jobs. |
|
9) Job Information and Parameters panel. |
This panel shows the parameters of the currently selected print job and also allows changes to the parameters associated with that job. |
|
10) Interface Tabs |
Use these tabs to select the different modules of the printer user interface. |
|
11) Software Version Number and Image Upload Progress |
Displays the current installed version of the printer software. The image upload progress panel indicates the name of a print job that is currently uploading to the printer. This panel is not always visible and appears only when an image is loading to the printer. It is located below the software version number when it is active. |
1) Job and Printer Status Panel
The job status panel is in the top left corner of the display screen. It shows information about the current state of the printer or job activities.
Printer Status
Job name currently printing
Total copies, number of printed copies and copy progress
Overprint progress and number of overprints if more than zero
All incoming jobs go directly into the job list or job queue.
Selecting a job in the list highlights the job and updates the job information area.
The job information area contains offsets, print quality mode information, number of copies and overprints, and the name of the ONYX profile used and the image to be printed is also displayed.
Jobs can be moved up or down in the list and can either be printed, held or canceled.
2) Printer Messages (or Log) Panel
The printer status panel is in the top right corner of the display. It shows the last four lines of the printer log that contains printer errors, warnings, and information messages. To see more of the log, click on the panel to bring up a new window that allows you to scroll through the log.
3) Ink Status. Displays the current status of all ink bags.
Ink System Status. Click the icon to open an ink system status dialog that displays ink-related information. This includes, for each color of ink: an expiry date, ink type code, ink bag status, fill status (whether ink is being pumped into the reservoir), and whether the reservoir is full. The dialog also shows the current printhead temperature, the meniscus vacuum level, and the purge pressure.
4 Command Toolbar left
Displays icons for actions related to the print jobs and control of the printer table. Note that some of the icons have a checked and unchecked state with a different appearance of the icon image to reflect their state.

|
|
|
Print job |
This command can do the following actions depending on context:
|
|
Hold job |
The command can do following actions depending on context:
|
|
Cancel job |
The command can do following actions depending on context:
|
|
Delete job |
Deletes a job from the printer. However, you cannot delete a job that is currently printing. |
|
Flatbed icon |
Process flatbed jobs toggle command - Allows printer to process flatbed jobs. This must be selected to enable flatbed printing when the printer is booted or after re-setting the printer due to an error. |
|
Flatbed Settings |
A dialog window automatically appears when confirmation is required. If it is closed before you select Confirm, it can be reopened by clicking on this button. Media Parameters Enter or confirm the thickness of the media. The printer will automatically adjust the carriage height to media thickness and also the print gap. Media thickness confirmation is required only for the first copy of a print job, unless it is changed during printing. If the media thickness value is changed while printing, confirmation is requested before printing the next copy. Lamp Power Control Allows the operator to control the power output of each UV lamp independently. To extend lamp life, use the lowest setting that provides adequate curing for a particular media. Leading and Trailing Edge are relative to the direction of carriage travel. To enable or disable this setting, see User Interface Settings. When enabled, this feature automatically matches the power of the trailing UV lamp, when power of the leading UV lamp changes. It is still possible to adjust the power of the trailing UV lamp individually, when this setting is not enabled. |
|
Create Batch Edit Batch (appears when a batch job is loaded) |
In the Batch Mode Operation individual print jobs are sent from the RIP to the printer, and then combined on the printer to create a batch job for flatbed printing. There are two types of batch mode jobs: Composite and Collation. In a Composite batch all images are printed on a single piece of media without interruption. Composite batch mode can be used to efficiently print more than three data layers and/or mix print modes for a batch job. A Collation batch prints a set of individual print jobs on individual pieces of media, and then repeats the number of copies of the set, as required. The gantry moves to the park position between each print job, the media is changed, and media thickness confirmation and pushing the start button is required to continue printing the next copy. Refer to Batch Mode Printing for more details and examples. |
5) Command Toolbar right
Displays icons for ink temperature, lamp control, vacuum pumps, vacuum settings , move the gantry, start/pause print jobs, and print a nozzle check. Note that some of the icons have a checked and unchecked state with a different appearance of the icon image to reflect their state.

|
|
|
Ink Temperature Control |
This icon displays the current ink temperature. The ink heater must be on at all times. The printheads must be at operating temperature (47°C / 116°F) before a job will start printing. If this button is flashing, it indicates an error. Click on the Ink Status button to check the ink system. |
|
UV Curing Lamp Control |
This icon controls the UV curing lamps. The state of the button reflects the state of the lamps. The UV lamps will timeout after 15 minutes of inactivity (time can be changed by a service technician). If lamps are extinguished when the timeout expired, then the button changes its status to unchecked. If lamps are off before the print starts, then lamps are turned on automatically and the button would reflect the state accordingly. |
|
Table vacuum |
These icons control the table vacuum for Zones A & B. They duplicates the function of the table vacuum foot switches. The icon reflects the actual state of the table vacuums. There is an automatic timeout that will turn the table vacuum zones off. The actual time is set in the Settings module under Printer. Once turned off, vacuum cannot be turned on again for approximately 5 seconds. |
|
Move Gantry |
This moves the gantry from its parked position to a new location. Pressing the icon again moves the gantry back to its home position. The Custom gantry park position can be selected by the operator in the Settings tab. It determines the distance the gantry moves. |
|
Raise Gantry |
This raise the gantry to allow placement of media that is too thick to fit under the default height. Before a print begins the gantry is set back to its operating height. |
|
Start |
This icon can be used to start a flatbed print job (same function as the physical button on the table). Use of the Pause/Resume button may cause artifacts in a print because of the uneven curing of the ink if the job is paused. Do not use this unless it is essential that the print job is paused. |
|
Nozzle check |
This icon populates the active job list with a job that prints a nozzle check pattern. The nozzle check print is used to identify nozzle dropouts that can cause banding and other print quality problems. For information on how to use the nozzle check to troubleshoot nozzle dropouts, see the Checking Nozzle Performance. |
6) Active Print Job List
The active job list consists of a table, job count summary on top and job order control buttons on the left. A job count summary displays total number of active jobs and number of jobs put on hold. Job order control buttons can be used to change order of jobs queued for printing. The active job list has the following features:
All incoming jobs issued from the ONYX workflow go directly into the active job list.
After a job is printed it automatically moves from the active to the inactive job list.
The operator can drag and drop jobs to move them between the active and inactive job lists (except for a job that is being prepared to print).
All the jobs are stored locally on the printer hard drive.
Selecting a job highlights the job and updates the job information area.
Jobs can be moved up/down in the active list using the button on the left. Jobs can either be printed, held, canceled or deleted. Jobs canceled from the active list are moved to the inactive list.
Deleted jobs are removed from the hard drive and are no longer accessible (except for Special Prints, which cannot be deleted).
The current job being printed can be paused or canceled. A canceled job will move from the active to the inactive print job list.
A job count summary displays the total number of active and inactive jobs and the number of active jobs on hold.
How to Manage the Appearance and Content of the Print Job List
You can control the order that columns appear on the job list, the width of each column, and also the columns that appear on the display.
Control the order of columns by dragging the column header to a different position.
Change the width of a column by clicking on the vertical line that separates column headers and dragging to the left or right.
Chose the columns to display by right-clicking on a column header and then click on a column name to add or remove it. Columns with a check mark will appear on the display and those with no check will not be seen.
Columns can be set back to their original appearance by right-clicking any column head (name) and selecting Reset to default.
This column management can also be applied to the Inactive Print Job List (see 8) below and also to the Batch Mode job list (see Batch Mode Printing).
7) Job Placement Preview
The table placement preview shows the print location and a proportional representation of the image in relation to the table. The zoom button in the bottom right corner activates a popup preview window. If a preview image is not available, an approximately sized white box is used as a placeholder, and the zoom button is not displayed.
The preview image can be positioned by dragging it around the window (this will automatically update the offsets fields).
When an image is out of bounds in the actual table area, that area in the table preview is marked in red.
When an image is out of bounds in the bleed region, that area of the table preview is marked in yellow.
8) Inactive Print Job List
Inactive job list consists of a table and job count summary on top. A job count summary displays the total number of inactive jobs. The list can be sorted by clicking on the appropriate column header. The icons in the first column reflect the job type and status and can be use to sort the list. The size column is sorted by image area. Date column is sorted by a compound value of date and time. The inactive job list has the following features:
The operator can drag and drop jobs to move them between the active and inactive job lists.
Jobs deleted from the inactive list are deleted from the hard drive.
The operator can automatically set the status of a job to Hold when the job is put in this queue. This can be set separately for flatbed and roll media jobs.
9) Job information and parameters panel
The job information area displays only relevant job parameters of the current print job. Some of the parameters may be modified.
|
Offsets |
To change parameter values, click on the field and this brings up an onscreen keyboard so you can click on the numbers required. It can also be changed with the mouse wheel when the mouse cursor is positioned over the field. Rotate the mouse wheel up or down increments or decrements offset at the rate of one unit per notch. Hold the right mouse button and rotate the wheel increments or decrements at the rate of 10 units per notch. You can also use Preview to drag an image to the desired position. Position on media - No:
Position on media - Yes:
|
|
Print Parameters |
Displays information about the print job that is currently selected:
|
|
Job Parameters |
|
Print Modes Available
High Key mode is the fastest available print mode in the Arizona 6100 XTS Mark II series series. It is best suited for the production of images characterized by lower density and limited contrast.
Express mode provides fast printing but image quality depends on all nozzles jetting ink. It is best with images that do not have large areas of solid color or high saturation.
Production mode allows a wide variety of printing output. As with high-speed modes on any inkjet printer, there is insufficient nozzle redundancy to produce flawless images all the time on all media. As a result, it may be necessary to print some output in Quality Mode.
Production Plus mode has the same features as the Production mode but offers a better image quality in uniform and smooth colour areas.
Production-Matte mode offers identical nominal productivity as standard Quality mode, but may allow the printing of an image/media combination that would otherwise have been rejected due to gloss artifacts that can occur in areas or dark color and/or heavy ink coverage with Production or Quality modes. It also has the potential to produce more difficult work at higher average print speeds and has the advantage of being applied instantly (at the printer) when the operator deems it necessary without reprocessing the data. Most importantly, it offers a print mode for highly saturated images at the relatively high productivity of 72 square meters per hour. Production-Matte print mode is interchangeable with Production at the printer user interface. In other words, if a print job has been prepared in Production mode, it can be switched to Production-Matte mode at the printer user interface without re-processing in the workflow software.
Quality provides excellent image quality and is suitable for a wide range of image types and looks good with most media.
Quality Plus mode offers, in addition to the Quality mode, superb quality in uniform and smooth colour areas.
Quality-Density doubles the density for backlit media. For flatbed media that may warp or move slightly from the heat of the lamps, this mode provides better image registration than Overprint because it is done in one gantry pass.
Quality-Smooth mode is a slower version of Quality mode that features unusually high nozzle-redundancy. Although not an excuse for poor maintenance practices, this print mode allows most technically difficult images to be printed successfully, even if the printer is in less than optimal printing condition. It is a slower version of Quality mode that features unusually high nozzle-redundancy.
Quality Matte is very effective in reducing or eliminating the gloss (curing) artifact that appears in dark areas of heavy ink coverage when printing in Quality mode. This new mode yields almost 40% more productivity than Quality-Smooth mode, which was used previously to reduce gloss banding. Quality-Matte print mode is interchangeable with all other Quality print modes at the printer user interface. In other words, if a print job has been prepared in Quality mode, it can be switched to Quality-Matte, Quality-Smooth or Quality-Density mode at the printer user interface without re-processing in the ONYX® workflow software.
Quality-Layered (2 or 3 layers) allows you to place multiple layers in one print job. It is most useful when printing with White Ink (see How to Manage a White Ink Workflow). You must configure any extra layers in the ONYX software.
When Quality Density or Layered mode is used, there is a pull-down menu in the Print Job module that allows you to select either Quality-Layered or Quality-Density (the menu allows you to change how it was configured in your ONYX software).
When you use two layers, images will take twice as long ro print and with three layers it will take three times as long.
10) Printer Interface Module Tabs
These tabs allow you to switch between different functional modules of the printer. Click on a tab to display the screen associated with each of the modules available.
11) Software Version Number and Image Upload Progress
Displays the version of the currently installed printer software.
The image upload progress panel indicates the name of a job that is currently uploading to the printer. This panel only displays information while an image is transferred from the host computer.