
When the spiral cleaner is almost full, the control panel displays the orange maintenance icon. The POC action [Replace the spiral cleaner] becomes active. The table below describes the meaning of the maintenance icons.
|
Icon |
Description |
|---|---|

|
Maintenance is required soon. It is advised to replace the spiral cleaner as soon as possible. You can print about 45,000 more images before replacing the spiral cleaner becomes required. |

|
Maintenance is required now. The printer stops. You must replace the spiral cleaner to resume printing. |
You can replace the spiral cleaner:
Immediately or at a convenient time in the short-term, if you cannot wait for the printer to cool down (for example when your printer is in use 24/7), or
During a cold start of the printer, for example the next morning when the printer was off or in sleep mode during the night.
When the printer is shut down or put into sleep mode while the orange maintenance icon is displayed, you must replace the spiral cleaner at the next start-up. Then the red maintenance icon will be displayed.
The same indication may appear shortly after you replaced the spiral cleaner. Sometimes error 6324 is displayed shortly.
The cause may be one of the following:
The spiral cleaner is not connected correctly.
Do not replace the spiral cleaner during the POC action, but install the same spiral cleaner.
The spiral cleaner is broken.
Replace the spiral cleaner.
The temperature sensor for the spiral cleaner is dirty.
Clean the sensor.
Do not replace the spiral cleaner during the POC action, but install the same spiral cleaner.
On the control panel, touch [System] -> [Maintenance] -> [Go to maintenance tasks] -> [Replace the spiral cleaner] -> [Start].
[Enter the maintenance PIN.]
[Touch Next to unlock the door.]
Wait until the printer is turned off.
Put on the heat-resistant gloves in case the machine is warm.
Heat-resistant gloves
Socket wrench
New spiral cleaner
Only trained personnel is allowed to carry out POC actions.
 Required tools
You must wear the heat-resistant gloves when you replace the spiral cleaner.
|
Step |
Action |
Illustration |
|---|---|---|
|
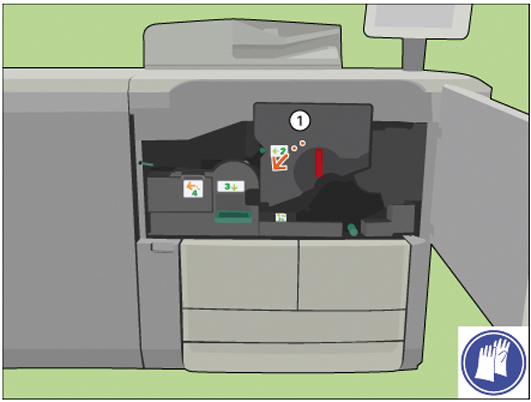
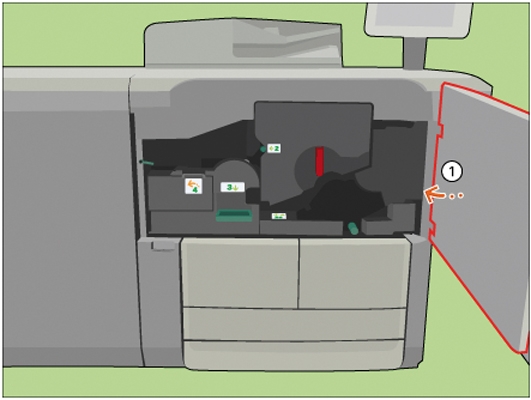
1 |
[Open the front door.] |

|
|
2 |
[Use the socket wrench to loosen the 2 fixation pens.] |


|
|
3 |
[Turn the red handle counter-clockwise.] |
|
|
4 |
[Slide out the TTF unit from its frame.] |


|
|
5 |
[Pinch both fixation springs.] |

|
|
6 |
[Slide the fixation caps from the cleaner ends.] |

|
|
7 |
[Remove the spiral cleaner from the TTF.] [Place the spiral cleaner on the packaging of the new cleaner.] [When the spiral cleaner has cooled down, discard the cleaner into a common dustbin.] Or return the cleaner to your service organization. |


|
|
8 |
[Place the new spiral cleaner in the TTF.] |


|
|
9 |
[Slide both fixation caps over the cleaner ends until the caps click in place.] |


|
|
10 |
Check if the spiral cleaner can rotate freely. |

|
|
11 |
[Align the TTF with the rail.] |

|
|
12 |
[Slide the TTF unit back.] |

|
|
13 |
[Turn the red handle clockwise.] |


|
|
14 |
[Use the socket wrench to tighten the 2 fixation pens.] |


|
|
15 |
[Close the front door.] |
|
|
16 |
Answer the question [Which spiral cleaner did you put back?] with [New] to confirm that you installed a new spiral cleaner. When you did not replace the spiral cleaner, touch [Existing]. |