White Ink can be printed in two ways:
Multiple Layers - Using a Quality-Layered print mode
Arizona Quality-Layered print mode is used to print white ink applications such as under-printing for non-white media, over-printing for backlit applications viewed 2nd surface or as middle layer for a day-night application.
Single Layer - Using any non Quality-Layered print mode that has been made with a CMYKSS ink configuration with spot colors defined.
Print modes other than Quality-Layered mode can also be used to print only white ink as long as the ONYX media profile (media model) has been made with a CMYKSS ink configuration with spot colors defined.
When you print white ink using a print mode other than Quality-Layered, we recommend that you don't print white ink in the same area of an image as CMYK inks. The white ink does not mix well with the other ink colors.
For Quality-Layered print mode jobs:
Create spot data in a design application. See Create Spot Data in Adobe Illustrator or Create Spot Data in Photoshop.
Not required if only printing white ink using a printer generated white flood or using the ONYX Spot Layer Tool to create spot data (step 3).
Open the job in ONYX workflow software using an ONYX media profile that has been made using the Quality-Layered print mode (See Configure ONYX Thrive for White Ink ).
Create underlay or overlay spot data using the ONYX Spot Layer Tool. See Create Spot Data with the Spot Layer Tool
Not required if only printing white ink using a printer generated white flood or using spot data created in a design application (step 1).
If the desired layer definitions have not been predefined in the ONYX media profile or Quickset, select "Hold for Operator" prior to submitting the job to be printed, so that the job will not automatically be sent to the printer.
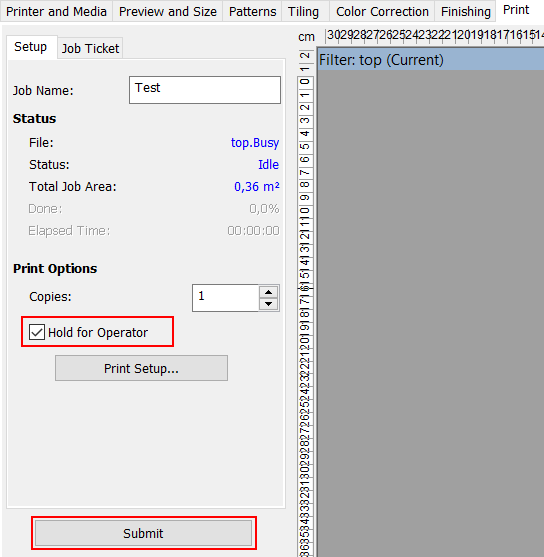 Hold for Operator
Define or verify the layer definitions prior to sending the job to the printer. See section Define the Layers for more information.
Not required if the layer definitions were correctly specified in the ONYX profile or Quick Set.
Submit the print job (i.e., process/rip the job).
Send the job to the printer and then print it.
For print jobs that do not use Quality-Layered mode:
When you print white ink with print modes other than Quality-Layered, it is not recommended to print white ink in the same area of an image as CMYK inks. The white ink does not mix well with the other ink colors.
Create spot data in a design application. See Create Spot Data in Adobe Illustrator or Create Spot Data in Photoshop.
Open the job in ONYX workflow software using any print mode other than Quality-Layered with an ONYX media profile that supports printing of white spot ink . (See Configure ONYX Thrive for White Ink)
Submit the print job (i.e., process/rip the job).
Send the job to the printer and then print it.
The Quality-Layered print mode can be used to print three, two, or one layer of image data or printer generated flood data. All layers are independent of each other.
Quality-Layered layers are defined in ONYX media - mode options, but may be optionally overridden within a Quick Set - Media Options, and optionally overridden on a per job basis by modifying the printer settings of a processed job in RIP Queue - right click the job and edit print settings. Editing the print settings for a job displays the following dialog:

Each layer can be defined with one of the following choices:
CMYK Data - CMYK image data
White Spot Data – Print Spot 1 data with white ink
White Flood Fill – Printer will generate flood data for the extent of the image data using the largest ink drop level
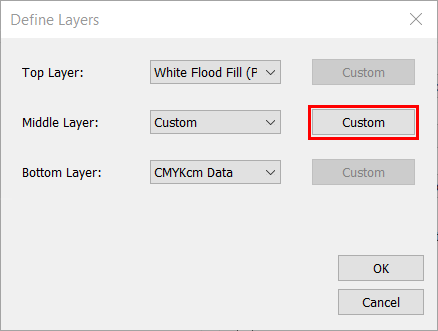
Custom - Custom ink color to data mapping and advanced options
Empty
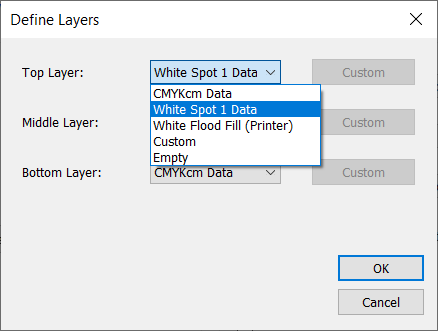
The layers are identified as bottom, middle and top. The bottom layer is printed first (if it is not empty) and the top layer is printed last (if it is not empty).
Custom Layer Definition
The "Custom" layer definition allows customer ink color to data mapping and advanced options for the selecting the printer flood level or mirroring the data.
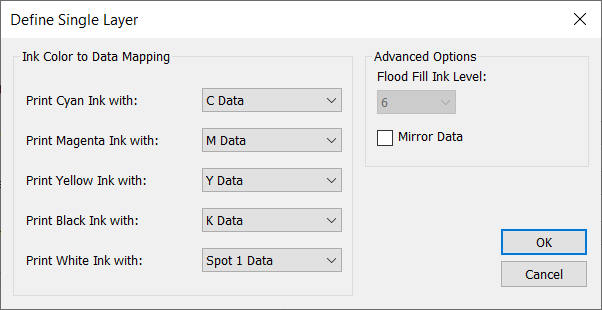
There are five color channels: C,M,Y,K and W, and six data planes: C,M,Y,K,Spot 1, and Spot 2 data.
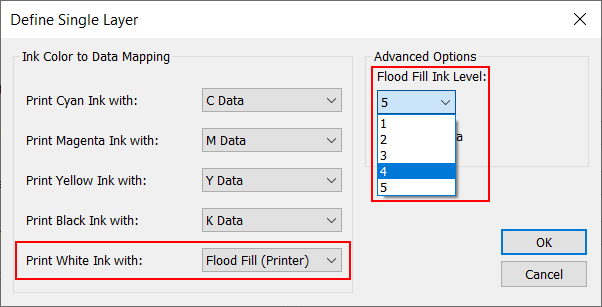
Each color channel can be configured to print: nothing, any one of the six data planes, or have the printer generate flood data with a chosen drop level.
Example 1: White ink to be printed Spot 2 data

Example 2: White ink to be printed with printer generated drop level 4 (24 pl) data