
The Arizona Xpert application has default recipes installed. Below the default recipes are explained.
When you use the recipes in Adobe Photoshop the design assets are defined as groups. The design assets in Adobe Illustrator are defined as Layers.
Adobe Photoshop exports the application as a multi page PDF and Adobe Illustrator as a multi layered PDF.

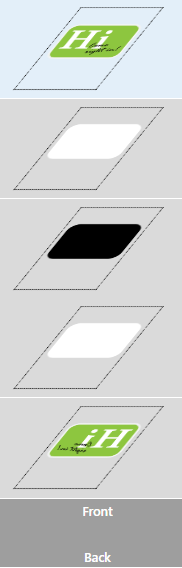
With the [Block out sticker] recipe you can create a window sticker with text readable on both sides.
The PDF contains the colour image in a single page. The PDF doesn’t have to contain white or black masks. When producing the application, the white and black masks are automatically generated by the Arizona Xpert Engine based on the recipe.
|
Design assets |
Info |
Print layers |
|
|---|---|---|---|
|
Image |
Group/Layer |
Colour image |
|
With the [Day/night switch] recipe you can create an application that displays different images during day and when the back light is switched on. A second image is used to selectively block the back light.
|
Design layers |
Info |
Print layers |
|
|---|---|---|---|
|
Day image |
Group/Layer |
Colour image |
|
|
Night mask |
Group/Layer |
Image to selectively block the back light |
|

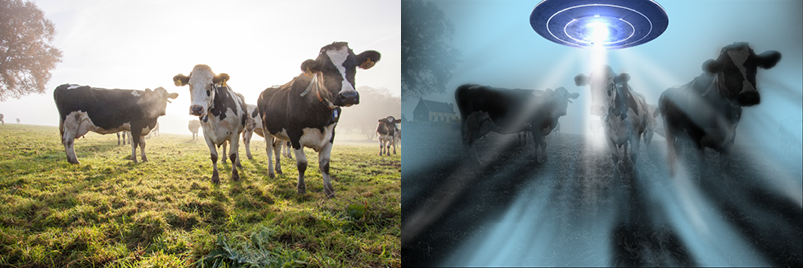
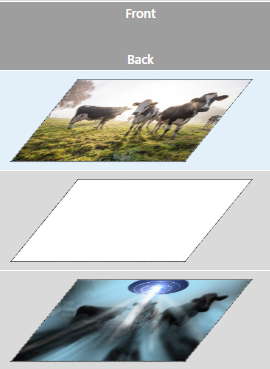
The [Illuminated panel] recipe uses light blocking selectively across the image to allow more light through in some areas. When illuminated from behind, applications created with this recipe show a stunning effect. It is printed as double sided - all the colour information is printed on the back while high gloss varnish is printed on the front.
|
Design layers |
Info |
Print layers |
|
|---|---|---|---|
|
Varnish |
Group/Layer |
A coloured area to apply varnish. |

|
|
Image |
Group/Layer |
Colour image |
|
|
Block out mask |
Group/Layer |
A coloured area to apply black ink to block out the light when illuminated from behind. |
|

The [Print on objects] recipe allows you to print on precut objects. The recipe is pre-configured to print on the back side of clear objects.
|
Design layers |
Info |
Print layers |
|
|---|---|---|---|
|
Image |
Group/Layer |
Colour image |

|
|
Through cut |
Layer (Adobe Illustrator) |
Registration information for positioning the objects correctly |
|

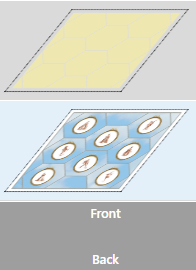
The [Prototype tiles] recipe prints your design directly onto the ultra-lightweight white Forex. The innovative use of Forex printing for prototyping allows the creation of beautiful tiles that are lightweight and easy to carry. Mounting multiple tiles on large boards provides an additional benefit compared to loose tiles.
First a gap is engraved between the tiles and the image is printed on top. As a result, you will not see a white gap between the tiles but you will get the impression of real tiles.
|
Design layers |
Info |
Print layers |
|
|---|---|---|---|
|
Varnish mask |
Group/Layer |
A coloured area to apply varnish. |
|
|
Image |
Group/Layer |
Colour image |
|
|
Through cut |
Layer (Adobe Illustrator) |
Information to cut through the application |
|
|
Engrave |
Layer (Adobe Illustrator) |
Information to engrave the application |
|
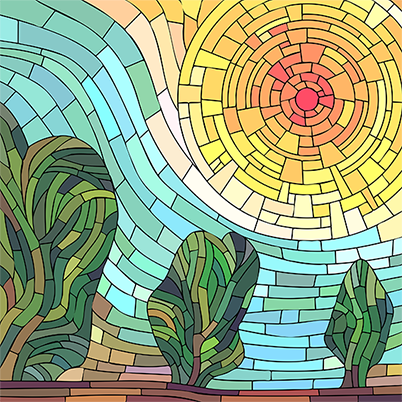
The [Stained glass] recipe creates an application that, illuminated from behind, gives a stained glass 3D effect.
|
Design layers |
Info |
Print layers |
|
|---|---|---|---|
|
Lead lines |
Group/Layer with 1 spot colour |
The image in spot colour ‘Spot 1’ to print the lead lines in black and white ink. |

|
|
Image |
Group/Layer |
Colour image |
|