
With the large table size and the single vacuum zone of the Arizona 61x0 XTHF Mark II, printing in an alternating 2-up arrangement using Print Origin A and Origin B for placement of the image is possible.
The lack of multiple vacuum zones in the system, does not restrict printing of the same image on media loaded in both Print zones. However, the limitations in a single zone vacuum system mean that:
Media for both zones must be loaded and unloaded at the same time
Both images will be printed in one pass of the gantry.
In order to minimize unproductive printer motion time, the gantry will fast-slew between the images in Print Zone B and Zone A printing continuously. The key advantage of printing a multi-copy job in 2-up Dual Origin Mode versus printing in a single zone is that it allows the operator to walk away from the printer for the amount of time it takes to print two boards versus one.
Dual Origin is used to print more than one copy of a specific print job on media not larger than 1.25 x 2.5 meters (4 x 8 feet). This allows greater productivity when printing multiple panels.
If the dimensions of your image are not greater than 1.25 x 2.5 meters (4 x 8 feet), the Dual Origin option is available from the Job parameters menu.
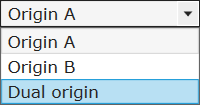
It is also possible to select Dual Origin in the ONYX workflow application. In Layout preview, the Preferred Origin field can be selected from a pull-down menu with the choices Origin A, Origin B, or Dual Origin Mode. If you don't select Dual Origin it can still be made active after the job is sent to the print job queue, as explained below.
When Dual Origin is selected, a scaled view of the image appears on the screen preview in Zone A and a bounding box that represents the image appears in Zone B. Both images are displayed at their respective origin points. If you move the primary image in Zone A to a new origin (enter new offsets), both images will then print from that changed relative origin point.
The printer will not print if the vacuum is not On.
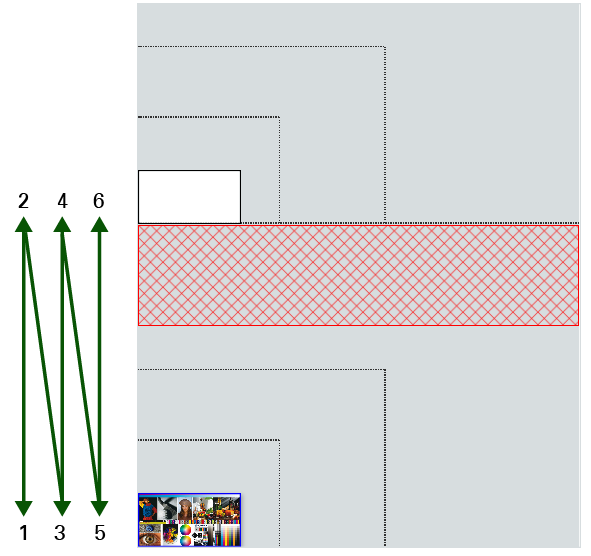
The green arrows show the order in which images are printed in Zones A & B when Dual Origin was selected.