
Your printer uses a High-flow vacuum system to secure media to the printer table. Three vacuum pumps are used to evacuate the air inside the table. In order for the system to work effectively during printing, all the holes on the vacuum table must be covered.
|
Label |
Hardware Description |
|---|---|
|
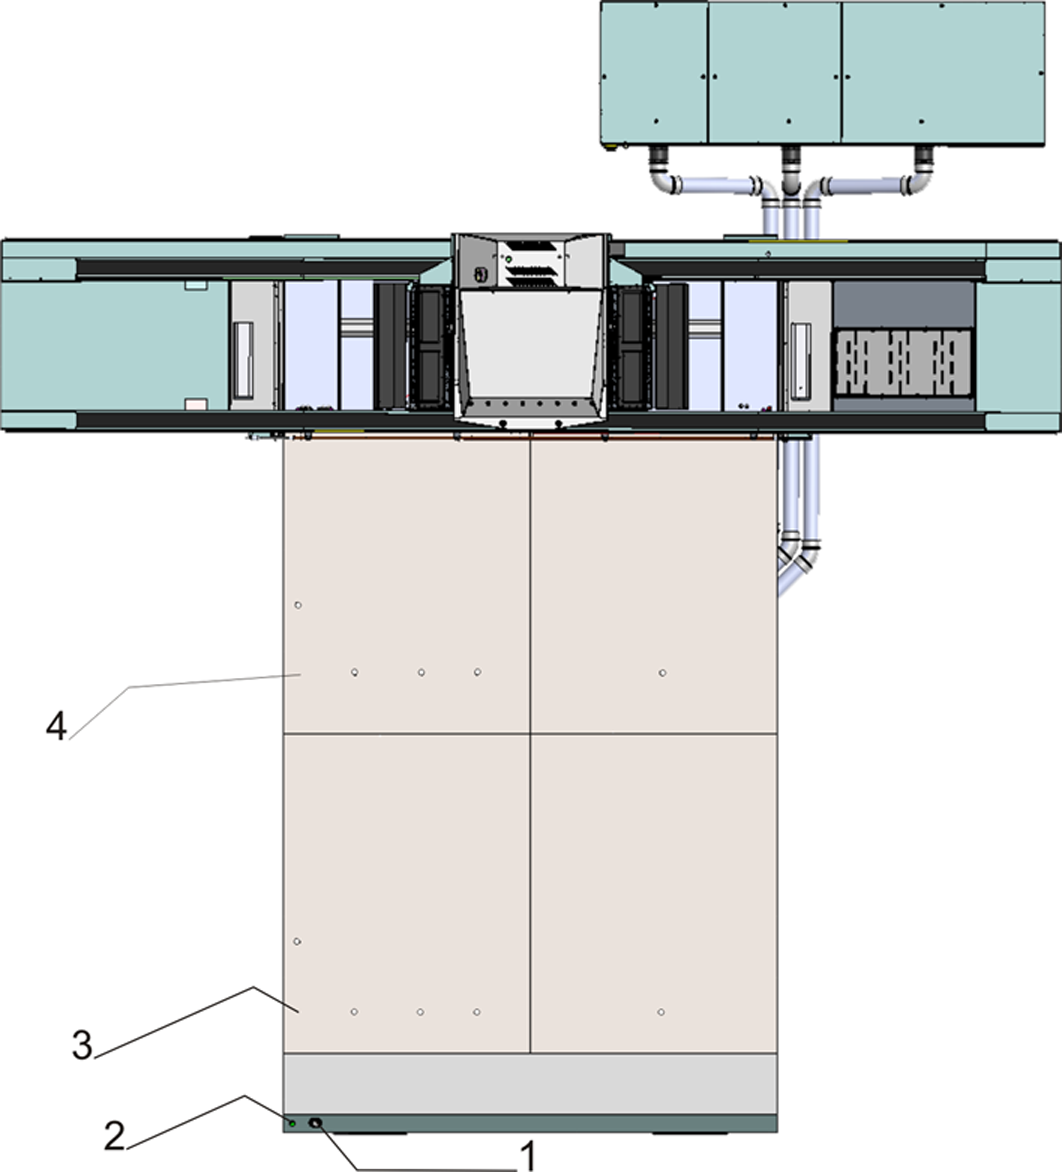
1 |
Vacuum Gauge |
|
2 |
Print Start Button |
|
3 |
Origin for Print Zone A |
|
4 |
Origin for Print Zone B |
The table can be used with two print zones, A and B. This allows 2-Up Dual Origin printing (see Chapter 6). Open vacuum holes must be masked for printing.
A vacuum gauge is located on the table. It provides a visual representation of the actual pressure in the vacuum table.
If the vacuum gauge reads below 40"H2O and vacuum vents are closed and all vacuum holes are covered with I/O paper or similar non-porous media, there may be a leak in the vacuum system. If this occurs place a service call.
Printing on porous media or reducing the vacuum vent settings may cause the gauge to show less the 40"H2O and this is acceptable in some circumstances.
There are two Print Zones, A and B. Each zone has it own origin and registration pins.
The vacuum foot pedal toggles the table vacuum on or off. It helps the operator to secure the media on the vacuum table since it allows hands-free operation. The vacuum must be turned on prior to starting a print, and the vacuum cannot be turned off until a print is completed
There are 2 foot pedal switches for the printer. Each foot pedal provides the following functionality:
If the pumps are “Off” the foot pedal powers them "On" and opens the vacuum valves.
If the pumps are On, the pedal alternates between opening and closing the vacuum valves. To turn the pumps Off click on the Pump icon in the printer UI.
Raises or lowers the media registration pins (if the switch depressed for 2 seconds) in its respective print zone.
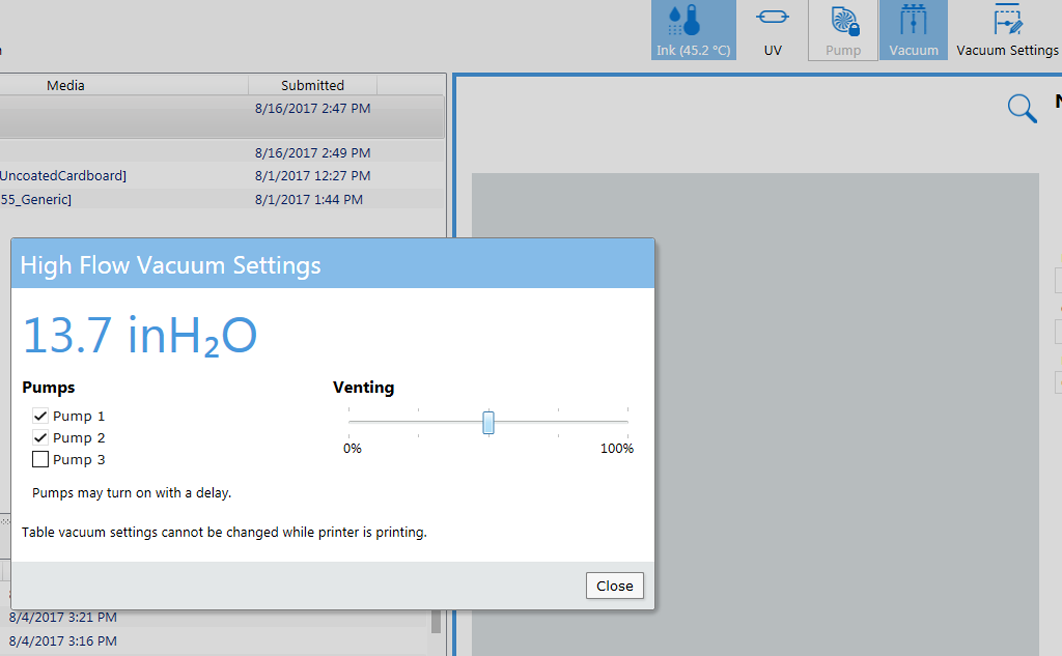
Three vacuum pumps are connected to the vacuum table. Click on the Vacuum Setting icon to open the vacuum Setting window. Here the number of active vacuum pumps can be set. The vacuum pumps will remain on throughout a print job or jobs. Three vacuum valves control flow from the vacuum pumps to the table. Opening and closing the vacuum valves to turn On and Off vacuum to the table is done by either using the foot pedal switches or clicking on the Vacuum icon on the UI. The Pump icon is used to turn On and Off the vacuum pumps that are active. It is not efficient for the vacuum pumps to be turned On and Off between prints because it takes time for each pump to reach full vacuum.
The pumps will NOT turn off automatically after a period of inactivity. Pumps must be powered off by the UI icon or the AC power switch on the pump box.
Vacuum vents are provided for printing on corrugated cardboard. The vents can be used to reduce the level of vacuum and air flow in the table. This control enables printing closer to the edges of corrugated cardboard. There are 4 levels of venting provided: 0%, 25%, 50%, 75%, 100%. Click on the Vacuum Setting icon to open the vacuum Setting window. Here the level of venting can be set.
When printing close to the edge of the media, open the vents as much as possible while still maintaining media hold-down. Refer to the vacuum gauge to reach the ideal reading of 10"H2O to 15"H2O, depending on the media and how close to the edge you print .
The number of active pumps, the level of venting, and media characteristics affect the level of vacuum required to secure the media to the table. It is up to the operator to determine the level of vacuum sufficient to draw down and secure media to the vacuum table without having a negative effect on print quality.
If your media does not cover all of the vacuum table you must mask all of the area around the media to create a closed vacuum system. Use scrap media or non-porous material that is less than the thickness of the media to mask the table. The masking material must be inserted under the edge of the media with an overlap of between 5 to 25 mm (.2 to .5 inches)
If there is no overlap or a gap between the media and the masking material, ink may be deposited on the table around the media edge.
If ink build-up occurs on the table, remove the ink. If it is not removed, the print gap can be affected and this may affect the vacuum table's ability to secure the media properly. To remove ink we recommend that you use a paint scraper containing a straight edge razor blade.
Do not step or put pressure on the ends of the printer vacuum table where the no-step label is placed.

If pressure is put on the edges of the vacuum overlay they can bend or warp and thus affect the flatness of the printer table and therefore print quality. The same applies to the whole table, but a lesser amount of pressure such as leaning across the table to reach a center area, is acceptable.