
Media can be registered on the table using the built-in registration pins and the table rulers. The registration pins can be linked to the vacuum switch or activated manually by the operator to allow quick registration of the media to the printer origin. The rulers are printed on the table and provide a horizontal and vertical rule that originate from the 0,0 print origin point on the table. The rulers can also help to provide offset distances if you need to start a print away from the origin point. Registration pin operation can be set at the user interface to work in either Independent or Linked mode.
In Independent (manual) mode the vacuum foot pedal switch for the corresponding zone can be used to raise or lower the pins in that zone. This is done by keeping the switch depressed for approximately 2 seconds. When the media is placed, press the switch for 2 seconds again to retract the pins.
If the registration pins are left in the UP position, they will retract automatically when the gantry and carriage are within a set distance from any of the pins.
For large format single sheet printing on the whole printer, depressing the Zone A vacuum foot pedal switch for approximately 5 seconds will raise and lower the required pins in Zone A and B to support large format printing.
In Linked (automated) mode the registration pins will be in the Up position waiting for the operator to load media. Once the operator has registered media and initiated the table vacuum switch for the selected zone, the pins used to register the media for that zone will retract. After the print job is completed and the gantry has moved clear from the last print zone, the relevant pins will return to their Up position and the table vacuum will be turned off. To eliminate the possibility of a crash between the pins and the gantry or carriage, the printer verifies the Down state position of each pin when possible interference conditions may exist. Either the pins will retract or the carriage/gantry movement will stop.
When the printer is powered on, but not ready to print, all registration pins will be in the Down position.
Do not slide heavy media into the pins with excessive force.
Media with abrasive edges can damage the pins - handle carefully.
Ink contamination can cause pins errors (see Pin Maintenance section below for cleaning tips).
You can set the behavior of the registration pins in the Settings/Printer tab.
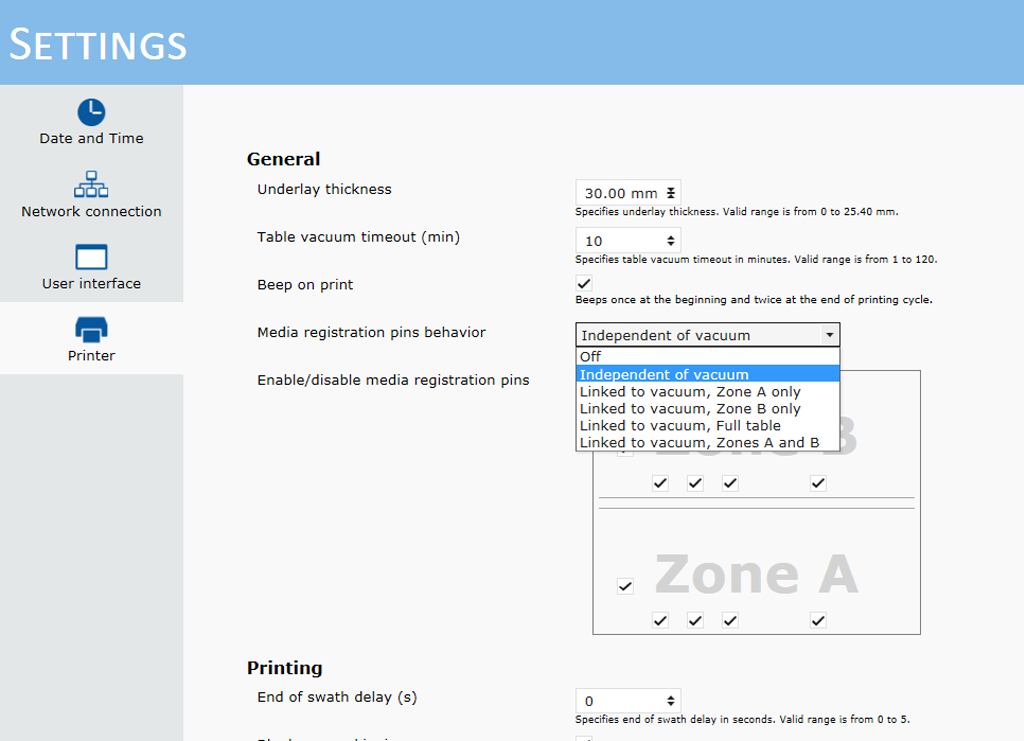
The media registration pins behaviors include:
Off
Independent of vacuum (manual)
Linked to vacuum, Zone A only (both groups - vertical and horizontal);
Linked to vacuum, Zone B only (both groups - vertical and horizontal);
Linked to vacuum, Full table mode (both groups in Zone A + vertical in Zone B);
Linked to vacuum, Zone A and B - 2 up mode (both groups in either Zone A or Zone B).
Each registration pin can be configured as active or not available. By default all pins are active as shown by the check mark associated with each pin. Click on a registration pin check box to disable that pin. The check mark will disappear. Click the box again to enable the pin and the check mark will appear to confirm that pin is active again.
Loading media on to the vacuum table is a manual process. A configurable automated pin registration system is provided to facilitate the loading process. Pin positions support both 2-up and large format single sheet printing. In addition, the following prints are provided to help with positioning of the media. They can be printed directly on to the table to show the following:
2.5m Ruler Print-1mm Resolution-Primary Origin (Horizontal Axis)
2.5m Ruler Print-1 mm Resolution-Secondary Origin (Horizontal Axis)
3.2m Ruler Print-1mm Resolution (Vertical Axis)
98inch Ruler Print-0.125inch Resolution-Primary Origin (Horizontal Axis)
98inch Ruler Print-0.125inch Resolution-Secondary Origin (Horizontal Axis)
126inch Ruler Print-0.125inch Resolution (Vertical Axis)
Three Levels of Safety:
Before any gantry motion begins, the printer software retracts all registration pins.
Each of 4 pin groups has a “safety zone”. When the moving gentry enters any of these zones, all pins from the appropriate group retract to provide safe gantry passage.
If pin behavior is set to manual – the user is allowed to activate pins using the table vacuum pedals. However, if the gantry is within safety zone of any of the pin groups, that group will ignore request to extend. The same is true if pins are in one of automatic operational modes.
Error handling
In case any of the pins is stuck in either UP or DOWN position, gantry motion is stopped, printing cancelled and the "registration pin error" window will pop-up. Safety zones ensure detection of a pin that failed to retract and the gantry stops before it hits that pin.
The pop-up error window informs the user that the software detected undesired pin position, and it will show possible reasons for the error (air pressure, sensors) and ask user to visually check if all pins are in retracted (DOWN) position. There are two buttons in this error window - one allows the user to re-initialize pins and another button allows the user to completely disable the pins. Pins are automatically re-enabled on the next printer power-up, so they go through usual initialization process.
If initialization fails, the same process of error handling repeats. In this case you must request a service call.
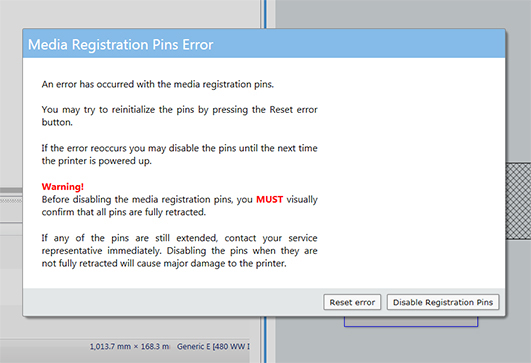 Registration Pin Error Window
During a print job with a bleed, ink will deposit on the top surface of the pins and pin housings. The accumulation of ink on these surfaces should not grow beyond the top surface of the overlay. When this occurs remove the accumulated ink by using a razor blade or scraper on the top surface of the overlay only (with pins in the down position). It is also possible to clean the top surface of each pin with the same tools in their UP position.
• Do not use any cleaning solutions to clean pins
• Do not lift overlays to clean pins
• Do not dig out ink from below the top surface of the overlay as this may damage the surface of the pin.