
The Arizona 6100 Series printers use a vacuum system to secure rigid media for printing on the table. Two independent vacuum pumps provide vacuum to the table, which is divided into multiple vacuum zones. Pump 1 provides vacuum to Zone A and Zone C. The operator can control vacuum flow to Zone C with the center manual On/Off valve. Pump 2 provides vacuum to the Zone B. All printers are shipped with metric vacuum zones. It is possible to change the configuration from metric to imperial in the field by a qualified service technician (the technician who installs your printer can do this, if needed).
The independent control of the zones allows the operator to print in a 2-up configuration with minimal down time. For example the operator may remove a printed panel and register a new panel in zone A while printing continues in zone B. This is referred to as Dual Origin mode (Dual Origin printing is explained in the next section).
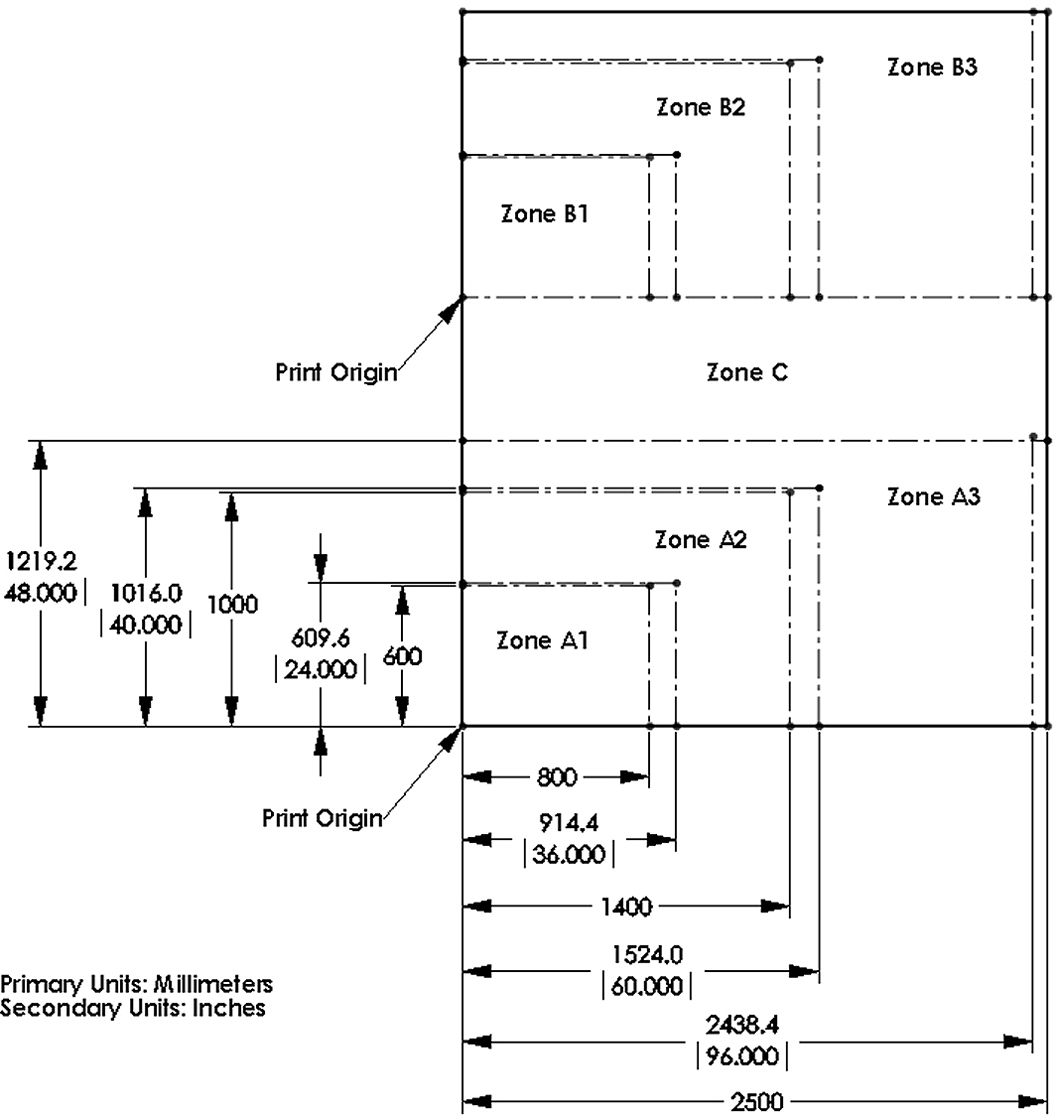 Vacuum Zone Configurations
There are three A zones and three B zones as indicated in the illustration. These zones are controlled by the vacuum handles. Zones B1 and A1 are always on when the vacuum is activated. Zones A2, A3 and B2, B3 are controlled by the position of the two left and two right vacuum handles. Zone C is controlled by the middle vacuum handle. It determines if the zone is On or Off when the vacuum is active.
The vacuum system holds the media in place on the printer table. The zones are arranged to accommodate common media dimensions. If a zone is activated, you must mask any part of it that is not covered by the media.
An active zone that is properly sealed will read 20" Hg or higher on the vacuum gauge. If the vacuum gauge for an active zone reads below 10"Hg (34 kPa) and you have ensured that the area is properly masked and taped off, you may have a leak in the vacuum system. However, keep in mind that lower vacuum levels will be seen when the media is porous. Place a service call only after you determine that the zone is correctly masked and the gauge reads consistently low.
To place media at the print Origin B (Origin A is the default) you need to set that up either in the ONYX software or after the job is sent in the Print Job screen (this is explained in the next section "How to Print with Dual Origin").
The media can occupy more than one zone, but if a zone will be active, all of the area not covered by the media must be masked so that all vacuum holes are covered.
If the Center Zone is not occupied by media it can be turned Off with the manual valve located at the Zone 1 end of the printer.