
The Arizona 2200 XT uses vacuum to secure media to the printer table. Two independent vacuum pumps provide vacuum to the table, which is divided into multiple vacuum zones. Pump 1 provides vacuum to the A Zones and the C Zone. The operator can control vacuum flow to the C Zone with the manual On/Off valve. Pump 2 provides vacuum to the B Zones. All XT printers are shipped with metric vacuum zones. It is possible to change the configuration from metric to imperial in the field by a qualified service technician (the technician who installs your printer can do this, if needed).
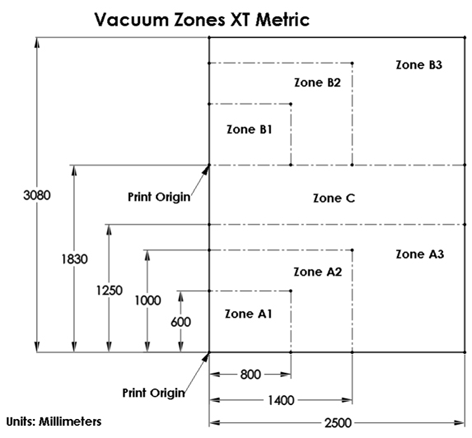

There are three A zones and three B zones as indicated in the illustrations. These zones are controlled by five vacuum handles. Zones B1 and A1 are always on when the vacuum is activated. Zones A2, A3 and B2, B3 are controlled by the position of the two left and two right vacuum handles. The C zone is controlled by the middle vacuum handle.
The independent control of the zones allows the operator to print in a Dual Origin mode with minimal down time.
Use the vacuum gauge to determine if a zone is properly masked. When the active zone is properly masked the gauge will read at 20"Hg (68 kPa) or higher. Small leaks can reduce this number and therefore the efficiency of the vacuum. Porous media can also degrade the vacuum effect.
If the vacuum gauge for an active zone reads below 10"Hg (34 kPa) and you have ensured that the area is properly masked and taped off, you may have a leak in the vacuum system. Place a service call only if you determine that the zone is correctly masked and the gauge reads consistently low.
To place media at the print Origin B (Origin A is the default) you need to set that up either in the ONYX software or after the job is sent in the Print Job screen (this is explained in the next section "How to Print with Dual Origin").