
The Tools and Utilities Module has six sub-modules: Shutdown, Job Manager, Special Prints, Ink Flush, Spit Catcher Alignment, and the System Logs. When you click on the Tools and Utilities tab, Special Prints always appears first. Click on the other icons to access the sub-modules.
Shutdown provides a clean way to properly power down the printer.
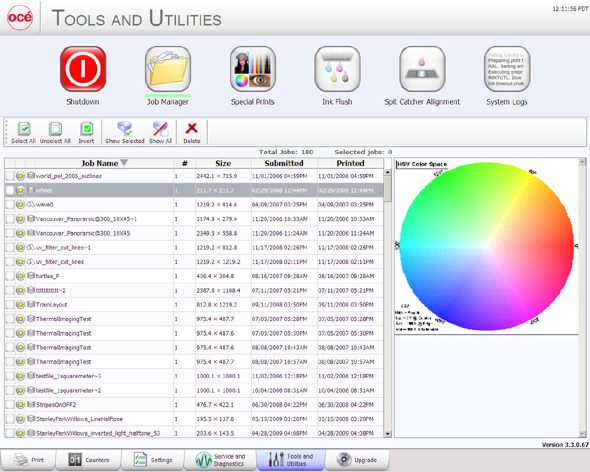
Job Manager allows you to manage the view of print jobs.
Special Prints provides special prints for various purposes, such as reference, adjustment and alignment etc. Some are for operator use and others are for service technician use only.
Ink Flush clears the selected color ink line. This is used when you change to a different kind of Océ-approved ink and need to flush out all of the existing ink.
Spit Catcher Alignment allows you to adjust the carriage position over the spit catcher after you install it.
System Logs allows the operator to generate log files for service diagnostics and troubleshooting purposes.
 Job Manager
Use the Shutdown icon when you need to turn the printer power off. The printer should be left powered On at all times but there are some exceptions such as some service procedures, or if the printer requires a reboot.
The Job Manager allows you to view a select range of print jobs or to delete many print jobs at the same time. In the Print Job module, you can only manipulate one print job at a time. In the Job Manager you can select multiple print jobs using the checkbox to the left of each job. Once you have your range selected you can then delete them. Click on the column heading to sort the display of print jobs by that criteria.
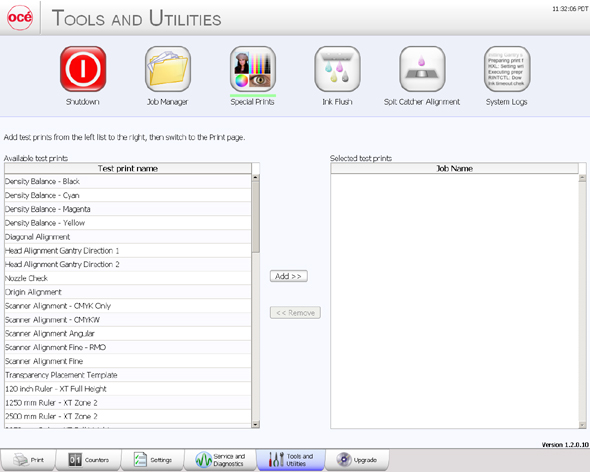
The Special Prints module displays two lists. The list on the left shows the available special prints. Some of these prints are used by service technicians to adjust and troubleshoot the printer. Some are of interest to the Operator: the Ship print, the table ruler prints, the Nozzle Check print, and the Media Advance Correction Factor print.
Special Prints of Interest to the Operator
the Reference print is used to determine that the printer output meets quality standards. A ship print that is printed at the factory is shipped with each printer. It can be used as a comparison with one printed at the customer site.
The Table Rulers are meant to be printed on the table to assist you to place media. These images are set up to print on the horizontal and vertical axes of the table. They are available in metric or imperial measure.
The Nozzle Check is used to determine if there are any clogged nozzles that can affect print quality (note that it is also available on the command toolbar in the Print Job Control module).
the Media Advance Correction Factor print (used for roll media only). This print is used to correct a certain type of banding related to incorrect media advance - see How to Determine Media Advance Correction.
The list on the right shows all active jobs that are currently in the print queue. Add a special print from the left into the right list to make it active in the Print Job Control module. If you remove a job from this list, it is also removed from the Active job list and is not available to print. Special print instances that are removed from the Active list do not go to the Inactive list; they are simply removed.
 Special Prints
 |
1) Click a special print to select it in the left window.
2) Click the Add button to place it in the print queue on the right.
That special print is now available in the Active job list of the Print Job Control module.
Go to the Print Job Control module to actually print the special print. It will appear in the active job list and is printed like any other print job.
Refer to the sections that document the special prints for details on printing. For example, the Nozzle check and the Ship print are printed on I/O paper, while the Ruler Guide Print is printed directly on the table. Note that some of the special prints are meant for service technicians only and are not for use by the printer operator.
The Ink Flush Procedure is used when the printer is switched from one type of ink to another that is not compatible with the first ink. It requires a special ink flush kit and will not work without it. If you attach a new bag of ink that is not compatible, or for any other reason an ink flush is required, you will see the Ink Status screen with a message that directs you to the Ink Flush Procedure.
Contact your local service representative for information about the ink flush kit that is required for the flush procedure. Only inks certified by Océ can be used with your printer.
A Spit Catcher is necessary for all printers with the white ink option installed or for any printer that uses the Océ ICJ256 inks. The Spit Catcher consists of a slotted cover for the Maintenance Station drawer and a foam pad that is held in place under the drawer. Both the white ink and all of the IJC256 inks need to "spit" periodically to help keep the printhead nozzles clear of debris. The Alignment Procedure is needed when the Spit Catcher is first installed or if for some reason the park position of the carriage changes. The purpose of the alignment is to have the carriage parked directly over the slots in the spit catcher so that the ink that is spit falls though the slots and is soaked up by the foam pad below. If you see a buildup of ink on the surface of the spit catcher it may mean you need to follow the alignment procedure.
The foam pad must be changed if it becomes too saturated with ink. It is a commercial item so see your local representative for replacements.
The System Logs are raw data log files for service diagnostics and troubleshooting purposes. They are meant for service technicians only. Generate system logs only when requested by an Océ service technician and follow the instructions they provide for retrieval of the files.
When System Logs are generated, any previously saved log files are deleted. Therefore, do not generate a second batch if you have just recently generated log files (unless requested to do so by a service technician).