
The [Layers] tab displays a graphical representation of the layers of your application.
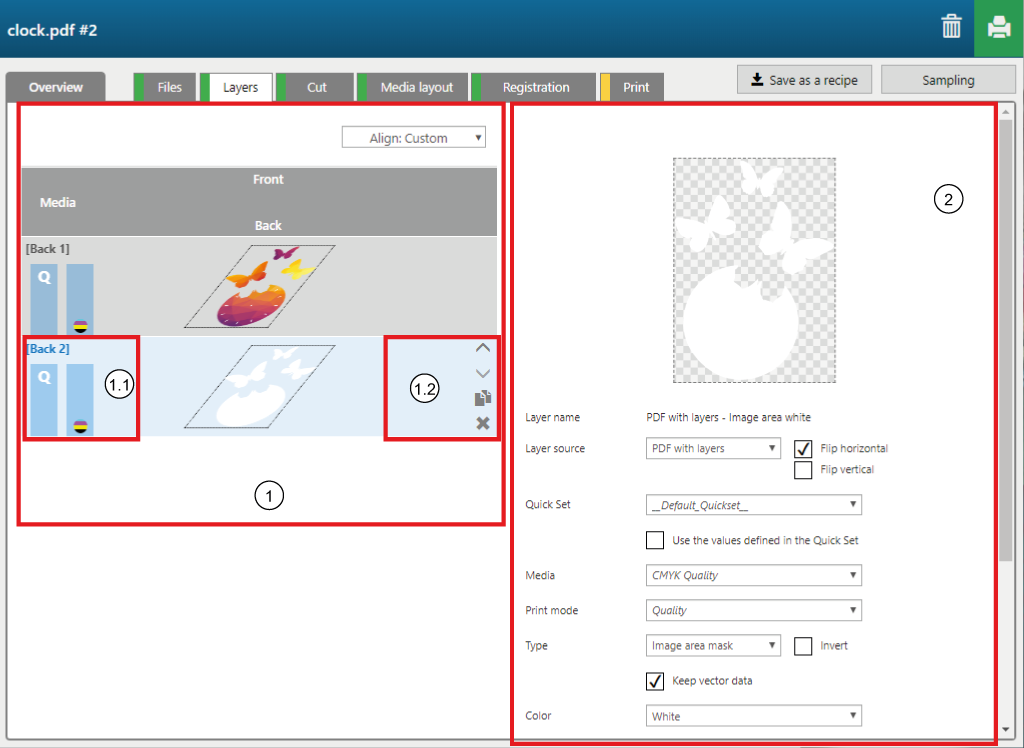
To select a specific layer click on the layer.
1.1 Print mode information
The icons represent the print mode that is defined for the layer.
1.2 Layer actions
The icons allow you to easily duplicate or delete layers, or change the position of the layer. Also, you can drag-and-drop the layers to a different position.
Per layer, you can define the following advanced layer settings.
|
Settings category |
Setting |
Description |
|---|---|---|
|
[Layer name] |
The name of the layer that is defined in the recipe. |
|
|
[Layer source] |
PDF page or a layer within a design on a specific page |
Select the layer in your design that should be used as input for the layer in the recipe. Tick the option [Flip horizontal] or [Flip vertical] if you want the information in your layer to be flipped horizontally or vertically. |
|
[Quick Set] |
Quick Set |
When you don't use a Quick Set the media and print mode defined for the layer will overwrite the settings defined in the quick set. You can select a Quick Set for a layer when you want to configure multiple settings that are available in ONYX Thrive, but that are not accessible via the Arizona Xpert Engine user interface.
Both the [Media] setting and the [Print mode] setting will be greyed out. The [Media] and the [Print mode] displayed in the greyed out input fields, are not the values defined in the selected Quick Set. |
|
[Media] |
Media library available for your Arizona printer in the Media Manager |
Select the media type for your artwork. |
|
[Print mode] |
Print modes defined in the selected media library |
Select the print mode that you want to use to print the layer. |
|
[Type] |
[Color] |
The entire PDF page or layer content is used as is (including spot colors) to produce the print layer. |
|
[Image area mask] |
An image area mask is generated based on the PDF page or layer content. |
|
|
[Bounding box mask] |
A mask is generated as big as the PDF page that is used as source for this layer. |
|
|
[Keep vector data] |
When the checkbox is not ticked, the complete layer will be rasterized. Areas in the [Media color], which is by default white, will become transparent. Tick the checkbox to preserve the vector data. The vector objects will stay opaque. |
|
|
[Color] |
[White] |
Select the color of the mask. This option is only available when you select [Type] - [Image area mask] or [Type] - [Bounding box mask]. |
|
[Block-out (black)] |
||
|
[Varnish] |
||
|
[Opacity] |
0 to 100% |
Select the opacity of the color of the information in the layer. This option is only available when you select [Type] - [Image area mask] or [Type] - [Bounding box mask]. |
|
[Media color] |
Color |
Select the color of the media. When you use raster images, the software can isolate the media color to identify the image area. This option is only available when you select [Type] - [Image area mask]. |
|
[Threshold] |
Positive numeric value |
The value is used to define how precisely the color of a pixel must match the media color in order to isolate it from the image area. When you create a white mask, you typically use larger values if you want to make sure there are no white pixels on the edges if the image has a lossy compression. This option is only available when you select [Type] - [Image area mask]. |
|
[Fill choke/spread] |
Negative or positive numeric value (pixels) |
Enter a positive value if you want the image area mask to be printed slightly smaller (choke) than the color image. Enter a negative value if you want the image area mask to be printed slightly larger (spread) than the color image. This option is only available when you select [Type] - [Image area mask]. |
|
[Overprints] |
0-10 |
Select the number of overprint for the layer. |
|
[Horizontal offset] |
Negative or positive numeric value (mm) |
Offsets allow you to do the following:
|
|
[Vertical offset] |
Negative or positive numeric value (mm) |