
When you make a scan, you can define the following.
How the original looks.
How the resulting file must look.
Generic settings for the whole job.
To improve the productivity, the system defines a number of logical settings for the [Original] and the [Output] automatically. However, you can overrule these automated settings manually. The automated settings have the prefix [Auto].
 The scan job settings
|
Section |
Description |
|
|---|---|---|
|
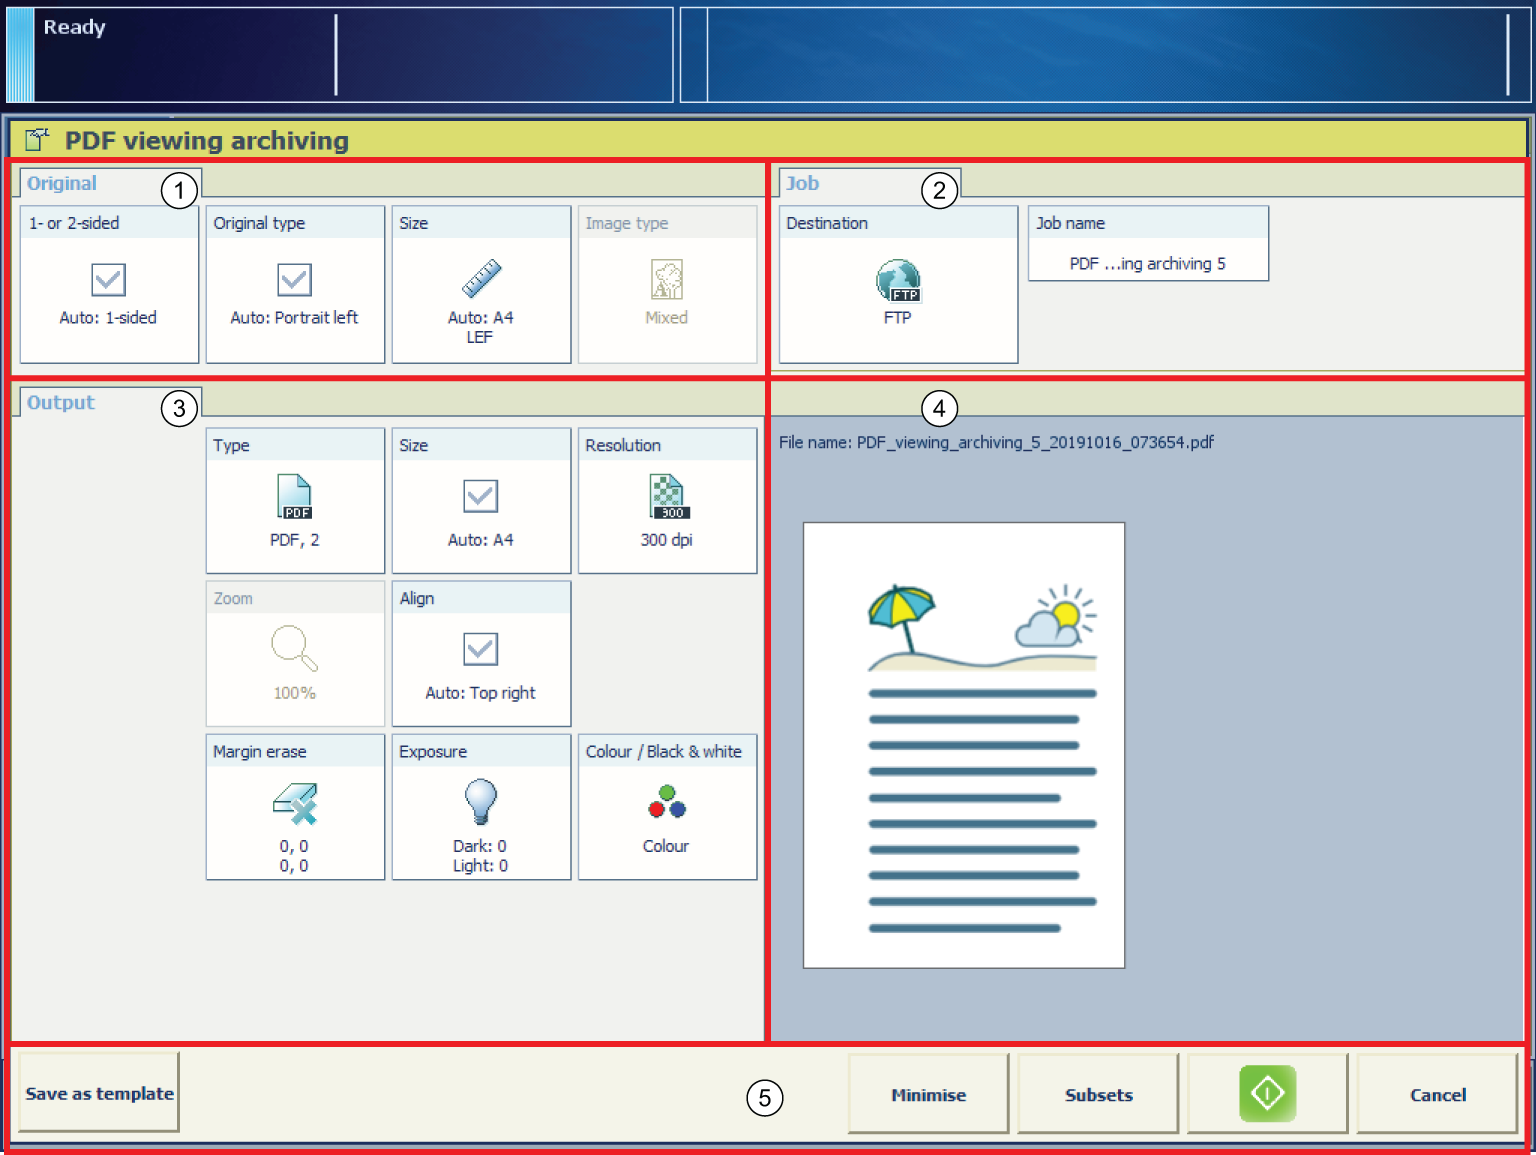
1 |
[Original] |
The [Original] section contains the settings to define how the original looks. |
|
2 |
[Output] |
The [Output] section contains the settings to define how the resulting file must look. |
|
3 |
[Job] |
The [Job] section enables you to define generic properties for the whole job. |
|
4 |
Preview |
The preview section shows the result of the settings defined for the output. |
|
5 |
Action buttons |
The buttons in this section enable you to select an action, for example save the settings in a template, cancel the job or start scanning. With the optional [Page programming] function you can insert pages and define the media and finishing settings of the page ranges in a job. The optional [Page programming] function is available when you scan subsets into one file. |
|
Setting |
Values |
Description |
|
|---|---|---|---|
|
[1- or 2-sided] |

|
The automatically set value for this setting. |
|

[1-sided] |
Only the front side contains an image or text. |
||

[2-sided] |
Both the front side and the back side contain an image or text. |
||
|
Setting |
Values |
Description |
|
|---|---|---|---|
|
[Type] |
|
The automatically set value for this setting. |
|
|
[Portrait left] |
|
||
|
[Portrait top] |
|
||
|
[Landscape left] |
|
||
|
[Landscape top] |
|
||
|
[Book] |
Make copies/scans from a book original on the glass platen. You can copy/scan the individual pages of a book. [Pages]
|
||
|
[Paper weight] |
[Light] |
For optimal sheet separation, the ADF of the scanner needs to be configured for different media weights:
|
|
|
[Medium] |
|||
|
[Heavy] |
|||
|
Setting |
Values |
Description |
|
|---|---|---|---|
|
[Size] |

A4, A3, Letter, Ledger, etc. |
Original in the ADF or on the glass plate:
|
|

[Portrait] 
[Landscape] |
|
||
|
Setting |
Values |
Description |
|
|---|---|---|---|
|
[Image type] |

[Mixed] |
The original contains a combination of text and images. |
|

[Photo] |
The original contains mainly or only images. |
||

[Text] |
The original contains mainly or only text. |
||
The default settings result in small files with an acceptable quality loss. When higher quality is needed, set the quality factor higher.
|
Setting |
Values |
Description |
|
|---|---|---|---|
|
[Type] |
[Format] |
Select the required format. |
|

[Compression] |
Define the compression factor to reduce the file size. A higher compression factor results in a scan with lower quality. |
||
|
[Quality] |
When a higher quality is needed, you must set the [Quality] higher. |
||
|
[PDF/A] |
Select [On] to use the PDF/A-1b option in colour mode. This is the standard ISO format for archiving purpose. |
||
|
Setting |
Values |
Description |
|
|---|---|---|---|
|
[Resolution] |
[300 dpi] |
Select [300 dpi] when you want to view or archive the generated file, for example. |
|

[600 dpi] |
Select [600 dpi] when you want to print or edit the generated file, for example. |
||
|
Setting |
Values |
Description |
|
|---|---|---|---|
|
[Size] |
All media sizes that the media catalogue supports |
Select the media size of the resulting file. |
|
|
Setting |
Values |
Description |
|
|---|---|---|---|
|
[Zoom] |
[Fit to page] |
You can select a media size for the file that differs from the media size of the original. When the [Fit to page] setting is enabled, the system scales the original in such a way that the image fits on the selected media size of the file. |
|
|
[Percent] |
Use this setting to change the zoom manually within the range 25% to 400%. |
||
|
Setting |
Values |
Description |
|
|---|---|---|---|
|
[Align] |

[Top left] |
The [Align] setting allows you to indicate the position of the image on the sheet. [Top left] moves the image to the upper left corner of the sheet. |
|

[Top centre] |
[Top centre] moves the image to the centre at the top of the sheet. |
||

[Top right] |
[Top right] moves the image to the upper right corner of the sheet. |
||

[Centre left] |
[Centre left] moves the image to centre of the left side of the sheet. |
||

[Centre] |
[Centre] moves the image to the centre of the sheet. |
||

[Centre right] |
[Centre right] moves the image to the centre of the right side of the sheet. |
||

[Bottom left] |
[Bottom left] moves the image to the lower left corner of the sheet. |
||

[Bottom centre] |
[Bottom centre] moves the image to the centre of the bottom side of the sheet. |
||

[Bottom right] |
[Bottom right] moves the image to the lower right corner of the sheet. |
||
|
Setting |
Values |
Description |
|
|---|---|---|---|
|
[Margin erase] |
[Binding edge] |
Margins of a document sometimes contain notes or punch holes, for example. The machine allows you to hide these elements on the copy. With the + and - buttons of the [Binding edge] setting you can define how much margin of the original you want to erase. You can enter a value up to 100 mm / 3.94". |
|
|
Setting |
Values |
Description |
|
|---|---|---|---|
|
[Exposure] |
[Dark] |
You can adjust the settings for light areas and dark areas on the print separately.
|
|
|
[Light] |
|
||
|
Setting |
Values |
Description |
|
|---|---|---|---|
|
[Colour / black & white] |

[Black and white] |
Select this setting to make black & white scans. |
|

[Greyscale] |
Select this setting to make greyscale scans. When you select this option, the [Image type] and [Zoom] function get disabled. The file type automatically changes into the preferred settings. |
||

[Colour] |
Select this setting to make colour scans. To make colour scans, the colour scanning option must be licensed. |
||
|
Setting |
Values |
Description |
|
|---|---|---|---|
|
[Destination] |
For scan to USB, you can enter the destination of the scan job on the USB drive. You can select either the root of the USB drive, or a new folder called ScansX, whereby X is an incrementing number. The first time you use this option, the folder will be called Scans1. For the other destinations you select the destination in the [Destination] field, for example scan to email or FTP. |
||
|
Setting |
Values |
Description |
|
|---|---|---|---|
|
[Job name] |
For scan to USB, you can enter a job name. |
||
This setting applies only to scan-to-email jobs. This setting is only applicable when you do not have an address book configured for scan-to-email.
|
Setting |
Values |
Description |
|
|---|---|---|---|
|
[Enter the user code.] |
This setting applies only to scan-to-email jobs. To use the scan-to-email function, an LDAP server must be configured. The LDAP server contains a mapping of unique user codes and email addresses. When you enter your user code, for example your employee number or telephone number, the LDAP server checks if you are a registered user. When you are a registered user, the system sends the scan job as an attachment to the corresponding email address. The name of this button depends on the name defined in the scan profile file. |
||
This setting applies only to scan-to-email jobs.
|
Setting |
Values |
Description |
|
|---|---|---|---|
|
[Recipients] |
Depending on the configuration of Scan to Email you can enter one or more email addresses of an user ID. |
||
|
[Email subject] |
Enter the subject of the email. |
||
|
Setting |
Values |
Description |
|
|---|---|---|---|
|
[Accounting ID] |
Enter the account ID for the current job. The [Accounting ID] setting is only available when the accounting function on the PRISMAsync controller is enabled. |
||