
The machine is used in different printing environments. Each environment requires specific settings to optimize the workflow or to match personal workflow preferences. The machine contains a number of default workflow profiles to help you optimize your workflow. The default workflow profiles are combinations of frequently used settings for print jobs ([Receive], [Print] and [Output] ). However, the workflow profiles cannot cover all the possible workflows you may need. Therefore, you can also define the settings individually (custom workflow).
This section makes recommendations about when to use which workflow profile. Furthermore, this section describes the settings and the effects of the settings.
The [Workflow profile] button in the [Setup] section of the [System] view displays the name of the selected workflow profile. When you customized the settings of a workflow profile, the button displays the text [Custom].
The [Workflow profile] button in the [Setup] section of the [System] view displays the name of the selected workflow profile. When you customized the settings of a workflow profile, the button displays the text [Custom].
The following sections make recommendations about when to use which default workflow profile.
|
[Standard] 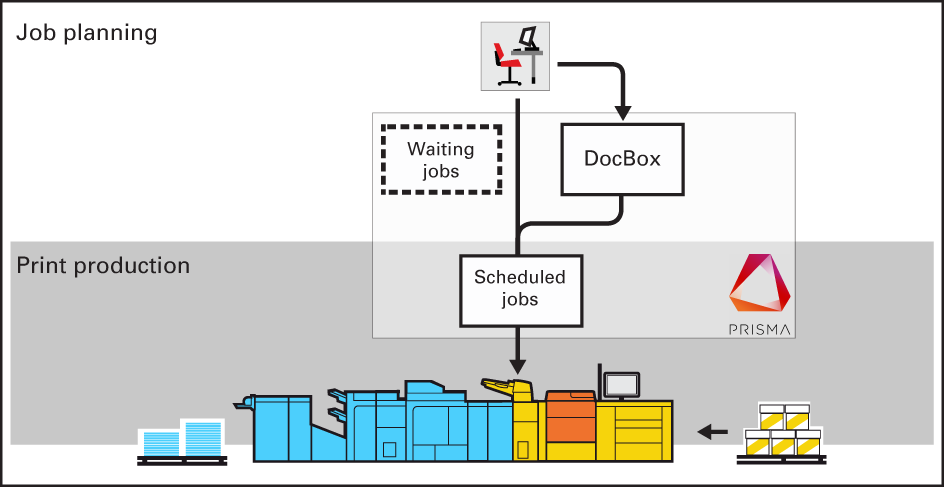 Standard workflow profile
 |
|
|
[Job by job] 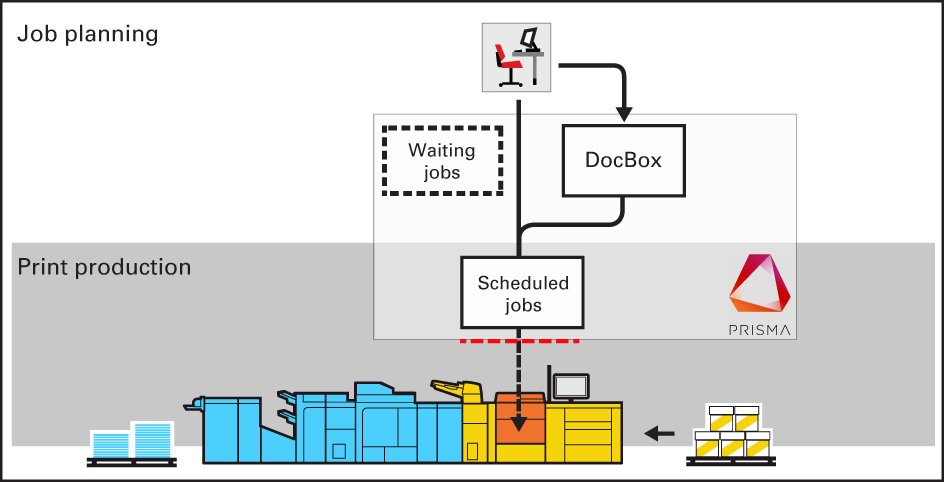 Job by job workflow profile
 |
|
|
[Check and print] 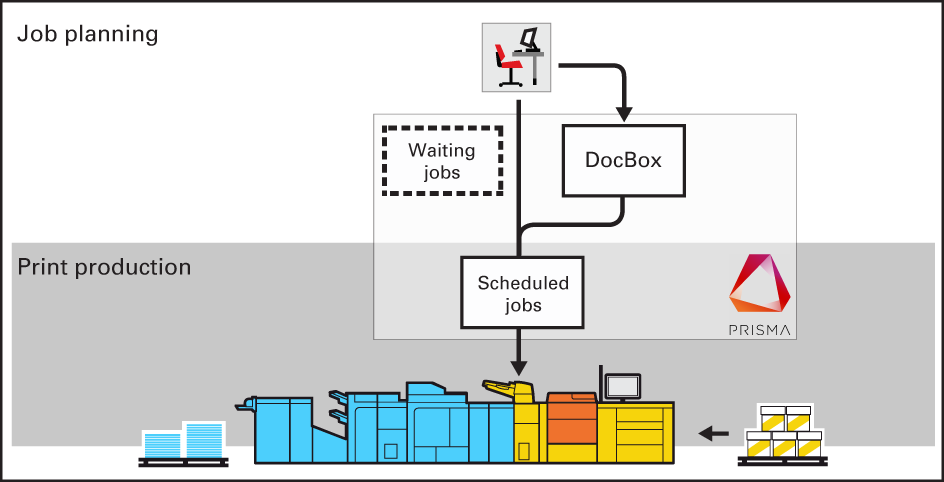 Check and print workflow profile
 |
|
|
[Manual planning] 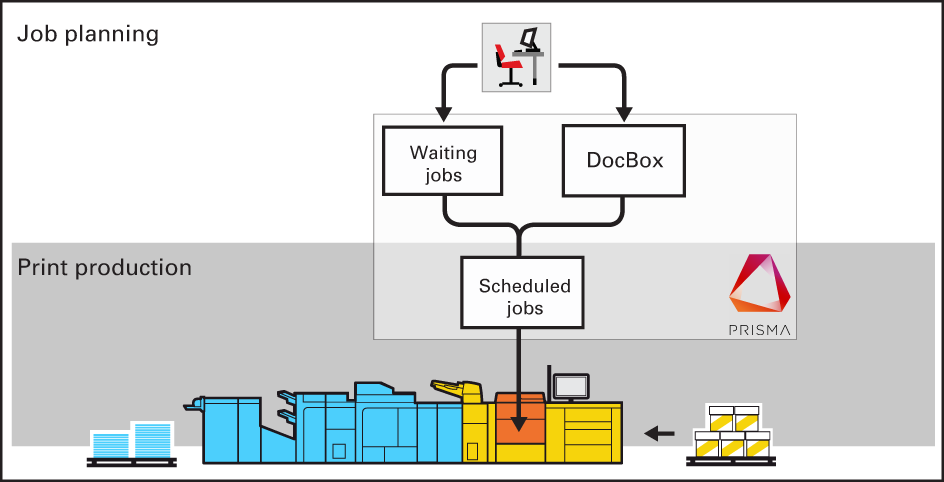 Manual planning workflow profile
 |
|
|
[Unattended] 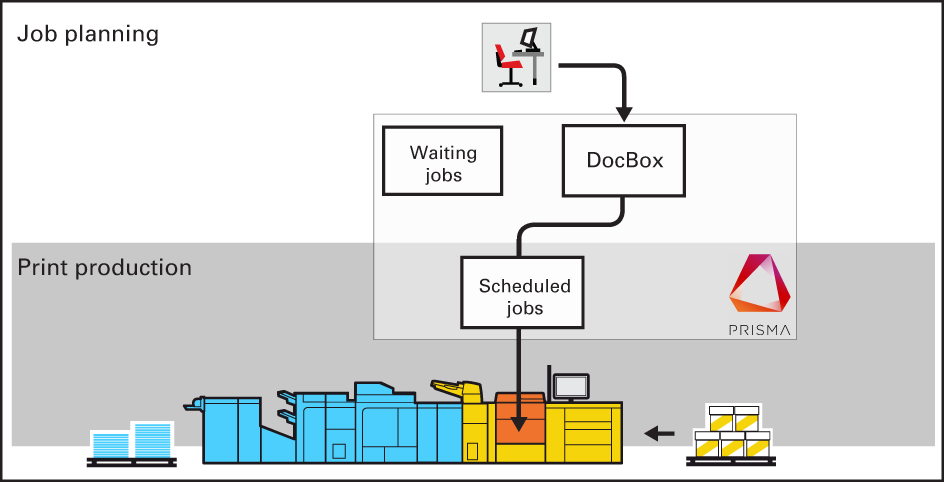 Unattended workflow profile
 |
|
|
Workflow profile |
[Receive] settings |
|
|---|---|---|
|
[Destination of print job] |
[Destination of DocBox job] |
|
|
[Standard] |
[Scheduled jobs] |
[Scheduled jobs] |
|
[Job by job] |
[As in job] |
[Scheduled jobs] |
|
[Check and print] |
[Scheduled jobs] |
[Scheduled jobs] |
|
[Manual planning] |
[Waiting jobs] |
[Scheduled jobs] |
|
[Unattended] |
[As in job] |
[Scheduled jobs] |
|
Workflow profile |
[Print] settings |
|
|---|---|---|
|
[Confirm start of job: On] |
[Check first set] |
|
|
[Standard] |
[Never] |
[As in job] |
|
[Job by job] |
[On] |
[As in job] |
|
[Check and print] |
[Never] |
[On] |
|
[Manual planning] |
[Never] |
[As in job] |
|
[Unattended] |
[Never] |
[Never] |
|
Workflow profile |
[Output] settings |
|||
|---|---|---|---|---|
|
[Next output tray] |
[Offset stacking] |
[Tray linking] |
||
|
[Standard] |
[After each job] |
[As in job] |
[Never] |
|
|
[Job by job] |
[After each job] |
[As in job] |
[Never] |
|
|
[Check and print] |
[After each job] |
[As in job] |
[Never] |
|
|
[Manual planning] |
[After each job] |
[As in job] |
[Never] |
|
|
[Unattended] |
[When tray is full] |
[Banner pages] |
[Never] |
|
The following table describes the effects of the various values of the settings.
|
Setting |
Values |
Effect |
|---|---|---|
|
[Destination of print job] |
[Scheduled jobs] |
The jobs are immediately sent to the list of [Scheduled jobs]. |
|
[Waiting jobs] |
The jobs are sent to the list of [Waiting jobs]. You can manually define the order in which the jobs will be printed. |
|
|
[As in job] |
The jobs are sent to the destination that is defined in the job ticket. |
|
|
[Destination of DocBox job] |
[Scheduled jobs] |
The jobs are immediately sent to the list of [Scheduled jobs]. |
|
[Waiting jobs] |
The jobs are sent to the list of [Waiting jobs]. You can manually define the order in which the jobs will be printed. |
|
|
[Confirm start of job: On] |
[On] |
The machine always stops before the next scheduled job. Touch [Resume] in the dashboard to start each job. |
|
[Never] |
The machine keeps printing all the jobs. The machine does not stop before the next scheduled job, unless there is a reason to stop. For example when a media is not available. |
|
|
[Conflicting settings] |
The machine only stops when there is a conflict in the next job. Resolve the conflict to continue printing. |
|
|
[Check first set] |
[On] |
The machine goes on hold after the first set of a job is printed. You can check the quality and layout of the first set before the machine prints the remaining sets. |
|
[Never] |
The machine will print the whole job without stopping after the first set. |
|
|
[As in job] |
The machine will print the jobs as indicated in the job ticket. |
|
|
[Next output tray] |
[After each job] |
Each job is sent to the next available output tray. In this context, the second stack of the stacker is also defined as an output tray. |
|
[When tray is full] |
All the jobs are stacked until an output tray is full. When an output tray is full, the next jobs are sent to the next output tray. |
|
|
[Offset stacking] |
[Each job] |
Each printed job that is delivered to an output location is stacked on top of the previous printed job with an offset. This helps you to identify the various jobs. |
|
[Each set] |
Each printed set that is delivered to an output location is stacked on top of the previous set with an offset. This helps you to identify the various sets. |
|
|
[As in job] |
Each printed set is delivered to the output location as defined in the job ticket. Therefore, the sets can be stacked in one straight line or with an offset. |
|
|
[Banner pages] |
Each banner page of a job is delivered to the output location with an offset. This helps you to identify the separate jobs. The jobs themselves are stacked in one straight line. |
|
|
[Never] |
All the printed jobs or sets are stacked in one straight line. There is no offset between the jobs or sets. |
|
|
[Tray linking] You can enable or disable the linking of output trays, when there are two or more high capacity stackers. Tray linking means that the prints delivery automatically switches to the other high capacity stacker. |
[Never] |
There is no tray linking. |
|
[When stacker is full] |
Tray linking occurs when the first high capacity stacker tray is full. |
|
|
[After each stack] |
Tray linking occurs by switching to the other high capacity after the delivery of a stack. |