
The Spot Layer Tool is a tool in ONYX Thrive that helps you to define areas that have to be printed with white ink or varnish/gloss without additional editing in Adobe Photoshop or Adobe Illustrator.
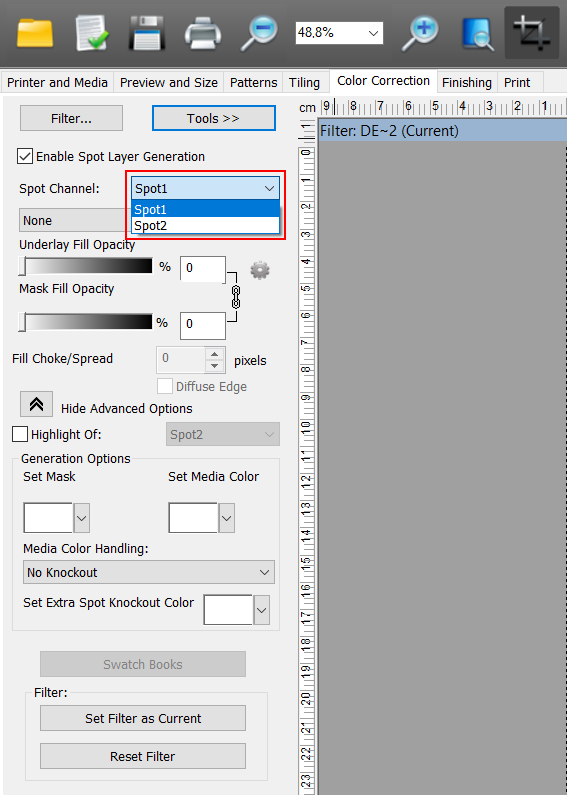
There are two spot channels available: Spot1 and Spot2. In general Spot1 data is used for white ink and Spot2 data is for varnish/gloss. However the same spot data can be used to print either white ink, varnish, or both.
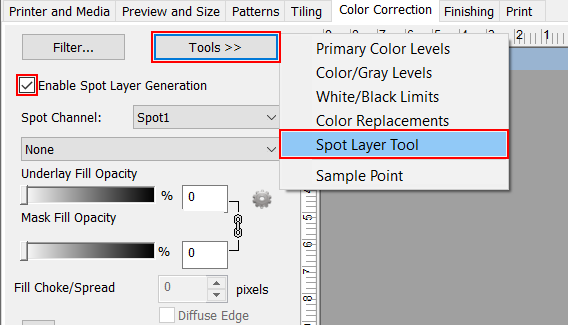
The tool is located in the ONYX Job Editor in the Color Correction tab.
Open a print job in the Job Editor using an ONYX profile (media model) that contains spot data channels.
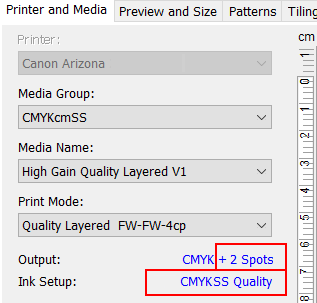
Select the Color Corrections tab.
Click on Tools and select Spot Layer Tool. This will open the feature set.
Check Enable Spot Layer Generation to activate the tool.
If the Enable checkbox won't activate, the media you used to open the job has not been configured with the Quality-Layered print mode. Create or Edit your media to support spot ink in Media Manager before you open the job in theJob Editor (or download a white ink media model from the website https://graphiplaza.cpp.canon).
Select the spot channel you will use to create data.
In general Spot 1 data is used for white ink and Spot 2 data is for varnish.
The tool has many advanced options and this section will explain them so that you can set them up to best achieve your desired results.
Select the area of the design that will be added to the spot channel and will be printed in white or varnish/gloss.
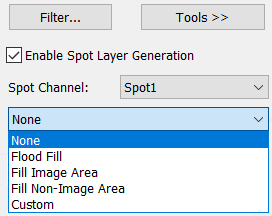
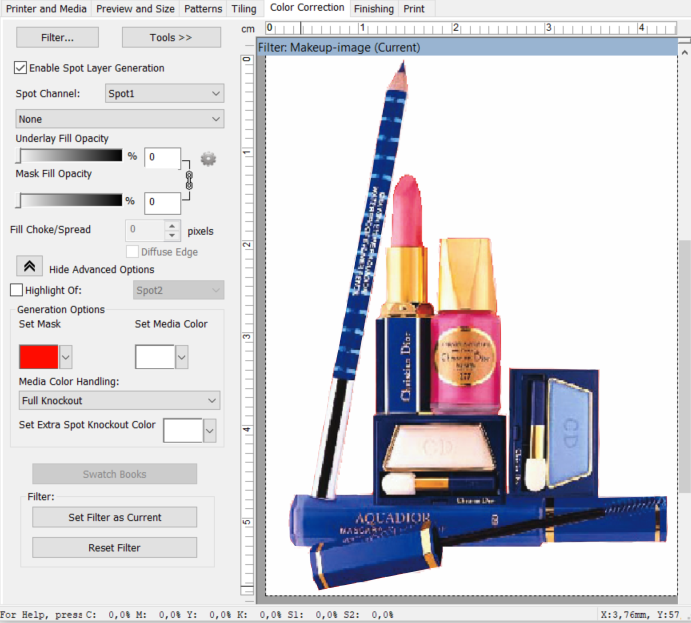
None
No spot data is defined
Flood Fill
This option generates a flood fill for the entire image (bounding box) by combining the underlay and mask fills together. When you check this option, the underlay and mask fill sliders lock together and are set at 100%. You can change the opacity for the flood fill by moving either of the sliders.
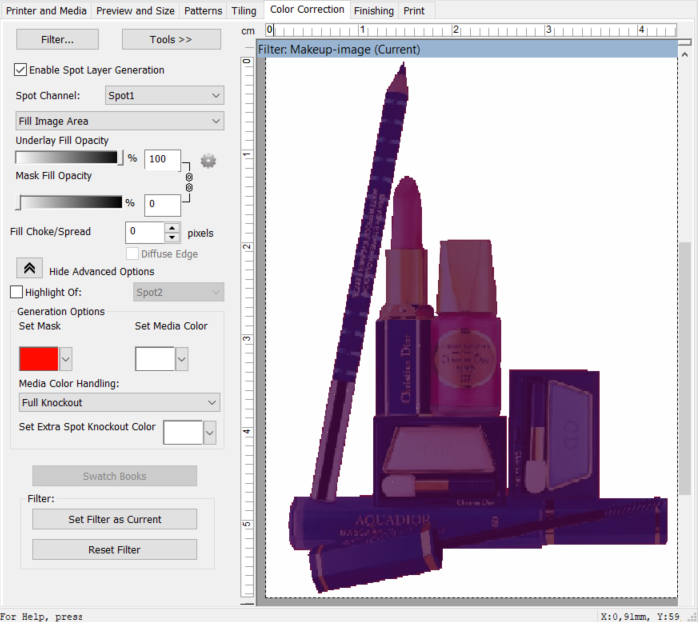
Fill Image Area
This option generates a fill for the image without the underlay . Every color, except white (media color), is set as image area. The Underlay Fill Opacity is set to 100%, the Mask Fill Opacity is set to 0%. You can change the opacity by moving either of the sliders.
Fill Non-Image Area
This option generates a fill for the underlay without the image. White (media color) is always set as Non-image / Underlay. The Underlay Fill Opacity is set to 0%, the Mask Fill Opacity is set to 100%. You can change the opacity by moving either of the sliders.
Custom
Define the opacity of the image or underlay by moving either of the sliders.
Custom fill options
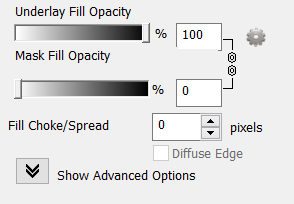
Underlay Fill Opacity: The opacity of the non-image data. White (media color) is set as Non-image. The data with 100% opacity will be added to the spot channel (Spot1 or Spot 2). You can also use a mask to delete data from the spot channel.
Mask Fill Opacity: The opacity of the image data. Every color except white (media color) is set as image area. The data with 100% opacity will be added to the spot channel (Spot1 or Spot 2). You can also use a mask to delete data from the spot channel.
Choke and Spread: Choke reduces the outer edge of the underlay. Use choke when you want to eliminate white from peeking out of the edge of your image. Spread increases the outer edge of the underlay fill. Use spread when you want a deliberate halo around the edge of your image. Choke and Spread work in tandem. Each mark on the slider represents 1 pixel width of choke or spread up to 10 pixels (+-) . We recommend a choke value of 3 ticks.
The actual preview in the Job Editor is exaggerated from what is printed. This exaggerated display makes it easier for you to see the results from moving the slider.
Diffuse Edge: Use this option when you want a gradual transition from the underlay to the mask to create a soft edge for the fill. We do not recommend use of this option.
If you want to use the Spot Layer Tool to create flood fills, underlay fills or image area fills, it is not always necessary to set a mask or media color to get the desired results.
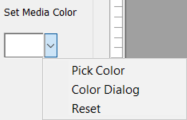
Set the Media color
To preview the color of the media in the Job Editor.
To identify the areas that use the media color and will be knocked out (not printed) but need to be part of the spot channel.
To set the media color, click the sample box to activate the color picker or use the drop-down arrow to pick the color from the preview. White is set as the default media color.
Set Mask
You can select a color that defines the mask area (data that will be deleted from the spot channel selection).
If the image you are printing contains white data in more than the mask area, you will need to set up a different background color not used anywhere else in the file to use as your mask. To ensure that mask selection is made without selecting those parts of your image that are of the same color, it is necessary to create a layer in Illustrator to serve as the mask.
Workflow:
To add mask color, open your design in Adobe Illustrator
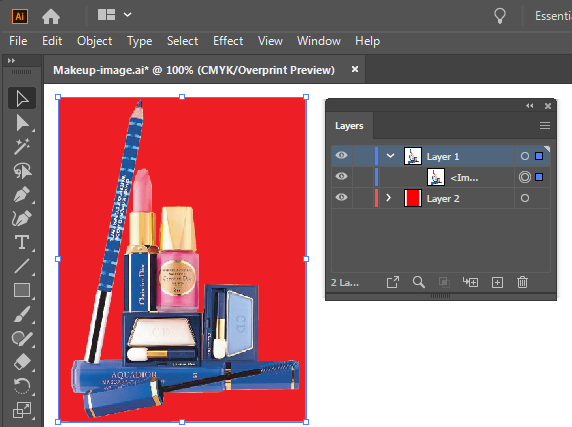
Create a box around your image using the Rectangle Tool and fill the box with a color that does not appear anywhere in your image. For this example we have used red (composed of 100% Magenta and 100% Yellow).
Place this rectangle behind your image data, either underneath or in a new layer below. It is not necessary to choose Overprint attributes for this layer.
The prepared file should look similar to the example below.
Open the file in ONYX Thrive- Job Editor- Spot Layer Tool
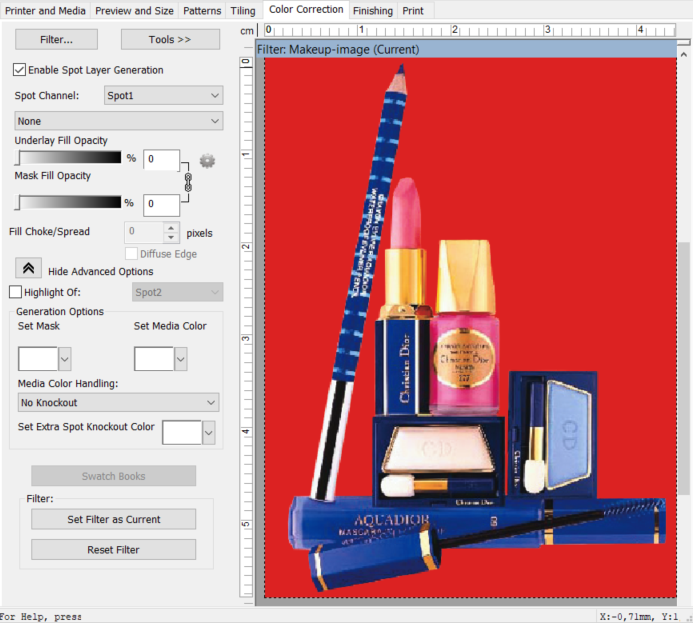
Set the mask color
Click the sample box to activate the color picker or use the drop-down arrow to pick the color from the preview. Select the red background. The color you select as a mask will not be part of the Spot channel.
If you’ve set the mask color, chances are you want some portion of the design to be removed to use the media color. Select the knockout option for the mask. The term “Knockout” means to remove from the selection.
No Knockout - If you’ve set a media color to help you visualize your output, choose this option. This will print the image and spot data with no knockout.
Spot Knockout - If you choose this option, RIP-Queue removes the spot data anywhere the image data matches the mask color that you set. Use this option when you want to knockout the spot data but still print the image data that matches the media color.
Full Knockout - If you choose this option, RIP-Queue removes the spot data and the image data anywhere the image data matches the mask color that you set. Use this option when you want to knockout the spot data and the image data, allowing the media to fully show through.
The generation options are used in combination with the fill options, except when the media color handling is set to "No Knockout". If you want the media color from the image to show through the design, you must first define your fill options, then set the media color and either select "Spot Knockout" or "Full Knockout".
The mask is set to full knockout. The spot channel is set to fill image area but the mask data is removed from the selection. This means that the red background in the image is not to be printed.
Filter
Once you've defined your settings, save them by exporting a Filter to use on similar jobs. Filters are a global color correction that can be applied to Quick Sets to automate the printing process for multiple jobs that use the same settings.
Many of the Quick Set and Filter settings for a job can be overridden in RIP-Queue or Job Editor, if desired.