
Your printer uses a low-flow, high-pressure vacuum system to secure media for printing on the printer table. A vacuum pump is used to evacuate the air between the overlay and the table. Three air-feed ports in the table surface connect to the vacuum pump through a series of manually operated flow valves. These valves are used to activate or shut down either the default single zone or any custom vacuum zones. In order for the system to work effectively, during printing all the circular holes on the top surface of the overlay sheet connected to an active vacuum zone must be covered. This creates a closed vacuum system. A bleed valve is provided to adjust the level of vacuum, if needed.
Default Vacuum Zones
The printer is shipped from the factory configured with one large vacuum zone that accommodates the maximum media size. There are two suggested custom vacuum zone configurations, one for Metric and one for Imperial units. These zones can be set up for common media sizes, and can be modified by placing a call to a service technician.
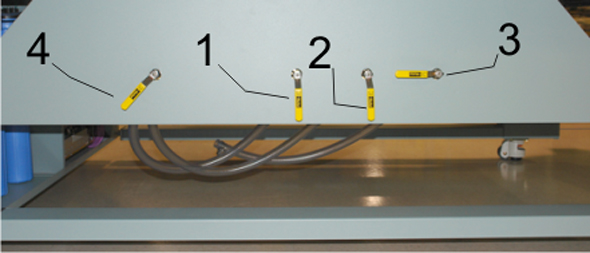 Vacuum Bleed Valve and Vacuum Zone Control Handles
|
1 - Zone 1 is Open |
2 - Zone 2 is Open |
||
|
3 - Zone 3 is closed |
4 - Bleed Valve partly open |
These controls are meant for use with custom vacuum zones. If you only use the factory default of one large zone, make sure all three handles are left in the open position. When you create custom zones the three control valves are used to control which zones of the printer table will have vacuum applied when the table vacuum pump is turned on. To close a zone turn the control handle a quarter turn clockwise.
When the printer table has only one large vacuum zone you must mask the area around the media to create a closed vacuum system. Use scrap media or material that is equal to or less than the thickness of the media to mask the table. Also when you create custom vacuum zones, if the media does not cover a whole zone you need to mask any exposed parts of the table in that zone. You can tell when the vacuum is sealed by the sound it makes and also by the vacuum gauge, which must read at least 20 "Hg.
The vacuum foot pedal toggles the table vacuum on or off. It helps the operator to secure the media on the vacuum table since it allows hands-free operation. The vacuum must be turned on prior to starting a print, and the vacuum cannot be turned off until a print is completed.
The bleed valve handle is located to the left of the three vacuum control handles. This bleed valve can be adjusted to control the amount of vacuum suction on the media. Less suction reduces artifacts caused by the suction when imaging on flexible media. If you see dimples on the media that are the same size and location as the vacuum table punched holes, introduce bleed until the dimples disappear from the media.
The bleed valve is off when its handle is in the horizontal position. To activate the bleed valve, turn the handle to the vertical position. The closer the handle is to the vertical position, the more vacuum pressure is reduced.
The vacuum guage is located on the side of the table above and to the left of the bleed valve handles. It provides a visual representation of the actual pressure in the vacuum table system.
Use the vacuum gauge to determine if a zone is properly masked. When the active zone is properly masked the gauge will read at 20"Hg (68 kPa) or higher. Small leaks can reduce this number and therefore the efficiency of the vacuum. Porous media can also degrade the vacuum effect.
If the vacuum gauge for an active zone reads below 10"Hg (34 kPa) and you have ensured that the area is properly masked and taped off, you may have a leak in the vacuum system. Place a service call only if you determine that the zone is correctly masked and the gauge reads consistently low.
If ink build-up occurs on the overlay sheet, remove the ink. If it is not removed, the print gap can be affected and this may affect the vacuum table's ability to secure the media properly. To remove ink we recommend that you use a paint scraper containing a straight edge razor blade (these can be found at a local hardware store). Refer to the Maintenance section for more detailed instructions.