
The paper trays contain the media that are required for the print jobs. The default configuration of the machine contains 1 paper module with 4 paper trays.
Two standard trays with a capacity of 600 sheets each.
Two bulk trays with a capacity of 1,700 sheets each (or 3,400 A4/Letter sheets each when the optional dual paper trays are installed)
Contact your local authorized dealer for more information about the dual paper trays.
You can add 1 or 2 more paper modules to the machine. Then the total number of paper trays is extended to 8 or 12 respectively. You can find more information about the capacities of the paper trays and the supported media size in the specification chapter of this manual.
You can also install a Flex-XL PIM paper input module. In this paper module the two bulk trays are replaced by Flex-XL trays. A Flex-XL tray can contain media until media size 350 mm x 500 mm. You can install the Flex-XL PIM instead of a standard paper module or in combination with a standard paper module. You can install a maximum of 3 paper modules. Contact your local authorized dealer for more information about the Flex-XL PIM. See also Flex-XL paper input module.
This section describes the control panel on each paper module.
You can use the control panel on the paper modules to open the paper trays and load the media. However, the recommended way to open the paper trays and assign the media is via the [Schedule] view. You can also open the paper trays and/or assign the media via the [Trays] view (see Assign the media to a paper tray).
 The control panel on the paper modules
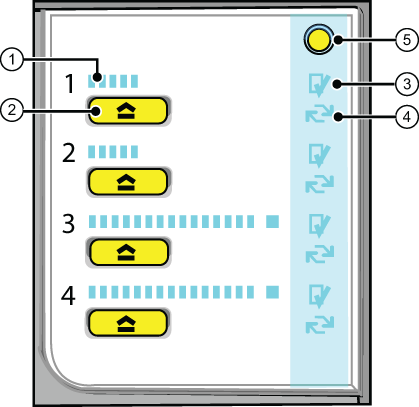
Each paper module contains a control panel next to the upper paper tray. The control panel consists of 4 sections that correspond with the 4 paper trays. Each section displays the current filling level of the corresponding paper tray. Furthermore, the control panel indicates whether the media in the paper tray is assigned or not. The following table describes the various parts of the control panel.
|
Number |
Description |
|---|---|
|
1 |
The LEDs indicate the current amount of sheets in the corresponding paper tray. Each lit-up LED indicates the presence of about 100 sheets (based on media of 80 g/m2 or 20 lb bond). |
|
2 |
Press the button to open the corresponding paper tray. You can only open 1 paper tray at a time. |
|
3 |
When the check mark is green, the media in the paper tray is defined. The system knows which media is in the paper tray. |
|
4 |
When the arrows are red, the media in the paper tray is not defined. The system does not know which media is in the paper tray. The [Trays] view on the control panel indicates that no media is assigned to the paper tray. |
|
5 |
The [Not assigned] button. This button applies to the paper tray where you just put the media. You can press the [Not assigned] button when you load a new media type into a paper tray without defining this media type on the control panel first. Then the printer cannot accidentally use the media in this paper tray before the media is correctly defined on the control panel. You can define the media type in the [Trays] view on the control panel later (see Assign the media to a paper tray). Make sure that the paper tray is open when you press the [Not assigned] button. |