
Your Océ Arizona printer uses two UV lamps, one on each side of the carriage, to cure the UV ink during printing. The bulbs in these UV lamps have a limited lifetime and must be replaced by the operator if they fail or when they can no longer cure the ink at maximum available power.
Although the functional life of the UV lamps can be as high as 500 hours, there are factors that can reduce the expected lifetime. Operational practices, such as turning the lamps off and on frequently, using them at high intensity all of the time, or touching the bulbs with your fingers, can shorten their life. Océ recommends that both UV Lamp bulbs be replaced at the same time to ensure that the curing effect is balanced when printing in both directions. In the case of a premature failure or accidental breakage of one lamp, the operator can decide to replace only one lamp but should confirm image consistency after the replacement. Uneven curing can cause gloss banding in the printed image. We also recommend that you change the lamp filters when the bulb is changed.
The Flatbed Settings icon on the printer interface allows the operator to control the power output of each UV lamp independently. To extend lamp life, use the lowest setting that provides adequate curing for a particular media. However, avoid handling media with insufficient curing as partially cured UV ink on your skin can cause irritation and sensitization.
Turn off the ink temperature.
Turn off the UV lamps.
Slide the maintenance station drawer out from under the carriage.
Press switch 2 (middle) to raise the carriage to its maximum height (this will provide access to clean the quartz window later in this procedure).
When the ink temperature is below 40°C (104°F) and the UV Lamps are cool, click on the Shutdown button in the Tools and Utilities module.
Turn off the printer power (see How to Power the Printer On and Off for proper procedure).
Apply a lockout to the AC power switch.
The UV lamps and the carriage guard may be hot if the printer has been active. Avoid touching the guard and the lamp assembly until it is cool.
These UV lamp bulbs contain mercury, and if they are broken the vapor is toxic if inhaled. The lamp bulbs must be disposed of according to local environmental regulations.
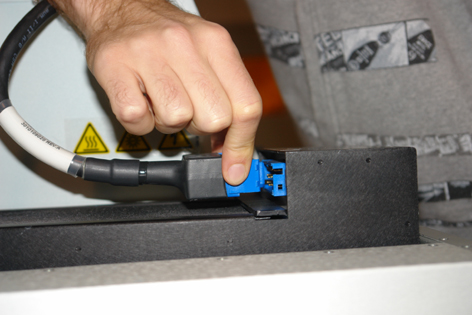 Disconnect power cable
 Remove Lamp Filter
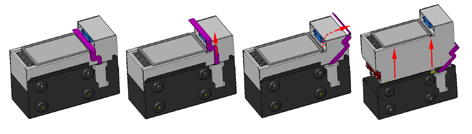 Interlock Safety Arm
first lift it straight up to the height of the blue connector;
then angle it away from the connector as you raise it higher; and
finally swing the arm back over the connector and past the raised part of the lamp housing.
The UV lamp housing cannot be removed from the carriage until the bracket is swung out of the way.