
The [Schedule] is your daily planning board for print jobs. The [Schedule] helps you to keep the machine running.
This section shows and describes the main parts of the [Schedule].
The descriptions of the colors of the bars and the indication of the required amount of sheets are only valid for document printing. For streaming jobs
 , all the bars remain grey until the paper trays are empty or the output locations are full. Then the machine stops and the bars become red. Furthermore, the media toolbar does not indicate the required amount of sheets.
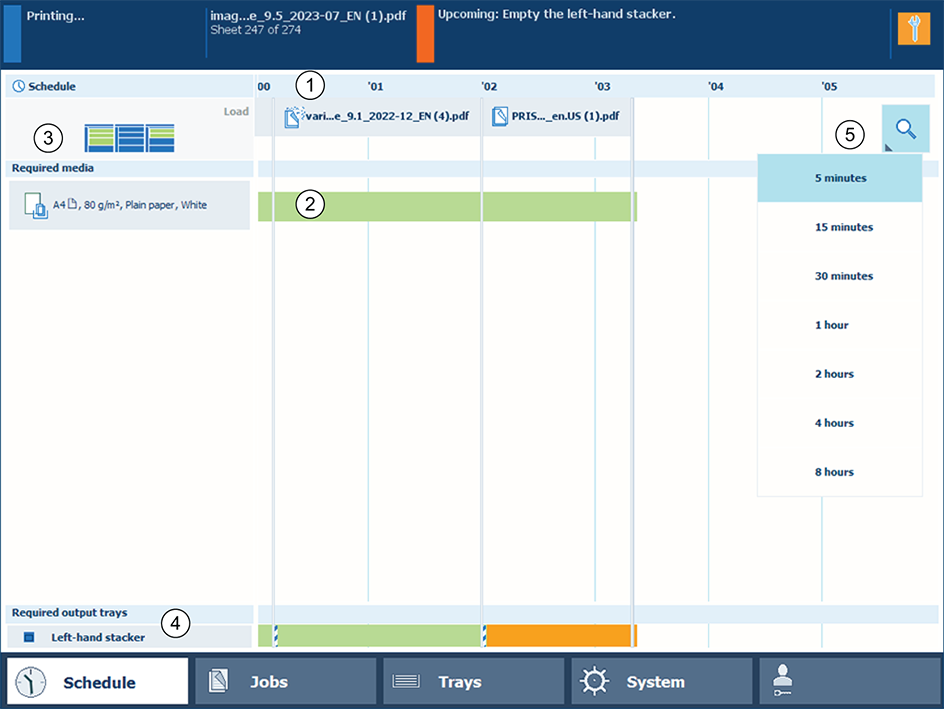 The [Schedule] view
The jobs pane shows the jobs on a timeline. The width of the job corresponds to the (remaining) print time. A vertical line separates the jobs. The vertical line moves to the left as the printing of a job progresses.
An icon and the job name represent a job. The icon indicates the state of the job, for example printing
 .
.
Furthermore, the
 icon indicates the stop moments of the machine. For example, when the setting [Confirm start of job: On] in the workflow profiles (see list of references below) is set to [On] or when you use the [Stop after job] function.
The [Required media] pane displays the media that are required for each scheduled job. For each required media, the media properties are displayed (see list of references below). The bars show the availability of the media. The bars can be the following colors.
|
Color of the bar |
Description |
|---|---|
|
Green |
The required media is available. |
|
Orange |
The media is required in the future, but not available then. For example because the paper trays do not contain sufficient sheets of the required media. |
|
Yellow |
The system cannot determine the exact number of sheets that is available in the paper trays. |
|
Red |
The media is required now, but not available. The job can only start when you load the required media. |
When you print small jobs, the bars for these jobs may not be completely visible. To prevent that you do not see the status of these small jobs, the control panel can show the following images.
|
When you set the zoom control (5) to a shorter time-scale, in most cases the control panel will display bars for these small jobs. |
|
Image |
Description |
|---|---|

|
Green. The required media is available. |

|
Orange. The media is required in the future, but not available then. For example because the paper trays do not contain sufficient sheets of the required media. |

|
Red. The media is required now, but not available. The job can only start when you load the required media. |
The media toolbar displays the following information for the media that is selected in the [Required media] pane. Furthermore, the media type toolbar contains the [Load] button to load and assign the required media.
|
Icon |
Description |
|---|---|

|
The list of [Required media] shows the required media for the scheduled jobs. When the paper module indicator is completely grey, this means that not one of the required media is available in the paper trays. |

|
The list of [Required media] shows the required media for the scheduled jobs. When a paper tray is highlighted in green, the highlighted paper tray contains a media that is required by one of the scheduled jobs. |

|
The list of [Required media] shows the required media for the scheduled jobs. When a paper tray is highlighted in blue, the highlighted paper tray contains the media that is also highlighted in blue in the list of [Required media]. |
The output locations pane displays the output locations that are required for the scheduled jobs. The bars show the availability of the output locations. The bars can have the following colors.
|
Color of the bar |
Description |
|---|---|
|
Green |
The output location is required and available. |
|
Orange |
The output location is required in the future, but not available then. For example, because the output location will be full soon. |
|
Red |
The output location is required now, but not available. For example, because the output location is full. |
|
Gray |
The output location is required, but availability is unknown. |
The zoom control enables you to adjust the time scale visible in the [Schedule]. When you touch the zoom button, a drop-down list appears. Then you can select the desired time scale (five minutes - eight hours).
