
You must use a media model that is configured for white ink before you can generate white ink output from ProductionHouse. The media is actually part of a media model description (sometimes incorrectly referred to as a profile) that contains other specific information such as ink restrictions, linearization, ink limits and ICC profiles. The creation of media models and profiling is a complex procedure that is partly explained elsewhere in this document. If you are not comfortable with the procedure, you can use the pre-defined media models posted on the DGS web site. These media models can be found at https://dgs.oce.com in the Customer Support area. Note that the names of these models contain a specific printer model, although they will work for all printers with the white ink option. The media models provide a good start point for the white ink workflow.
Generally we advise that you create a new media model or edit an existing one with your on-site printer and the specific materials you use for print jobs. However, for your convenience, we have provided a set of default White Ink Workflow media models that cover a few different common print scenarios and media types. This section includes descriptions of each media model and provides an illustration of how print jobs generated with them in ProductionHouse will look in your printer's software interface. There is also some explanation of how they are to be used. If you edit the models you can save them with a different name that reflects your changes.
The term "media" can be confusing as it really has two meanings in the context of your ONYX workflow. In general use, it refers to a physical material that you can print on. ONYX uses the term media to refer to how a particular material is used and included within a media definition. Their use of the term media refers to the model that you define and then use when you open a print job. Océ uses the term media model to make the definition distinct from the physical media. Another point of confusion is that media models are sometimes called Profiles. In fact, ICC Profiles are only a part of the media model that is associated with color management and are not the whole media model.
ONYX RIP Queue, ProductionHouse, and PosterShop, all use a media format known as an ONYX Media Library (.oml). To install an .oml, select your printer and open the ONYX Media Manager. In Media Manager, select Media> Import, and browse to the media. Once imported, the media will be available to any print jobs that you open.
ProductionHouse also allows you to create Media Groups that contain various Media Models. You can create a group that contains media models with different settings for the same physical material. Or you can group together various media models that have something in common, for example the five media described in this section belong to the group "WhiteInkUsageMedias".
Download file: Oce_Arizona_350_GT_WhiteInk_DayNight.OML
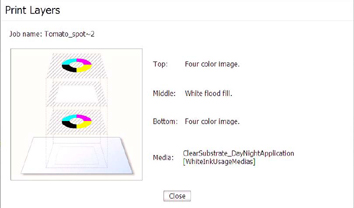
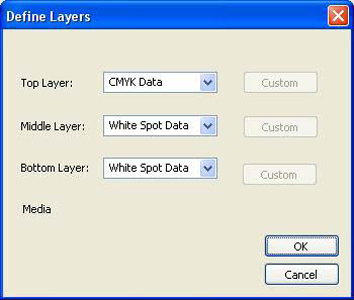
This media model was built for the creation of 3-layer Day/Night Application prints on clear materials. This method of printing is used to provide pleasing output for images when viewed under front or back lighting conditions. Day/Night output is obtained by first laying down a CMYK image layer, followed by a white layer (in this media the white is a flood fill layer, but a properly setup Spot layer may provide the same desired effect), and finished with another CMYK image layer. Since a Flood Fill layer has been defined, no additional file preparation is required to activate white printing.
If you print second surface (print on the back side of clear media) it may be necessary to choose Print Reflection in Print Setup in order for the images to read correctly when viewed from the front side of the media.
 Day/Night Define Layers
 Day/Night Print Reflection
When you process a print job in ProductionHouse with this media model as provided, the job information displayed in the printer's Print Job Control module will appear as follows:
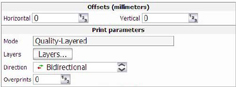
 Day/Night Parameters
Select the Layers button in the Job Control module to activate a graphical representation of the Print Layers that allows you to verify the layer order.
 Day/Night Layers
Download file: Oce_Arizona_350_GT_WhiteInk_BlackSubstrate.OML
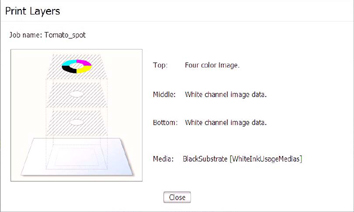
This media model was built using a media with a black print surface. In this instance, black Polystyrene was used. Due to the darkness of the media it is possible that the media color will show through. Therefore this media model makes use of two white ink layers to achieve opaque white coverage, followed by a CMYK image layer, and the result is a 3-layer media model. In this media model, the white ink layers are designated as Spot layers, so spot data must be either created in an image-editing program prior to opening in Production House, or it can be set up with Onyx Preflight Spot Layer Tool. To re-purpose the model for use with flood fill, access the drop-down menu and change from Spot to Flood Data. If a Flood Fill layer has been defined, no additional file preparation is required to activate white printing.
 Define Layers
When you process a print job in ProductionHouse with this media model as provided, the job information displayed in the Arizona 350 GT Print Job Control module will appear as follows:
 Parameters
Select the Layers button in the Job Control module to activate a graphical representation of the Print Layers that allows you to verify the layer order.
 Print Layers
Download file: Oce_Arizona_350_GT_WhiteInk_ClearBacklit.OML
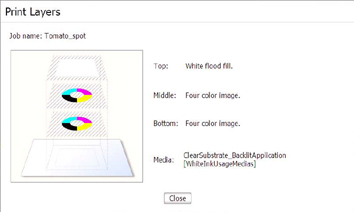
This media model is intended for use when you print data for backlit viewing on clear materials. Clear materials do not provide any light diffusion, which is often desired for more pleasing presentation on non-diffused light sources. Therefore, this media is built using 2 layers of CMYK data for color density followed by a layer of white flood data for diffusion. Since a Flood Fill layer has been defined, no additional file prep is required to activate white printing. Because this media is built for second surface backlit viewing, it will be necessary to set Print Reflection in Print Setup in order to have the image correctly oriented when it is viewed.
 Define Layers
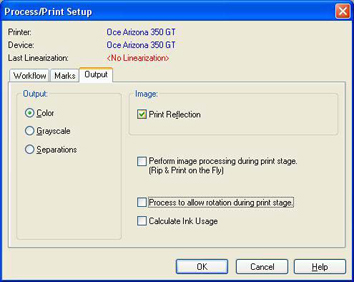 Print Reflection
If you want to re-use this media model for images to be viewed from the front, or print surface, simply re-order the layers with flood fill at the bottom and turn off Print Reflection.
When you process a print job in ProductionHouse with this media model as provided, the job information displayed in the Arizona 350 GT Print Job Control module will appear as follows:
 Parameters
Select the Layers button in the Job Control module to activate a graphical representation of the Print Layers that allows you to verify the layer order.
 Layers
Download file: Oce_Arizona_350_GT_MidtoneSubstrate.OML
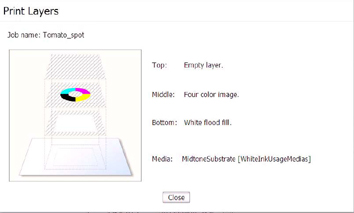
This media model is intended for a mid-tone grey print surface. Due to the relative lightness of the media it is not necessary to place two layers of white ink to provide opaque white coverage before your CMYK image data. As two layers of white are not necessary, this media model contains only one white layer followed by the CMYK color data. Since a Flood Fill layer has been defined, no additional file prep is required to activate white printing. To re-purpose for Spot usage, just access the drop down menu and change from Flood Fill to Spot Data and ensure that the file has been properly built for this type of output or appropriately edited with the Spot Layer Tool. A 2-layer configuration will result in faster print speeds than those configured for 3 layers.
 Define Layers
When you process a print job in ProductionHouse with this media model as provided, the job information displayed in the Arizona 350 GT Print Job Control module will appear as follows:
 Parameters
Select the Layers button in the Job Control module to activate a graphical representation of the Print Layers that allows you to verify the layer order.
 Layers
Download file: Oce_Arizona_350_GT_WhiteInk_ProductionFlood.OML
This is the only media within the provided White Ink Workflow Media Model set that is not in Quality-Layered mode. This media is to be used as either a pre-print or post-print flood fill when the speed of application is foremost and fully opaque white coverage is not necessary. This mode is not intended for 4 color CMYK plus white print jobs; it is simply a means to lay down white ink. First you must create a file that is sized at the final output dimensions required. Then fill it with either Spot 1 data, or leave it as a single color and then subsequently address it with white Spot data within Preflight’s Spot Layer Tool.
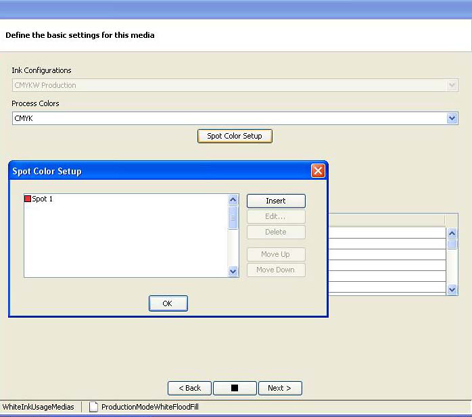 Setup Spot Color
 Mode Options
When you process a print job in ProductionHouse with this media model as provided, the job information displayed in the Print Job Control screen will appear as follows:
 Parameters