With [PRISMAguide XL] you can create print jobs with white ink, without extensive preprocessing in Adobe Photoshop or Adobe Illustrator. There is no need to have spot colors in a specific name, the layers for white data to be on top or to have overprint enabled.
In this example we are creating a window sticker, that will be visible on both sides. White is used to make sure that the other side does not shine through.
To use white ink in applications, a CMYKSS profile and a white ink print mode is needed. You can download print modes on graphiPLAZA.
For this example the PDF has a page for the front image and a page for the back image.


The [Overview] tab opens.

When you create a new application, one color layer is created, even when your PDF has more pages.

Change the order of the layers, if necessary, by dragging or by using the icons.

This can be the same [Layer source] as the color layer, but it can also be a [Layer source] created for this specific layer.

Color layers are printed in CMYK. The mask layers can be printed in [White], [Block-out (black)] and [Gloss].

There are two types of mask layers:
[Bounding box mask]
The shape of the mask layer is a rectangle in the size of the image. Parts in the media color are part of the layer, as well as the parts that are transparent.
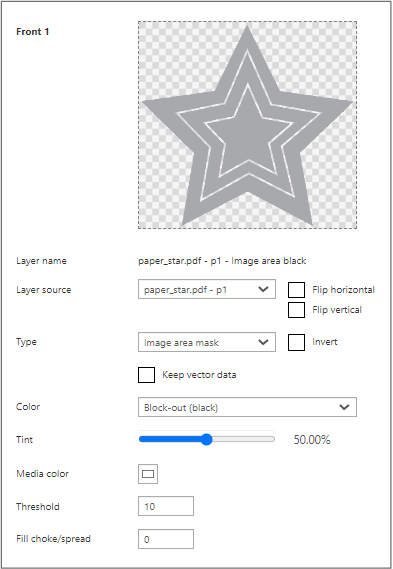
[Image area mask]
The mask detects the color data of the image and leaves out the parts that are in the media color. A pixel (in a raster image) and vector data in the media color will be set to transparent.
Vector data will be rasterized. Except when you enable the function: [Keep vector data] . Then the vector data will not be transparent and will be part of the [Image area mask] layer.
A design can contain raster and vector data in one. In this example the image is a raster image combined with vector data (white lines in the star).
[Threshold]
The [Threshold] function determines how close the color values should be to the set media color. These pixels will also be set as media color and are made transparent in the [Image area mask] layer. The higher the number the higher the tolerance.
Media color
Default the media color is set to white. You can select a different media color. This color will be set to transparent in the [Image area mask] layer.

|
Layer |
[Layer source] |
[Type] |
Remark |
|
|---|---|---|---|---|
|
[Front] 5 |
2 pages PDF - p1 |
[Color] |
The layer is printed in CMYK. |

|
|
[Front] 4 |
2 pages PDF - p1 |
[Image area mask] [Color]: [White] |
The layer is printed in white. [Keep vector data]: Yes |
|
|
[Front] 3 |
2 pages PDF - p1 |
[Image area mask] [Color]: [Block-out (black)] |
The layer is printed in a combination of black and white. [Keep vector data]: No [Fill choke/spread]: 4 |
|
|
[Front] 2 |
2 pages PDF - p1 |
[Image area mask] [Color]: [White] |
The layer is printed in white. [Keep vector data]: Yes |
|
|
[Front] 1 |
2 pages PDF - p2 |
[Color] |
The layer is printed in CMYK. |
[Fill choke/spread]
To prevent that a [Block-out (black)] layer or [White] layer is visible in the top layers, you can change the [Fill choke/spread] values.
Change the value to make the mask area smaller (Choke) or larger (Spread). A positive value makes the area slightly smaller, a negative one makes the area slightly larger.
You can rotate, shift, or zoom in and out on the preview as follows:
Rotate: click and hold the left mouse button.
Shift: click and hold the right mouse button.
Zoom in and out: rotate the mouse wheel.

In the preview you can check if the back image must be flipped, which can be the case when texts are visible. In this case this is not needed.
See for more information: