
The Nozzle Check print fires each nozzle individually in a manner that allows clogged nozzles to be easily identified by a visual inspection of this special print. The Nozzle Check has been designed to fit on a piece of media that is 36" (91.5 cm) and is 2.125" (5.4 cm) wide. Since you are likely to print more than one when you diagnose nozzle problems, make sure your media is wide enough. To calculate the required offset when you print multiple consecutive nozzle checks, add a horizontal offset of 2.5" or 60 mm to each consecutive print.
When you print a Nozzle Check print on the RMO, if the media width entered is less than 1067 mm (3.5 ft) the standard nozzle check will not fit across the media. In this case, if the Nozzle Check icon is selected from the Print Job Control command toolbar, the narrow version (Nozzle Check Narrow 886.5 x 214.7 (2.9 x 0.70 ft)) is automatically added to the print queue.
How to Evaluate a Nozzle Check Print
The Magenta section of the Nozzle Check print example shown in the figure below indicates that multiple nozzles are out.
This is an extreme example to illustrate the problem. In most cases you will likely see only two or three nozzles out.
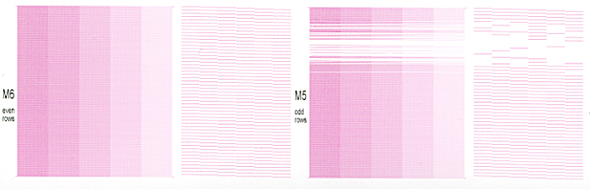 Nozzle Check Print Magenta Section
How to Correct Nozzle Dropouts
If there are only a few nozzle dropouts per printhead try suctioning the affected printheads again without purging. If many nozzles are out, perform Printhead Maintenance again.
Print another nozzle check and repeat step 1.
If nozzle dropouts still remain, swab that printhead (see the next section.
When a printhead does not have any dropouts, it will look like the Nozzle Check print of the black (K) section illustrated below.
There is an indication of some poor directionality in one of the nozzles illustrated in the top left section of the sample below, but it will not affect image quality (although it could, if multiple adjacent nozzles show this problem).
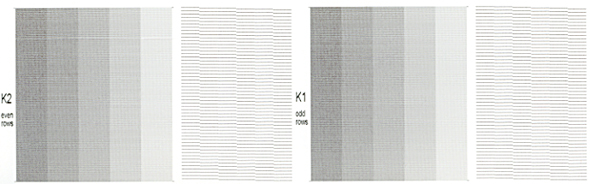 Nozzle Check Print Black Section