

This topic describes the parts of the following finishers:
Stacker/stapler
Folder
Long sheet catch tray
Bridge and finisher adapter for DFD (Document Finishing Device)
There are two standard stacker/stapler configurations: the stacker/stapler with booklet maker (Booklet Finisher-AC or Booklet Finisher-AG ) and without a booklet maker (Staple Finisher-AC or Staple Finisher-AG ). The booklet maker folds and staples booklets. Both finisher configurations can have the optional punch unit to punch two, three or four holes in the printed output.
The dashboard of the control panel displays the status of the staple cartridges. When the colour of the staple icon is orange or red, the staple cartridge needs replacement.
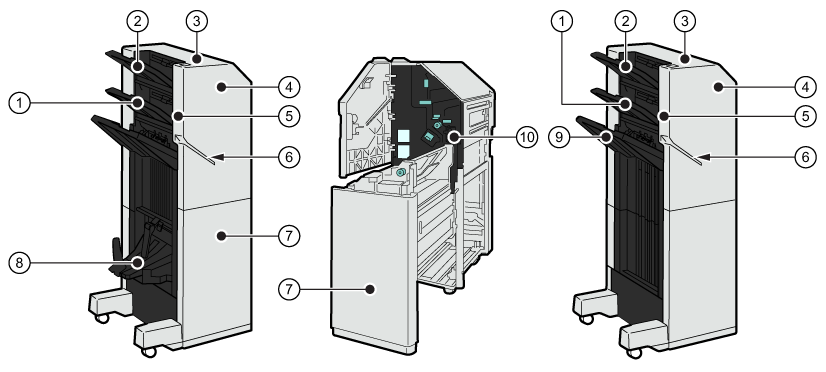 Stacker/stapler with booklet maker (Booklet Finisher-AC ), punch waste tray and standard stacker/stapler without booklet maker (Staple Finisher-AC )
|
Description stacker / stapler |
|
|---|---|
|
1 |
Tray to collect finished output |
|
2 |
Tray to collect finished output |
|
3 |
Staple button to manually staple the sheets in the stapling slit |
|
4 |
Cover to access the area where you replace staple cartridges, clear a paper jam, clear a staple jam, or remove punch waste |
|
5 |
Media jogger to align printed output |
|
6 |
Stapling slit to place sheets for manual stapling |
|
7 |
Cover to access the area where you replace staple cartridges, clear a paper jam or clear a staple jam |
|
8 |
Booklet tray to collect booklets |
|
9 |
Tray to collect finished output |
|
10 |
Punch waste tray to collect the punch waste |
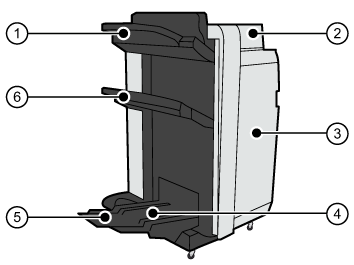 Stacker/stapler with booklet maker (external view)
 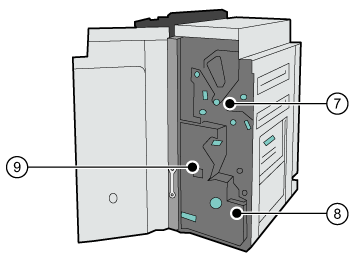 Stacker/stapler with booklet maker (internal view)
 |
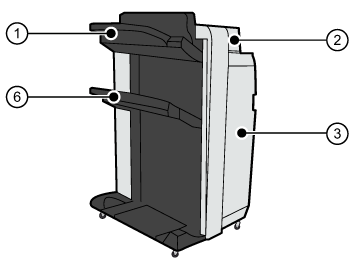 Stacker/stapler without booklet maker (external view)
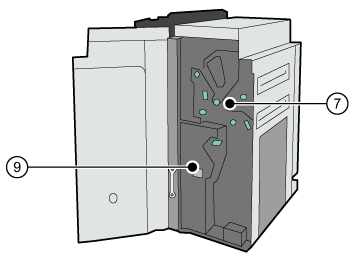 Stacker/stapler without booklet maker (internal view)
 |
|
Description stacker/stapler |
|
|---|---|
|
1 |
Upper tray to collect finished output; the guides enable a correct placement of the printed output. |
|
2 |
Top cover to access the area to clear a paper jam |
|
3 |
Front cover to access the area where you replace staple cartridges, clear a paper jam or a staple jam |
|
4 |
Booklet tray to collect booklets |
|
5 |
Auxiliary booklet tray to collect large booklets |
|
6 |
Lower tray to collect finished output; the guides enable a correct placement of the printed output. |
|
7 |
Punch waste tray to collect the punch waste |
|
8 |
Saddle-stitch unit to access the area where you replace staple cartridges, clear a paper jam or a staple jam in a saddle-stitch unit |
|
9 |
Staple waste tray to collect the staple waste |
The folder (Paper Folding Unit-K ) can fold the printed output in various ways: Z-fold, tri-fold in, half fold, tri-fold out, parallel fold.
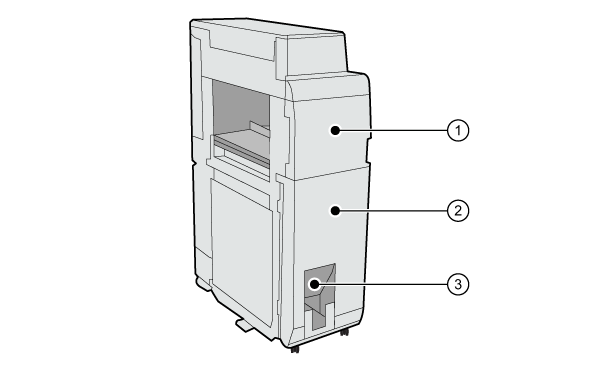 Folder
|
Description folder |
|
|---|---|
|
1 |
Front cover to access the area where a paper jam occurred |
|
2 |
Folding unit that you can pull out to clear a paper jam |
|
3 |
Exit slot where the printed output folded in tri-fold in, tri-fold out or parallel fold is output The printed output folded in Z-fold or in half fold is output to the output tray of the finisher. |
When printing on media which is longer than 762 mm (30 inch), attach the long sheet catch tray to the stacker/stapler.
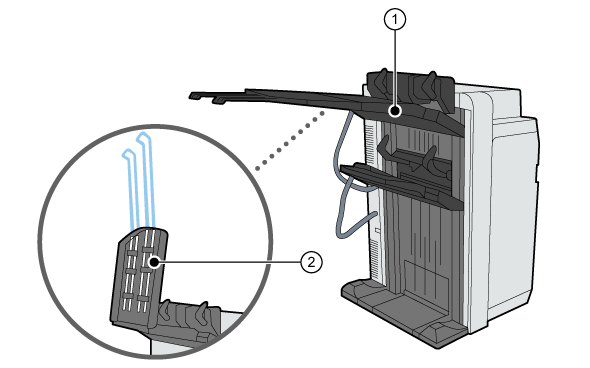 Long sheet catch tray
|
Description long sheet catch tray |
|
|---|---|
|
1 |
Long sheet output tray |
|
2 |
Extension long sheet output tray to support long sheets |
The [Finisher adapter] and the Bridge are two interface modules that improve the connectivity to DFD finishers. With these two interface modules there is no need to install a stacker behind the imagePRESS V900 series only to connect DFD finishers.
The DFD (Document Finishing Device) is a third-party external finisher such as a booklet maker or a perforator.
You can connect the [Finisher adapter] directly after the imagePRESS V900 series or directly after some specific finishers (not all finishers), no Bridge is needed.
You can also connect the [Finisher adapter] to the stacker/stapler. A Bridge is needed to connect the [Finisher adapter] to the stacker/stapler. The Bridge replaces the upper tray of the stacker/stapler. The other tray and all (optional) functionality (stacking, stapling, punching, and saddle stitching) remain available.
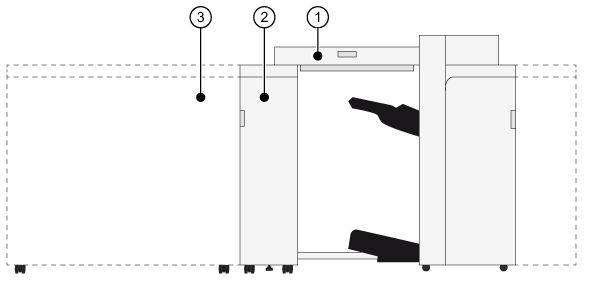 Bridge and finisher adapter
|
Description |
|
|---|---|
|
1 |
Bridge (Finisher Bridge-A ) to connect the finisher adapter to the stacker/stapler |
|
2 |
Finisher adapter (DFD Adapter-B ) to connect the DFD |
|
3 |
DFD to finish printed output |