
We understand the importance of tracking printer usage and ensuring that costs are accurately allocated to the right users, departments, and projects. With PRISMAlytics Accounting, you can now effortlessly monitor printing, copying, and scanning activities. This not only helps you keep track of these costs but also enables you to turn them into chargeable income.
The users with the admin role can include custom fields in the [CAD/GIS usage] report for all enrolled colorWAVE & plotWAVE devices by navigating to the [Configurations] workspace in the app menu, selecting the [colorWAVE & plotWAVE Accounting Dialog], and specifying valid values for each field, which the printer logs and the application collects.
The [Publish] button will push the new settings to ALL colorWAVE & plotWAVE printers enabled for PRISMAlytics Accounting in the tenant!
If the [Publish] operation fails (for instance, the connection to the device or cloud proxy is interrupted during the update), an error message will provide information needed for troubleshooting.
You will need to enable the device to 'force' user to use the accounting dialog.
This can be found in - like in the screenshot below:
For the devices capable of scanning and copying, also enable the setting [Force entry of accounting data for copy and scan jobs].
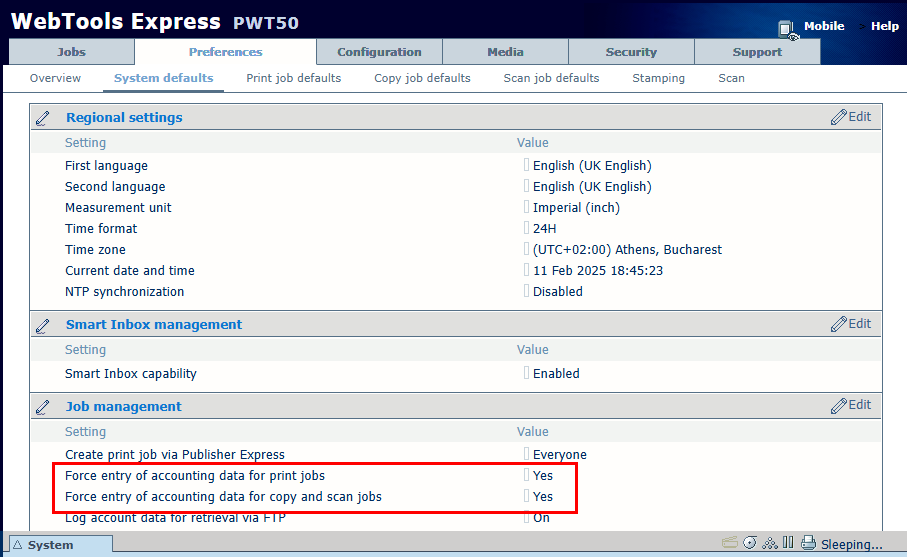 [WebTools Express] settings
A series of maximum 10 custom fields from the device's accounting dialog can be mapped for inclusion into the report. Each of those fields has an ID and can receive a friendly name. The type of data can be changed independent of the actual data supplied by the device.
Changing the friendly name may cause inconsistencies if the actual content is different.
A basic understanding of the accounting dialog feature of the colorWAVE & plotWAVE printers is expected from the user.
Navigate to the .
For each field in the colorWAVE & plotWAVE table you want to see in the [CAD/GIS usage] report, select the [Enabled] button
[On]
Field will be visible in the report.
[Off]
Field will not be visible in the report.
Once you enabled one of the fields, you will be able to work with the rest of the settings in the [Properties] panel.
Press [Publish].
Warning: Operation is performed on ALL the colorWAVE & plotWAVE devices currently enrolled in this tenant.
Each field with the [Enabled] status set to [On] can be managed in this panel.
|
Field |
Description |
Details |
|---|---|---|
|
[Name] |
You need to provide a name for the mapped custom field. |
Contains free text, no restrictions. By default, the initial value is the content of the field [ID]. This name is going to be visible on the printer's UI, as well as on the [CAD/GIS usage] report's header. |
|
[ID] |
Read-only descriptor |
This [ID] is needed by the app. Provide a [Name] for the fields in use. |
|
[Type] |
Select the type of the values in this field:
|
|
|
[Depends on] |
Select which of the enabled custom fields should be used as dependent. |
Initially, the list contains only the [None] item. Use [None] to delete the dependency. In the examples provided, for instance, if you have a list of departments and each department has their own project(s), users in one department cannot select other departments projects. This ensures the right project is selected when prints are sent for printing. Only one of the fields can be used as source for the [Depends on], but more fields can depend on it. |
|
[Required] |
Three possibilities: [No], [Always] or [On device] |
Older models contain a third value, [On device] which is no longer in use. |
|
[Clear] |
Toggle values, ON for [Clear], OFF for [Keep] |
|
Please exercise caution as it is not possible to test the changes before publishing them.
If the [Publish] operation fails, an error message will provide information needed for troubleshooting.
Possible reasons for the failure: printer is disconnected; printer is turned off; network malfunction.
The app is unaware about devices having different definition for the custom fields. It is up to the admin to ensure the synchronicity of the settings in this dialog for all relevant devices.
Since you are using a Cloud Proxy connected device, the data folder containing the Cloud Proxy contains a series of relevant information.
This folder contains a colorWAVE & plotWAVE folder with separate XML files for each printer, logging changes in this accounting dialog being sent to the printers. Each [Publish] creates new XML files per each printer in this folder.
The location of the folder is configurable. Navigate to to find the exact location of the folder.
In case of problems you cannot solve on your own, you need to contact the support organization. You will be asked to navigate to this folder and provide some of the logging files from that location.