
The following tables show the print job properties you can change on the control panel.
This topic describes the following settings:
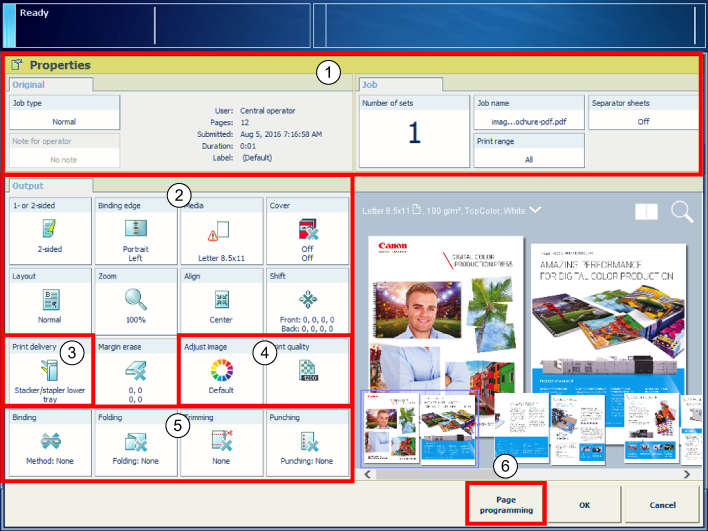
General job settings
Layout settings
Delivery settings
Print quality settings
Finishing settings
Page programming settings
|
Job setting |
What you can define |
|---|---|
|
[Job type] |
Job type Indicate the type of job:
|
|
[Note for operator] |
Job instruction Read the instruction from the sender. |
|
[Number of sets] [Check first set] |
Number of sets Indicate the number of sets:
|
|
[Job name] |
Job name Enter a new name for the job. |
|
[Print range] |
Print range Indicate if you want to print all pages or records, or want to select a print range. |
|
[Separator sheets] |
Separator sheets Indicate if you want to add separator sheets to distinguish individual sets. The media that are used for separator sheets are configured in the Settings Editor. (Configure media of banner pages, trailer pages, tickets, separator sheets, and covers) Configure in the Settings Editor if you want to use banner and trailer pages to distinguish individual jobs. (Configure banner pages and trailer pages) |
|
[Accounting ID] |
Accounting information Enter information for billing and charging job costs:
|
|
Job setting |
What you can define |
|---|---|
|
[1- or 2-sided] |
Sides to print on Indicate if the prints are printed on one or both sides. |
|
[Binding edge] |
Orientation and binding location The orientation of the content is part of the original settings and cannot be changed. You can change the binding edge: the sheet edge to which the previous page is bound. |
|
[Media] |
Media Select the media for the job. |
|
[Cover] |
Usage of covers Indicate if you want to use covers and select the cover media. You can also indicate if you want to print on one or both sides of the cover. The default media that are used for covers are configured in the Settings Editor. (Configure media of banner pages, trailer pages, tickets, separator sheets, and covers) |
|
[Layout] |
Layout of the pages on the sheets Indicate if and how you want to print more than one page of a document on a single side:
|
|
[Zoom] |
Scaling factor Indicate if you want to scale the image according to the page size, or set the zoom factor manually (25% - 400%). |
|
[Align] |
Alignment of the image to a sheet location Indicate how you want to align the image on the sheet: to a corner, edge or to the middle of a sheet. |
|
|
Mirrored and shifted page layout Indicate if you want to apply a margin shift. When you adjust the default margin shift you create more or less space at the location of the binding edge, with a maximum shift of 100 mm / 3.94". Indicate if you want to use an image shift. When you adjust the image shift you move the image on the sheet, with a maximum shift of 100 mm / 3.94". |
|
[Margin erase] |
Erase the margin of an image Indicate if you want to erase the margins of the image. When you adjust the margin erase you erase areas of the image, with a maximum of 100 mm / 3.94". |
|
Job setting |
What you can define |
|---|---|
|
[Print delivery] → [Output tray] |
Output tray Indicate which output tray to use. The selected finishing method can require a specific output tray. |
|
[Print delivery] → [Sort] |
Sorting method Indicate how you want to sort the output, [By page] or [By set] |
|
[Print delivery] → [Offset stacking] |
Stacking method Indicate if you want stacking with or without an offset. Offset stacking depends on the active workflow profile. (Choose a workflow profile) |
|
[Print delivery] → [Advanced settings] |
Delivery method Indicate the delivery method of the sheets in the output tray of your choice:
|
|
Job setting |
What you can define |
|---|---|
|
[Adjust image] |
Adjustment of CMYK values on job level Adjust the CMYK curves on job level when needed. The PRISMAsync Print Server color management and print engine ensure optimal color reproduction on the media you use. However, sometimes you want to edit CMYK values at the job level for a better result. (Adjust CMYK curves for a job) |
|
|
Selection of the color preset If required, select a default color preset for the job:
|
|
|
Definition and adjustment of the color preset Adjust the color settings of the selected color preset and save the color preset if required. The color presets are also created in the Settings Editor. (Configure color presets) |
|
:
|
Input profile and rendering intent Indicate which input profiles and renderings intents you want to use. Furthermore, you can indicate if embedded profiles and embedded rendering intents must be overruled. For CMYK you can indicate if the color management system must preserve pure process colors or comply to standard color management rules. |
|
|
Spot color matching Indicate if you want to use the spot color table that stores standard and custom spot colors. Spot colors are managed in the Settings Editor, but they can also be added with the spot color editor. (Create a spot color) |
|
|
Halftone selection Indicate if you want to change the default selection of the halftones:
|
|
|
Other color presets There are several other color settings, each for a specific situation:
|
|
|
Print resolution Indicate the print resolution. |
|
|
Color bars on the printed output Indicate if you want to print an extra color bar on the printed output to check the ink density, dot grain and contrast. Color bars are created in the Settings Editor. (Configure color bars) |
|
|
Values of used color settings on printed output Indicate if you want to print the values of the used color settings on the printed output. Information bars are created in the Settings Editor. (Configure information bars) |
|
|
Print quality adjustments There are several settings available to adjust the print quality:
|
|
|
Page numbering Indicate if you want to have page numbers on the printed documents. |
|
Job setting |
What you can define |
|---|---|
|
[Binding] |
Binding method Indicate how to bind your document. |
|
[Folding] |
Folding method Indicate how to fold the printed documents . |
|
[Trimming] |
Trimming method Indicate how to trim the printed documents. |
|
[Punching] [Creasing] |
Punching or creasing method Depending on the current, installed die set on the printer, indicate either the method of punching or the method of creasing. |
|
Job setting |
What you can define |
|---|---|
|
[Insert] |
Additional pages Add a page before or after one or more page ranges or subsets. |
|
[Delete] |
Removal of pages Delete one or more page ranges or subsets. |
|
[Select] |
Selection of job parts Select page ranges or subsets according to selection criteria. |
|
[Merge] |
Merging subsets Select subsets to merge. |
|
[Split] |
Splitting subsets Select a subset to split into the original subsets. |
|
[Merge finishing] |
Finishing settings for subsets Select one or more subsets to apply the finishing properties. |
|
[Split finishing] |
Original finishing settings for subsets Select a subset to use the finishing properties of the original subsets. |