
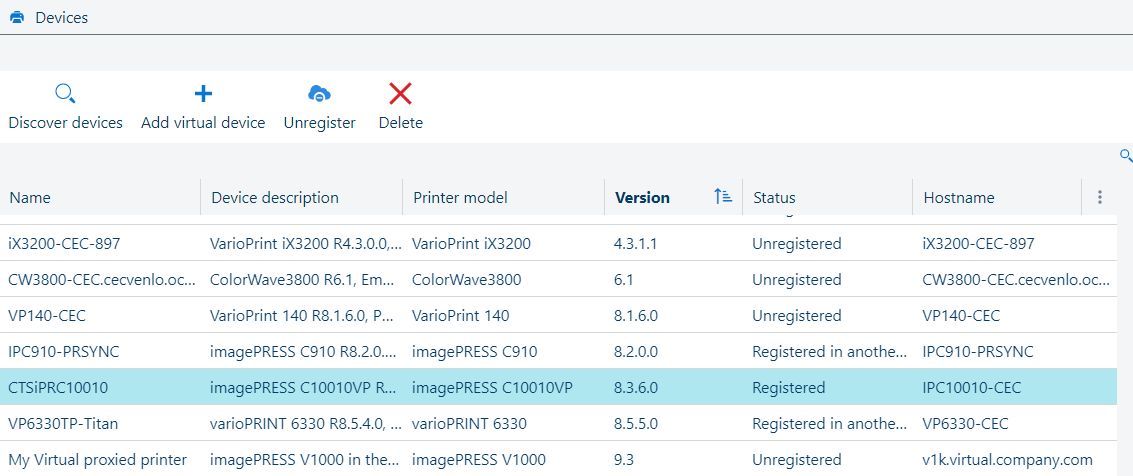
All the cloud applications use the devices set up in this workspace.
You first need to add devices to this list and mark them as [Registered].
Once a device in the list is selected, depending on its status, certain operations become available.
Use the icons on the selected row to change the device state:
Delete the device:
![]()
This operation will remove the device from the list.
Applications and other users will no longer be able to access this device.
Register the device:
![]() .
.
This operation will register the device for use by the users of the current tenant.
This operation is only available for [Unregistered] devices.
Unregister the device:
![]() .
.
This operation will keep the device in the list, but applications and other users will no longer be able to access this device.
This operation is only available for [Registered] devices.
Take over the device from another tenant:
![]() .
.
This operation will register the device for use by the users of the current tenant.
This operation is only available for devices that are already [Registered] by another tenant.
Edit details
The details pane lets you change some of the device's parameters.
For physical devices, you can only change the [Name]
For virtual devices, you can change any of the fields, except [IP address] and [Device ID].
Navigate to [Devices] .
Click [Discover devices].
Type in a range of IP addresses from the local network.
If you want to add a specific, singular IP, fill in both fields with the same address.
You cannot change the network mask, so only the devices connected to the same network will be visible.
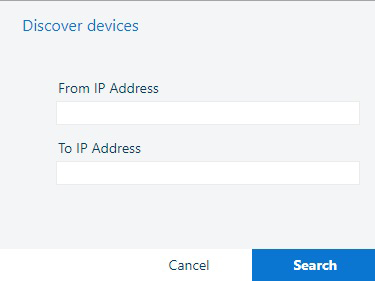
Click [Search].
Click [OK] to save the new device.
Click
![]() to register the device in your tenant.
to register the device in your tenant.
If a device has no serial number, or it cannot be automatically read, the Cloud Proxy will prompt you to type it in. Normally, the serial number should be available in devices's menus.
[Add virtual device] is a solution for a demo when no real devices are available. The advantage of using a virtual devices is their immediate availability and lack of connection issues. You will have to input values for all the fields in the [Devices] table.
You need to also supply a value for 2 internally used fields: [SNMP device description] and [SNMP system description].
Please use the exact same content in those fields as for the [Device description] field.
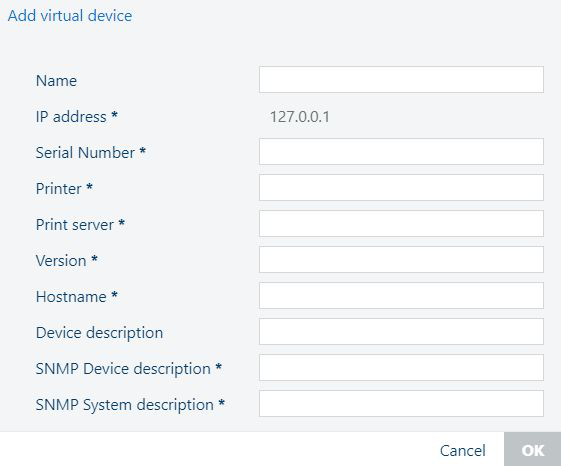
Fields marked with * cannot be empty.
The [IP address] field cannot be changed.
For each device, you are presented with the following information:
|
Column header |
Description |
|---|---|
|
[Name] |
Name of the device. |
|
[Device description] |
Full description of the device. When adding a virtual device, use the same value for the internal fields [SNMP device description] and [SNMP system description]. Those fields do not appear in the table and can only be seen in the [Details] panel, when a virtual device is selected. |
|
[Printer model] |
Device model. |
|
[Serial Number] |
The serial number of the device. If this field is empty, the device cannot be registered. |
|
[Version] |
Version of software installed on the device. |
|
[Status] |
A device, once added to the list, can have one of the following states:
|
|
[IP address] |
The network IP address of the device. |
|
[Hostname] |
The network host name, if available. |
All the information in the list of devices is taken directly from the device, and cannot be changed.
One exception: you can change the [Name] for a device, and replace it with something easier to remember.
For the virtual devices, [IP address] cannot be changed.
Click [Save] after changing the name.