
The [Layers] tab displays a graphical representation of the layers of your application.
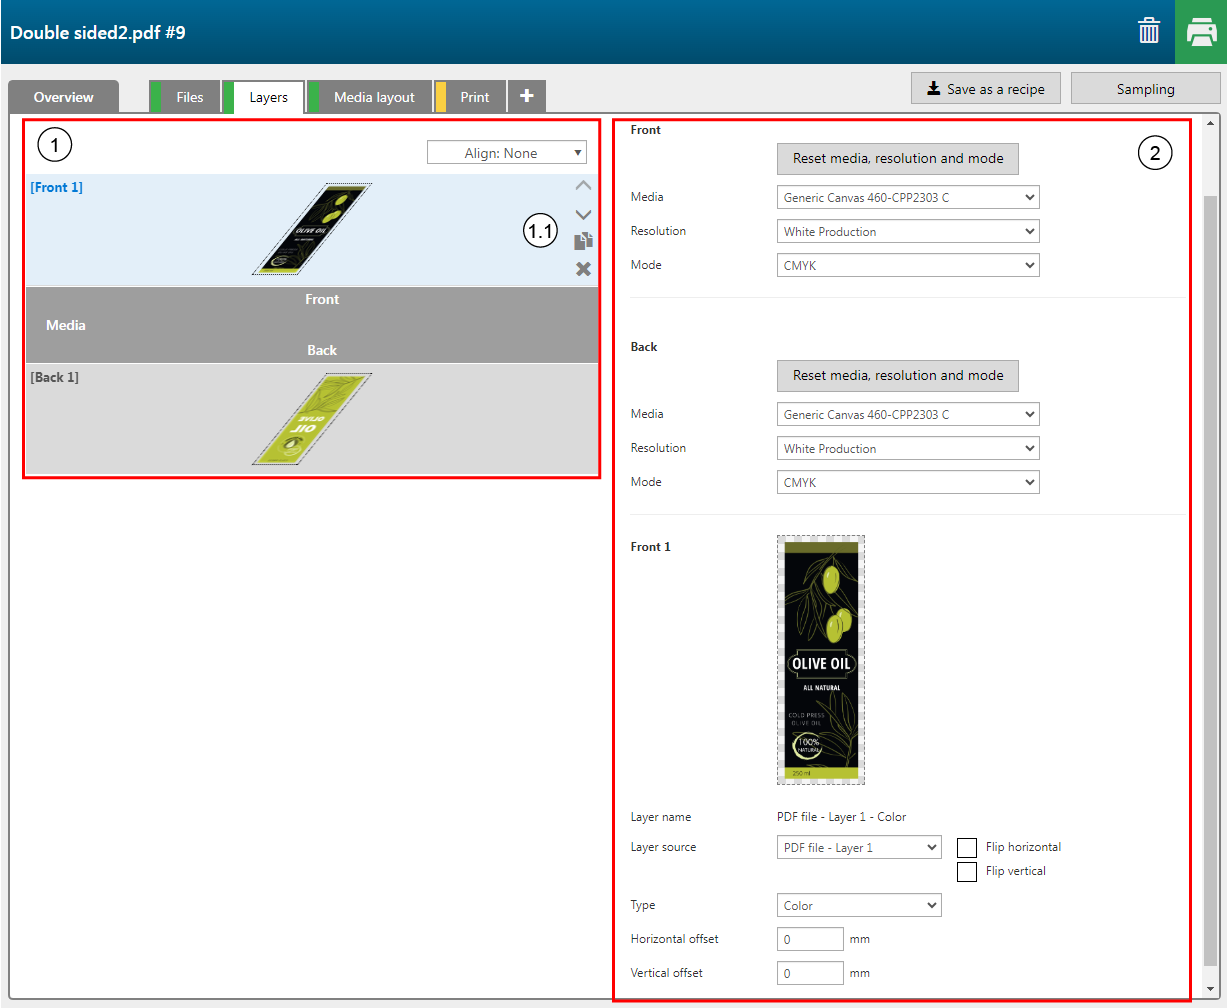
To select a specific layer, click on the layer.
The icons allow you to easily duplicate or delete layers, or change the position of the layer. Also, you can drag-and-drop the layers to a different position.
The maximum number of layers for Colorado M-series are Resolution dependent. Each Resolution allows a specific maximum number of layers. The Quality and Specialty print mode allow up to 5 layers, while other print modes allow 3, 2 or only 1 layer.
In the [Layers] tab you can merge two or more layers to one layer.
Hold down the [Control] key to select the layers.
Click the [Merge selected layers] button

Per layer, you can define the following advanced layer settings.
|
Settings category |
Setting |
Description |
|---|---|---|
|
[Front] / [Back] |
Select the specifications for [Front] and [Back]. |
|
|
[Media] |
Media available for your Colorado printer |
Select the media type for your artwork. If you want to reset to its original value, click the button: [Reset media, resolution and mode]. |
|
[Resolution] |
Resolutions available for the selected media |
Select the resolution that you want to use. You can choose different resolutions for the [Front] and [Back]. |
|
[Mode] |
The ink configuration setting |
|
|
[Layer name] |
The name of the layer that is defined in the recipe. |
|
|
[Layer source] |
PDF page, layer or spot color within a design on a specific page |
Select the pages, layers or spot colors in your design that should be used as input for the layer in the recipe. When you use a spot color as [Layer source], the spot color in your design must have the overprint property applied to. Spot color elements with gradients will be handled as raster images. Tick the option [Flip horizontal] or [Flip vertical] if you want the information in your layer to be flipped horizontally or vertically. |
|
[Type] |
[Color] |
The entire PDF page or layer content is used as is (including spot colors) to produce the print layer. |
|
[White Source] |
The layer is printed in white only. Opacities and transparencies defined in the input file are preserved. |
|
|
[Image area mask] |
An image area mask is generated based on the PDF page, layer or spot color content. |
|
|
[Bounding box mask] |
A mask is generated as big as the PDF page that is used as source for this layer. |
|
|
[Keep vector data] |
When the checkbox is not ticked, the complete layer will be rasterized. Areas in the [Media color], which is by default white, will become transparent. Tick the checkbox to preserve the vector data. The vector objects will stay opaque. |
|
|
[Max raster DPI] |
Define the DPI for the mask layers. This is to keep the print jobs manageable. The [Actual DPI: {0}] shows the maximum DPI depending on the size of the layer. You can set the value lower but not higher. When you do, the higher value will be disregarded.
|
|
|
[Color] |
[White] |
Select the color of the mask. This option is only available when you select [Type] - [Image area mask] or [Type] - [Bounding box mask]. [Gloss] defines the area to be printed in gloss. [No Color] is used to create a mask layer. Merged together with another layer the mask layer extracts content from that layer. The extracted content will not be printed. |
|
[Block-out (black)] |
||
|
[Gloss] |
||
|
[No Color] |
||
|
[Custom color] |
[Custom color], allows you to enter CMYK values to specify the color of the mask. 
|
|
|
[Opacity] |
0 to 100% |
Select the opacity of the color of the information in the layer. This option is only available when you select [Type] - [Image area mask] or [Type] - [Bounding box mask]. |
|
[Tint] Only available for Colorado M-series printer. |
0 to 100% |
This option is only available for the Colorado M-series printer. Select the [Tint] of the color of the information in the layer. The layer is built up with black and white. The maximum use of black is set to 60 %. This option is only available when you select [Type] - [Image area mask] or [Type] - [Bounding box mask] and select [Block-out (black)] as color. |
|
[Media color] |
Color |
Select the color of the media. When you use raster images, the software can isolate the media color to identify the image area. This option is only available when you select [Type] - [Image area mask]. |
|
[Threshold] |
Positive numeric value |
The value is used to define how precisely the color of a pixel must match the media color in order to isolate it from the image area. When you create a white mask, you typically use larger values if you want to make sure there are no white pixels on the edges if the image has a lossy compression. This option is only available when you select [Type] - [Image area mask]. |
|
[Fill choke/spread] |
Negative or positive numeric value (pixels) |
Enter a positive value if you want the image area mask to be printed slightly smaller (choke) than the color image. Enter a negative value if you want the image area mask to be printed slightly larger (spread) than the color image. This option is only available when you select [Type] - [Image area mask]. |
|
[Horizontal offset] |
Negative or positive numeric value (mm) |
Offsets allow you to do the following:
|
|
[Vertical offset] |
Negative or positive numeric value (mm) |