Loading

Configure printer adjustments

Be aware that the printer adjustment settings affect all print jobs.

When you want to

Solution

Go to the printer adjustment settings

  1. Open the Settings Editor and go to: [Preferences]  → [System adjustments].

Finisher adjustments

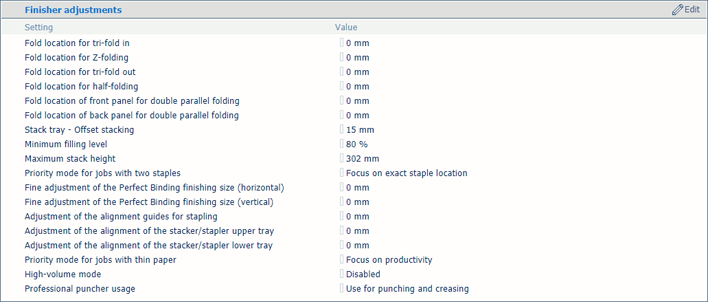
Finisher adjustment settings

When you want to

Solution

Adjust fold locations

  1. Go to the folding option you wan to adjust:

    • [Fold location for tri-fold in]

    • [Fold location for Z-folding]

    • [Fold location for tri-fold out]

    • [Fold location for half-folding]

    • [Fold location of front panel for double parallel folding]

    • [Fold location of back panel for double parallel folding]

  2. Define the adjustment value.

  3. Click [OK].

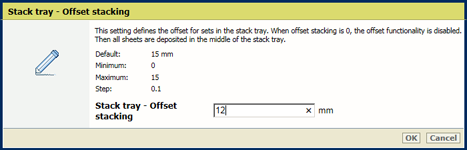
Enable offset stacking in the stack tray

  1. Go to [Stack tray - Offset stacking].

  2. Define the offset stacking value.

  3. Click [OK].

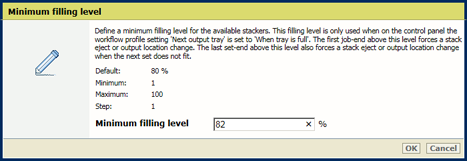
Define the minimum filling level of the stackers

  1. Go to [Minimum filling level].

  2. Define the level.

  3. Click [OK].

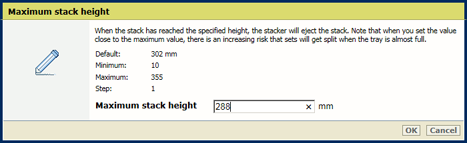
Define the maximum stack height of the stackers

  1. Go to [Maximum stack height].

  2. Define the height.

  3. Click [OK].

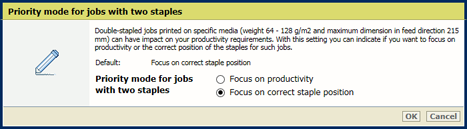
Productivity or correct staple position for jobs with two staples

  1. Go to [Priority mode for jobs with two staples].

  2. Select the priority.

  3. Click [OK].

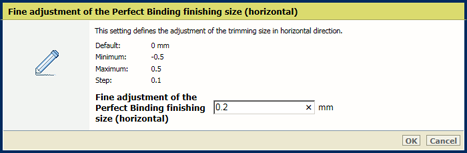
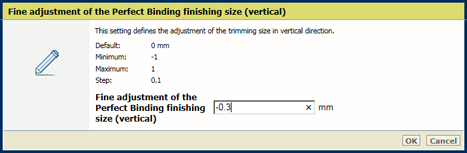
Adjust the trimming size of the Perfect Binder

  1. Go to [Fine adjustment of the Perfect Binding finishing size (horizontal)].

  2. Adjust the horizontal size.

  3. Go to [Fine adjustment of the Perfect Binding finishing size (vertical)].

  4. Adjust the vertical size.

  5. Click [OK].

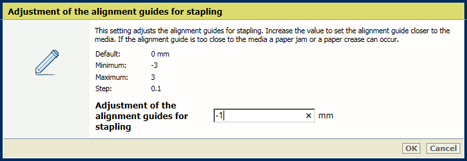
Adjust the alignment guides for stapling

  1. Go to [Adjustment of the alignment guides for stapling].

  2. Define the width.

  3. Click [OK].

Adjust the alignment of the stacker / stapler trays

  1. Go to [Adjustment of the alignment of the stacker/stapler upper tray].

  2. Adjust the alignment for the upper tray.

  3. Go to [Adjustment of the alignment of the stacker/stapler lower tray].

  4. Adjust the alignment for the lower tray.

  5. Click [OK].

Productivity or sheet alignment for jobs with thin paper

  1. Go to [Priority mode for jobs with thin paper].

  2. Select the priority.

  3. Click [OK].

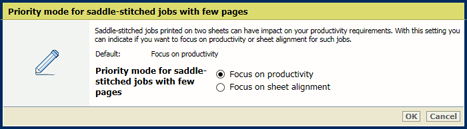
Productivity or sheet alignment for saddle-stitched jobs with few pages

  1. Go to [Priority mode for saddle-stitched jobs with few pages].

  2. Select the priority.

  3. Click [OK].

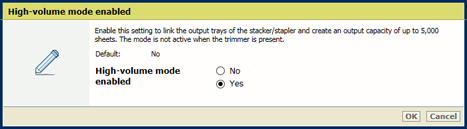
Enable high-volume stacking for the stacker / stapler

  1. Go to [High-volume mode].

  2. Select the priority.

  3. Click [OK].

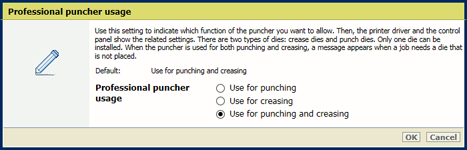
Define how the professional puncher may be used

The professional puncher usage can be defined by the system administrator.

  1. Go to [Professional puncher usage].

  2. Define the usage.

  3. Click [OK].

Print quality adjustments

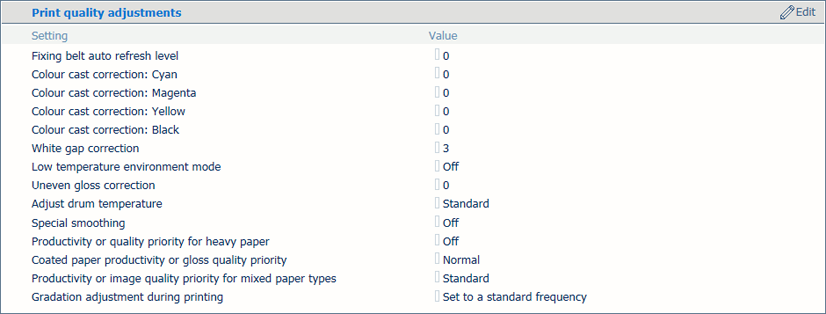
Settings for print quality adjustments

When you want to

Solution

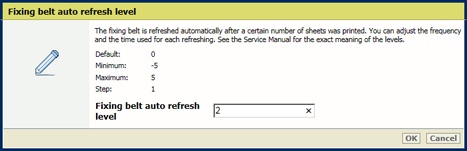
Adjust when and how long the fixing belt needs to be refreshed

  1. Go to [Fixing belt auto refresh level].

  2. Adjust the default level.

  3. Click [OK].

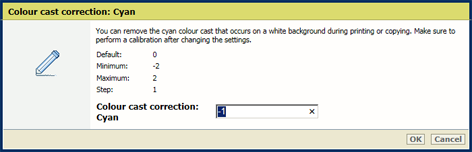
Remove a colour cast that occurs on a white background

  1. Go to the settings:

    [Colour cast correction: Cyan]

    [Colour cast correction: Magenta]

    [Colour cast correction: Yellow]

    [Colour cast correction: Black]

  2. Adjust the default correction level.

  3. Click [OK].

  4. Perform a printer and media family calibration. (Learn about calibration)

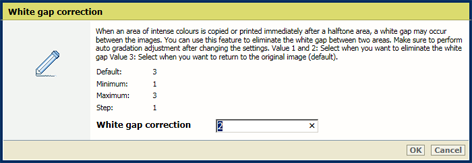
Remove white gaps between areas

  1. Go to [White gap correction].

  2. Adjust the default level.

  3. Click [OK].

  4. Perform an automatic gradation adjustment. (Learn about calibration)

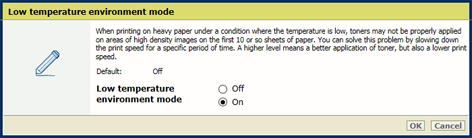
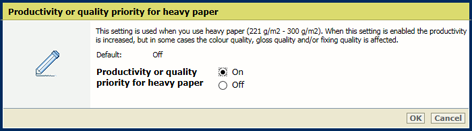
Increase print quality for jobs on heavy paper but with loss of print speed
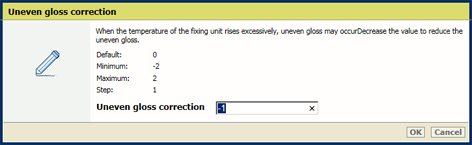
  1. Enable the setting [Low temperature environment mode].

  2. Click [OK].

Remove uneven gloss

  1. Go to [Uneven gloss correction].

  2. Decrease the level to reduce the uneven gloss.

  3. Click [OK].

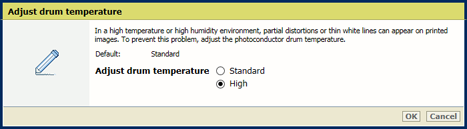
Remove partial distortions or thin white lines due in an environment with high temperature or high humidity

  1. Go to [Adjust drum temperature].

  2. Increase the drum temperature.

  3. Click [OK].

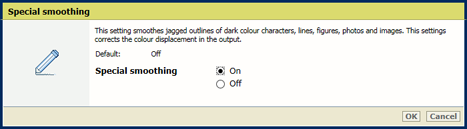
Smoothen jagged outlines

  1. Go to [Special smoothing].

  2. Enable the setting.

  3. Click [OK].

Increase productivity for jobs with heavy media but with loss of print quality

  1. Go to [Productivity or quality priority for heavy media].

  2. Select the required setting.

  3. Click [OK].

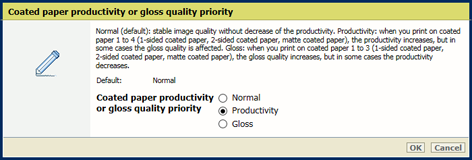
Increase productivity for jobs with coated media but with loss of print quality

  1. Go to [Productivity or gloss quality priority for coated media].

  2. Select the required setting.

  3. Click [OK].

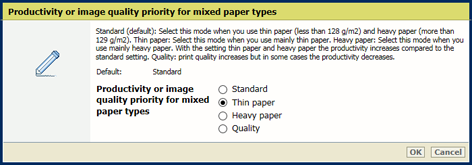
Increase print quality for jobs with mixed-size media but with loss of productivity

  1. Go to [Productivity or image quality priority for mixed media].

  2. Select the required setting.

  3. Click [OK].

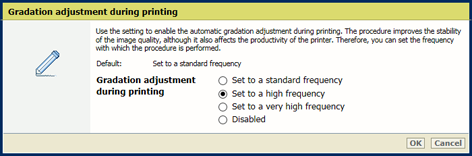
Increase the frequency of the gradation adjustment during printing but with loss of productivity

  1. Go to [Gradation adjustment during printing].

  2. Select the required setting.

  3. Click [OK].

Scan quality adjustments

Settings for scan quality adjustments

When you want to

Solution

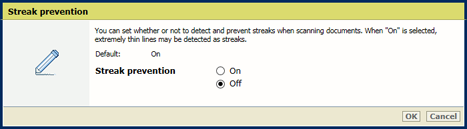
Scan documents with extreme thin lines

  1. Go to [Streak prevention].

  2. Disable the setting.

  3. Click [OK].