|
Go to the hotfolders
|
-
Open the Settings Editor and go to: .
|
|
Enable and configure the hotfolder function
|
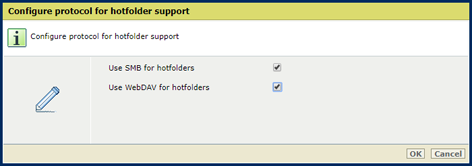
-
Click [Configure].
-
Select the protocols you want to use.
-
Click [OK].
|
|
Add a hotfolder
|
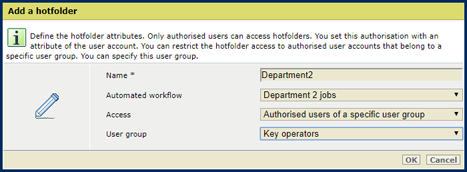
-
Click [Add].
-
Enter a name for the hotfolder.
-
Select the automated workflow that has the required job settings.
-
Define the access rights
-
Select [All authorized users] when all authorized user accounts are allowed to access this hotfolder.
-
Select [Authorized users of a specific user group] when all authorized user accounts of a specific user group are allowed to access this hotfolder.
-
Select the user group if you indicated that in step 4.
-
Click [OK].
|
|
Edit a hotfolder
|
-
Select a hotfolder.
-
Click [Edit].
-
Change the required attributes.
-
Click [OK].
|
|
Delete a hotfolder
|
-
Select a hotfolder.
-
Click [Delete].
|
|
Define the order in which hotfolder jobs are handled
|
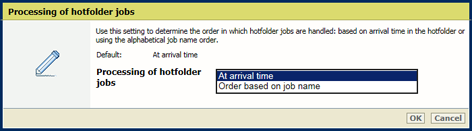
-
Open the Settings Editor and go to: .
-
Go to [Processing of hotfolder jobs].
-
Indicate the order in which hotfolder jobs are handled.
-
Click [OK].
|
|
Create a shortcut to a hotfolder on a Windows system
|
-
Start the standard Windows wizard to map a network drive.
-
Use the link to connect to the PRISMAsync hotfolder to share documents or files.
-
Enter the path to the hotfolder.
This path is displayed in the hotfolder settings in the Settings Editor.
-
For WebDAV use the format: http(s)://<hostname>/dav/<hotfolder name> or http(s)://<IPaddress>/dav/<hotfolder name>.
-
For SMB use the format: \\<hostname>\<hotfolder name> or \\<IPaddress>\<hotfolder name>.
-
Enter the username and password.
-
Enter a name for the network location.
-
Drag and drop the hotfolder to your desktop.
|
|
Create a shortcut to a hotfolder on a MAC system
|
-
Open the Finder.
-
Click .
-
Enter the path to the hotfolder.
Use the format: http://<IPaddress>/<hotfolder name> or http://<hostname>/<hotfolder name>
This path is displayed in the hotfolder settings in the Settings Editor.
-
Click [Connect].
-
Enter the username and password.
After approval of the login information, the Finder opens and automatically opens the mounted drive with the hotfolder name.
|
|
Create a JDF ticket for a hotfolder
|
-
Click [Ticket editor].
-
Make the required settings.
-
Click [Save ticket].
-
Open the folder where the ticket is saved from your web browser.
-
Drag and drop the ticket into the hotfolder.
-
Make sure the [Overrule job ticket] option of the corresponding automated workflow is unchecked. (Configure automated workflows)
|

 Hotfolders