
There are several starting points to use the imagePRESS V1350. Whether you access the printer via the control panel or remotely via PRISMAremote Manager / PRISMAsync Remote Manager Classic, you quickly find your way while operating the imagePRESS V1350. All interfaces have the same design approach and look and feel.
You can submit jobs with PRISMAsync Remote Printer Driver, PRISMAremote Manager / PRISMAsync Remote Manager Classic, PRISMAprepare, PRISMAproduction, UPD printer driver or Mac driver.
You edit or plan jobs on the control panel or with PRISMAsync Remote Manager. The control panel, PRISMAremote Manager / PRISMAsync Remote Manager Classic and PRISMAremote Monitoring show upcoming actions and messages. That way, you get informed about all upcoming and immediate tasks.
You configure the imagePRESS V1350 from the web-based configuration tool, the Settings Editor, and the control panel.
This topic describes the following interfaces:
Control panel
PRISMAsync Remote Printer Driver
Settings Editor
PRISMAremote Manager / PRISMAsync Remote Manager Classic
PRISMAremote Monitoring
Below you find an introduction how to use the imagePRESS V1350 via the remote printer driver, control panel, PRISMAremote Manager / PRISMAsync Remote Manager Classic, PRISMAremote Monitoring, and web-based configuration tool, the Settings Editor.
The control panel is local point to operate the printer and the domain of the operator and the maintenance operator.
Many instructions in this operation guide explain job editing and job management from the control panel.
 Control panel
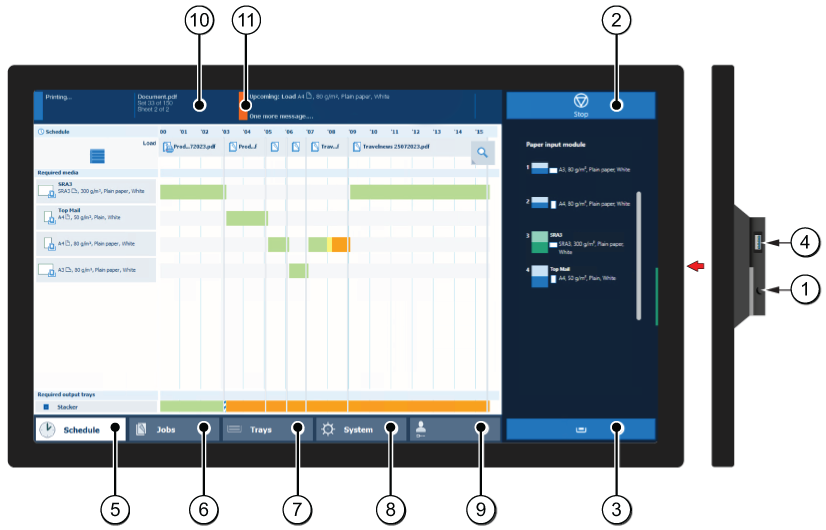
The table below describes the main parts of the control panel and their functions.
|
Component |
Function |
|
|---|---|---|
|
1 |
Sleep button |
Put the system into the sleep mode or wake up the system. |
|
2 |
Stop button |
Stop the printing process after a set or as soon as possible. |
|
3 |
Paper tray button |
Get immediate access to the [Trays] section on the control panel to do the following (for example):
|
|
4 |
USB port |
Use the USB port to enable printing from a USB drive or connect the i1Pro3 spectrophotometer. |
|
5 |
[Schedule] button |
Access the [Schedule] view to manage the jobs in the schedule. |
|
6 |
[Jobs] button |
Manage and print the jobs in the lists of [Waiting jobs], [Scheduled jobs] and [Printed jobs], or in a DocBox (optional). |
|
7 |
[Trays] button |
Access the [Trays] section on the control panel to do the following, for example:
|
|
8 |
[System] button |
Access the [System] section to do the following, for example:
|
|
9 |
Username |
The username of the user that is currently logged in. When you want to log in as another user, log out or change your password, use this button. |
|
10 |
Dashboard |
The dashboard displays information about the system status such as:
|
|
11 |
Status LED |
The status LED displays the status of the system:
|
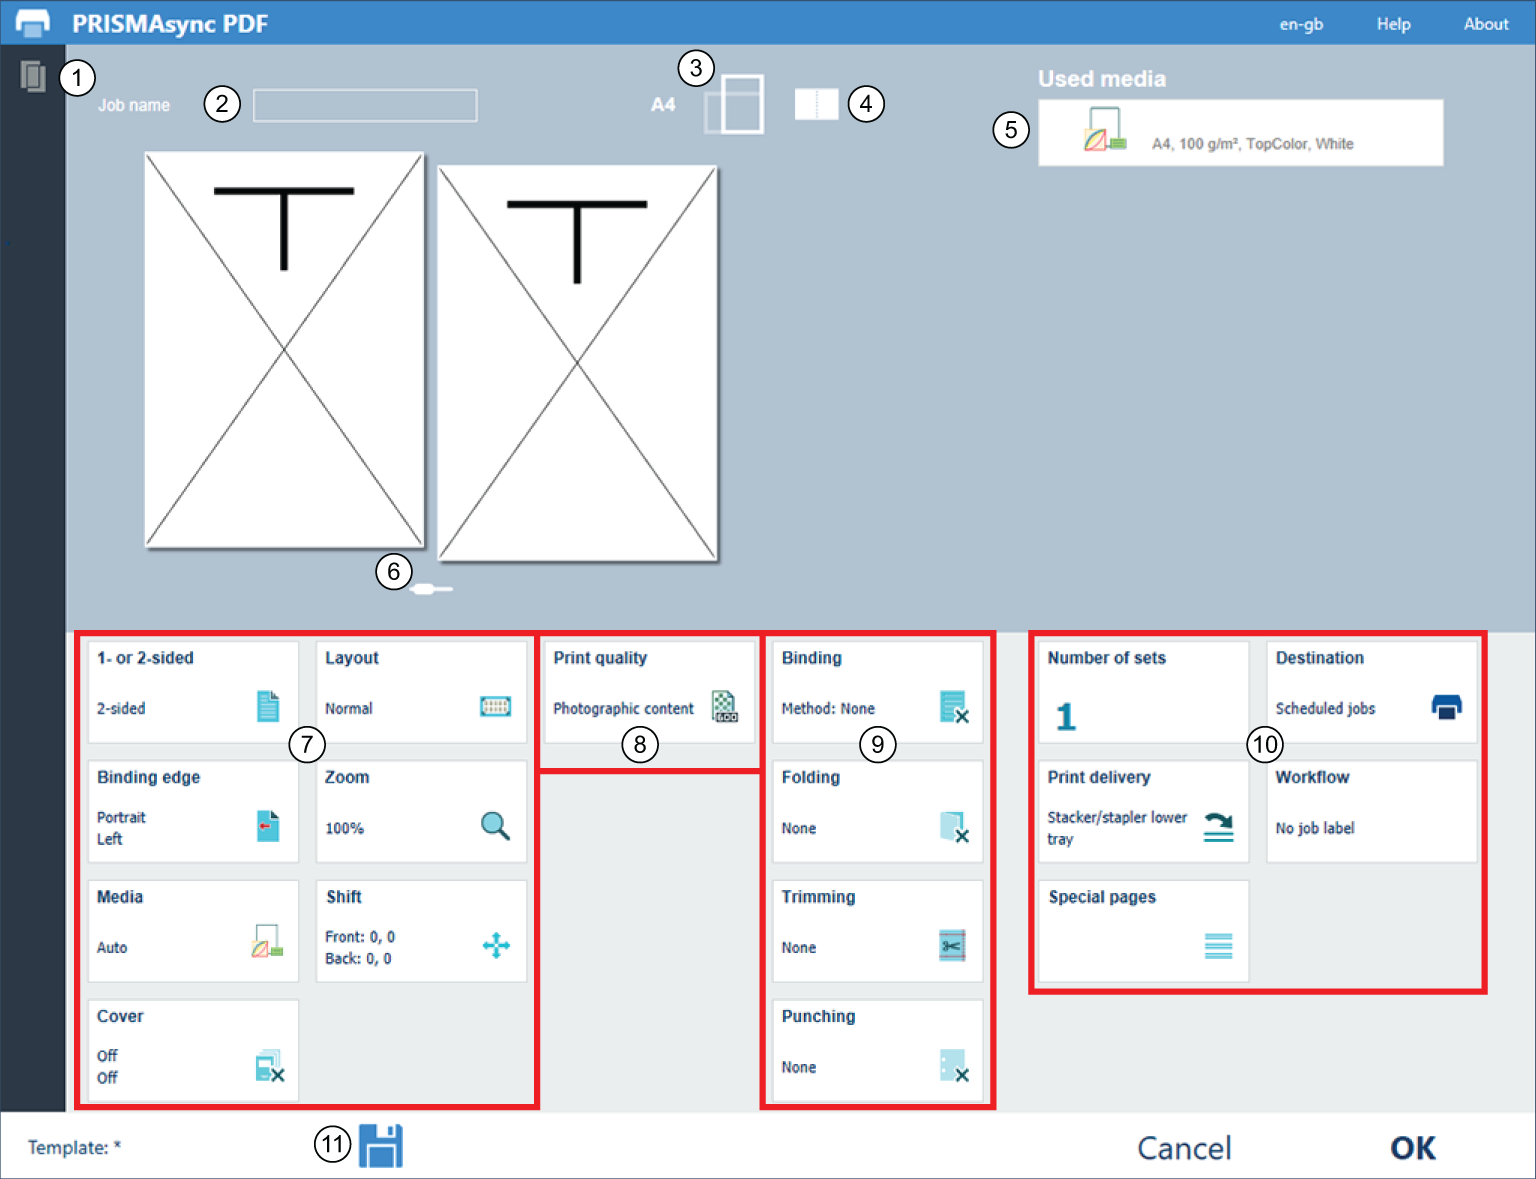
The printer driver is the remote point to prepare a print job from a desktop application, such as Microsoft Office and Adobe Acrobat. The job properties in the printer driver match the job properties on the control panel and PRISMAsync Remote Manager. A job submitted with the printer driver can easily be changed when the job is visible in the print queue on the control panel of in PRISMAremote Manager / PRISMAsync Remote Manager Classic.
In the illustration and table below, you see the main parts of the printer driver. Use the online help of the printer driver if you need more information.
 PRISMAsync Remote Printer Driver
|
Description control panel |
|
|---|---|
|
1 |
Printer status and available media |
|
2 |
General job settings |
|
3 |
|
|
4 |
|
|
5 |
|
|
6 |
|
|
7 |
Layout settings |
|
8 |
Colour quality and print quality settings |
|
9 |
Finishing settings |
|
10 |
Job production settings |
|
11 |
Job templates |
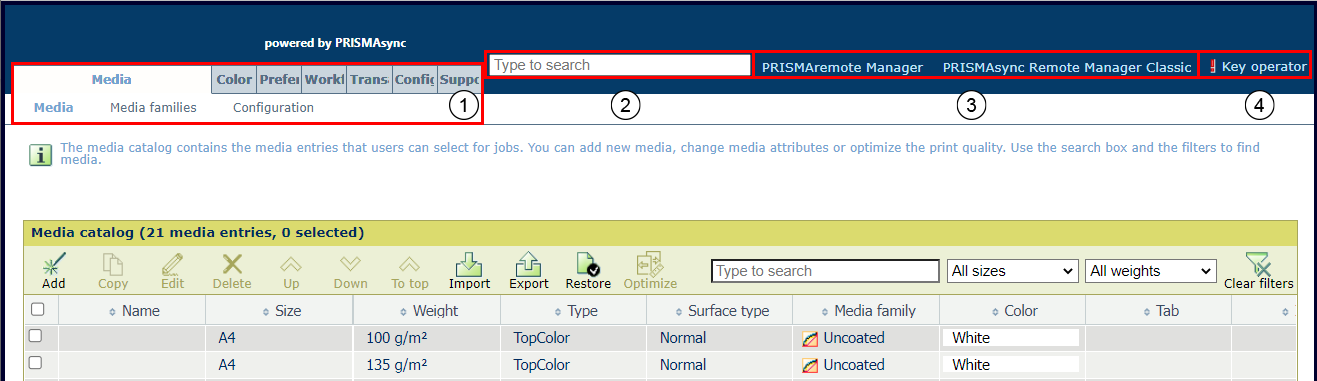
The Settings Editor is the location to configure the printer. The Settings Editor uses the same language as the web browser.
 Settings Editor
The table below describes the main parts of the Settings Editor.
|
Description |
|
|---|---|
|
1 |
The settings are grouped in main and sub tabs. |
|
2 |
Use the search box to quickly find a setting. |
|
3 |
Use the link to start PRISMAremote Manager / PRISMAsync Remote Manager Classic. |
|
4 |
Click the user name to log in to the Settings Editor, log out or change the password. A red exclamation mark indicates that a default password is used. You are advised to change default passwords. |
A setting can show an icon to provide more information on the use. The table below explains the icons.

|
Setting is editable |

|
Setting not editable |

|
Setting is also available on the control panel |

|
Setting can be changed with key operator or system administrator credentials |
PRISMAremote Manager / PRISMAsync Remote Manager Classic is a multi-printer schedule and remote management console to control PRISMAsync Print Server-driven printers.
This web-based tool helps central operators to manage their print production and to provide insight into the production schedules.
There are two versions of the tool. The main difference between the versions is that PRISMAremote Manager has a fully customisable user interface.
PRISMAremote Manager / PRISMAsync Remote Manager Classic enables to upload jobs, to edit job properties and to change the print queues from a remote location or workstation. Jobs can easily be rescheduled , relocated or changed before being printed.
You can start the tool from the Settings Editor.
 Start Remote Manager
Use the help function or user guide of PRISMAremote Manager / PRISMAsync Remote Manager Classic for more information.
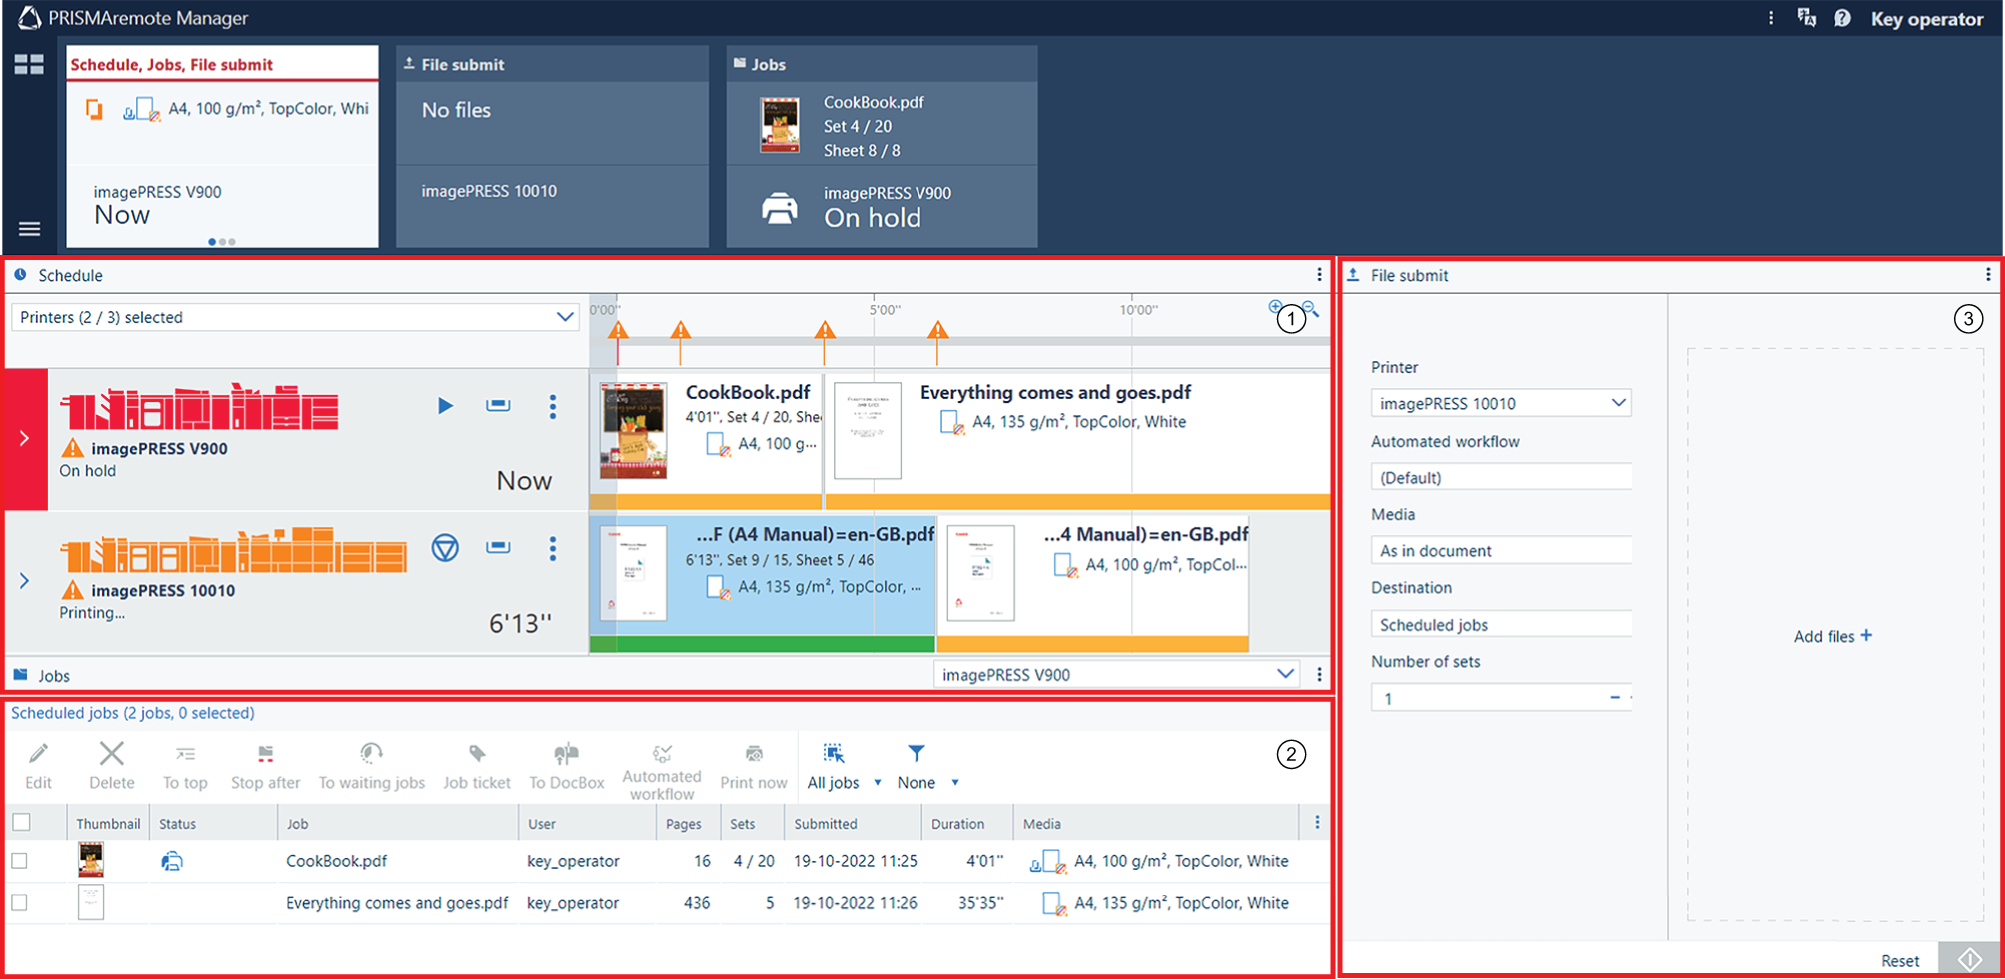 User interface of PRISMAremote Manager
|
Description |
|
|---|---|
|
1 |
A schedule that you can use to:
|
|
2 |
A list of scheduled jobs on a printer The toolbar has a number of buttons to edit, delete, move, apply automated workflow and print jobs. |
|
3 |
Submission of new print jobs |
The PRISMAremote Monitoring app helps the central operator to stay informed about the print production. Even at a distance.
You receive alerts when actions, such as loading media or adding consumables, are foreseen. Or, in case a problem at the printer asks for an immediate action.
The table below describes three screens of PRISMAremote Monitoring.
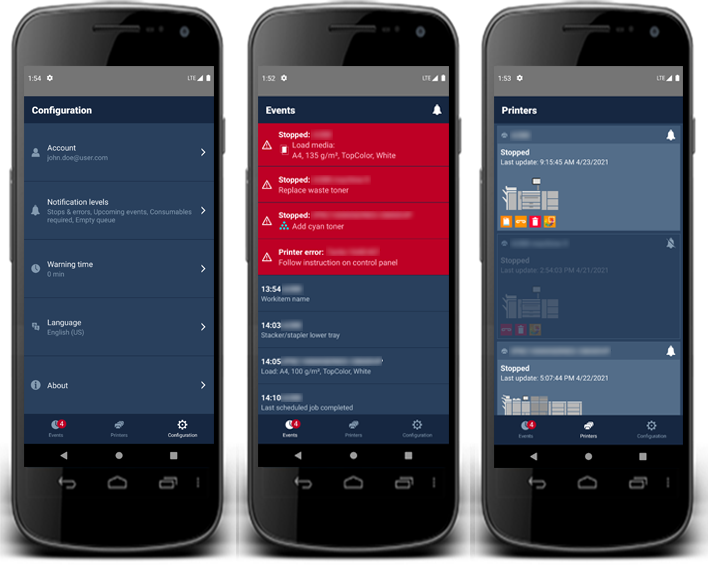 Screens with status and events on the smartphone
Refer to the quick reference guide of PRISMAremote Monitoring for more information.