Loading

Configure finisher settings

External finisher

An external finisher is made by an external company and is supported by the printer.

When you want to

Solution

Go to the external finisher settings

  1. Open the Settings Editor and go to: [Preferences]  → [Print job defaults].

Define how to continue when an error in the finisher was solved

  1. Go to [Error recovery method].

  2. Indicate if you want print the last set again or to continue after the last correctly printed sheet.

  3. Click [OK].

Define the default sheet orientation in the available output trays

  1. Go to [Preferred feed edge].

  2. Indicate the feed direction of the sheets on the output tray.

  3. Click [OK].

  4. Go to [Face orientation].

  5. Indicate if the front side of the sheets points up or down.

  6. Click [OK].

  7. Go to [Header orientation].

  8. Indicate if the header points to the front side of the printer or to the back side of the printer.

  9. Click [OK].

Define the default sheet order in the available output trays

  1. Go to [Preferred sheet order].

  2. Indicate the order of the printed sheets within a job set.

  3. Click [OK].

Define a meaningful name for the external finisher

  1. Go to [Name].

  2. Enter a name.

  3. Click [OK].

The name of the external finisher is visible in the job properties. Open the job properties and go to: [Print delivery]  → [Output tray].

Stacker / stapler

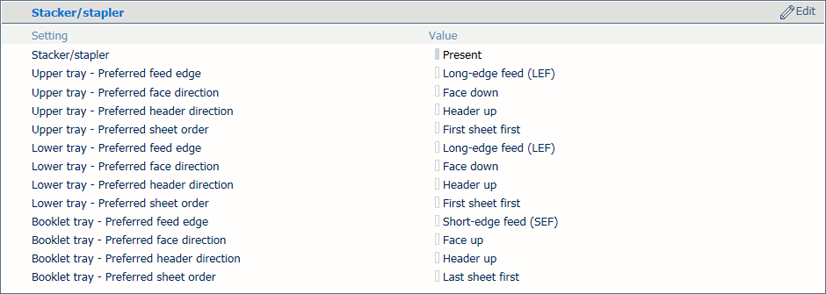
Stacker / stapler settings

When you want to

Solution

Go to the stacker / stapler settings

  1. Open the Settings Editor and go to: [Preferences]  → [Print job defaults].

Define the default sheet orientation in the available output trays

  1. Go to [Upper tray - Preferred feed edge], [Lower tray - Preferred feed edge] or [Booklet tray - Preferred feed edge].

  2. Indicate the feed direction of the sheets on the output tray.

  3. Click [OK].

  4. Go to [Upper tray - Preferred face direction], [Lower tray - Preferred face direction] or [Booklet tray - Preferred face direction].

  5. Indicate if the front side of the sheets points up or down.

  6. Click [OK].

  7. Go to [Upper tray - Preferred header direction], [Lower tray - Preferred header direction] or [Booklet tray - Preferred header direction].

  8. Indicate if the header points to the front side of the printer or to the back side of the printer.

  9. Click [OK].

Define the default sheet order in the available output trays

  1. Go to [Upper tray - Preferred sheet order], [Lower tray - Preferred sheet order] or [Booklet tray - Preferred sheet order].

  2. Indicate the order of the printed sheets within a job set.

  3. Click [OK].

High capacity stacker

There can be one or two high capacity stackers.

High capacity stacker settings

When you want to

Solution

Go to the high capacity stacker settings

  1. Open the Settings Editor and go to: [Preferences]  → [Print job defaults].

Define the default sheet orientation in the available output trays

  1. Go to [Top tray - Preferred feed edge] or [Stack tray - Preferred feed edge].

  2. Indicate the feed direction of the sheets on the output tray.

  3. Click [OK].

  4. Go to [Top tray - Face orientation] or [Stack tray - Face orientation].

  5. Indicate if the front side of the sheets points up or down.

  6. Click [OK].

  7. Go to [Top tray - Header orientation] or [Stack tray - Header orientation].

  8. Indicate if the header points to the front side of the printer or to the back side of the printer.

  9. Click [OK].

Define the default sheet order in the available output trays

  1. Go to [Top tray - Preferred sheet order] or [Stack tray - Preferred sheet order].

  2. Indicate the order of the printed sheets within a job set.

  3. Click [OK].

Define default offset stacking in the stack tray

  1. Go to [Stack tray - Offset stacking].

  2. Define the offset value. When the value is zero offset stacking is disabled.

  3. Click [OK].

Perfect Binder

Perfect Binder settings

When you want to

Solution

Go to the Perfect Binder settings

  1. Open the Settings Editor and go to: [Preferences]  → [Print job defaults].

Define the default sheet orientation in the available output trays

  1. Go to [Stacker tray - Preferred feed edge].

  2. Indicate the feed direction of the sheets on the output tray.

  3. Click [OK].

  4. Go to [Stacker tray - Preferred face direction].

  5. Indicate if the front side of the sheets points up or down.

  6. Click [OK].

  7. Go to [Stacker tray - Preferred header direction].

  8. Indicate if the header points to the front side of the printer or to the back side of the printer.

  9. Click [OK].

Define the default sheet order in the available output trays

  1. Go to [Stacker tray - Preferred sheet order].

  2. Indicate the order of the printed sheets within a job set.

  3. Click [OK].