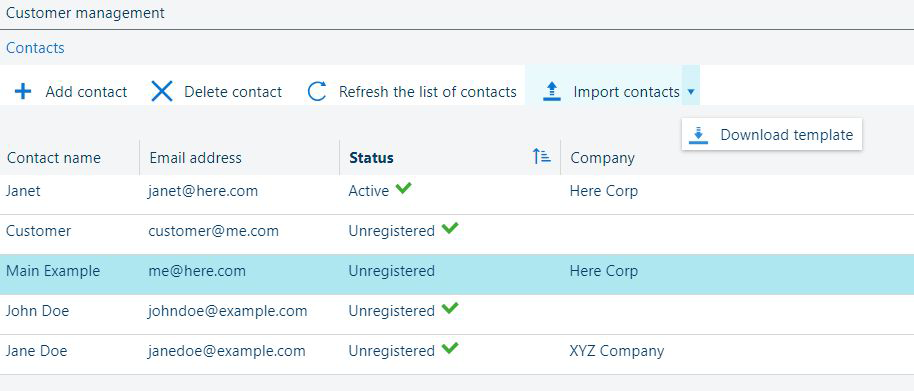
The [Contacts] table contains the full list of contacts for the print shop. You can manage the customer's details from this workspace.
Adding a new contact only creates an entry in this list.
In order for the new contact to be able to submit a job or to monitor the status of a job, the contact has to activate the customer account. Use the [Send activation request] function to send the invitation email.
The [Onboarding link] can be retrieved from this app.
The following table describes the available fields in the [Contacts] list.
|
Field name |
Description |
|---|---|
|
[Contact name] |
The customer's name. |
|
[Email address] |
The customer's email address. |
|
[Status] |
Status of the customer's account. Can be one of:
The flag
|
|
[Company] |
Company. This field is optional. |
|
[Service Terms] |
Date of the accepting the web shop's terms and conditions. The content of this field is reset each time you upload a new document containing the new terms and conditions for using the web shop. Any user with the "Administrator" role can do this, in the [Shop design] workspace. |
The main toolbar in the workspace lets you manage the contacts.
|
Action |
Icon |
Description |
|---|---|---|
|
[Add contact] |
|
Opens the operating system default e-mail application. A new e-mail message containing a temporary activation link is presented for review before sending. |
|
[Refresh the list of contacts] |
|
Updates the content of the [Contacts] list. |
|
[Delete contact] (one or more) |
|
Deletes the selected customer account. The application will request a confirmation before. This operation supports multi-selected users to be deleted in bulk. Use the Shift key together with the main mouse button to select more contiguous entries in the table. Use the Control key (Command on a Mac keyboard) together with the main mouse button to toggle the selection of one row on or off. This operation is not reversible. Jobs belonging to this account with the status [New], [Incoming] or [Completed] will also be deleted. If the customer has jobs with any other status ([Processing jobs] ), the operation will fail. |
|
[Import contacts] |
|
Opens the operating system default file picking dialog, letting you pick your own customer database file for adding to the list. The expected file format is .CSV (coma separated values). Use the template provided by the [Download template] feature. The contacts are imported with the status "[Unregistered] ". You still need to [Send activation request] to each imported contact. |
|
[Download template] |
|
Will create a file called users_template.csv in your browser's "downloads" folder. Edit this template file and provide it as input to the [Import contacts] dialog. |
The selected entry in the [Contacts] list has a number of possible actions available. The number of actions depends on the customer identity status.
|
Action |
Icon |
Description |
|---|---|---|
|
[Delete identities] |
|
Deletes the login identities for the selected customer. The customer account is not deleted. This operation is only available for customer accounts with [Active] status. This action results in the user receiving the status [Unregistered]. |
|
[Delete contact] |
|
Deletes the selected customer account. The application will request a confirmation before. This operation is not reversible. Jobs belonging to this account with the status [New], [Incoming] or [Completed] will also be deleted. If the customer has jobs with any other status ([Processing jobs] ), the operation will fail. |
|
[Send activation request] |
|
Opens the operating system default e-mail application. A new e-mail message containing a temporary activation link is presented for review before sending. |
|
[Activate the contact] |
|
Allows the customer account to access the application. Only available for [Inactive] accounts. This operation is reversible. |
|
[Deactivate the contact] |
|
Prohibits the customer account from accessing the application. Only available for [Active] accounts. This operation is reversible. |
|
[Backup user data] |
|
Creates a summary of the customer's activity. The data is collected and downloaded on the computer in .ZIP format. The archive bears the user's name. Inside of this archive you will find:
|
This is the link to the customer facing portal of your print shop tenant in PRISMAsubmit Go.
Use the
![]() button to copy the link.
button to copy the link.
Accessing this link requires the customer to provide login credentials.
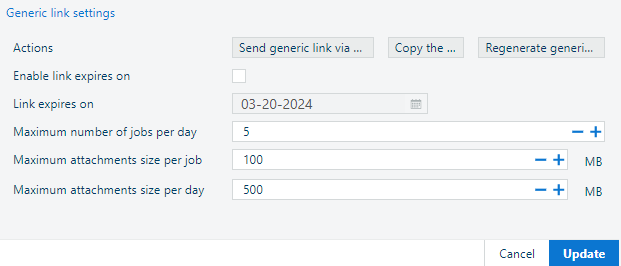
You can configure the job and link settings from this panel.
The generic link can be used by customers without a registered user account to submit a new job.
Three buttons let you:
[Send generic link via email]
Creates an email containing the generic link and sends it to the currently selected user in the [Contacts] table.
[Copy the link]
Copies the link into the clipboard of the device.
[Regenerate generic link]
Invalidates the old generic link and creates a new one.
Changing the generic link URL is only available to users having the Administrator role.
The control [Enable link expires on] lets you set an expiration date for the link in the field [Link expires on].
Use the + or - buttons to increase or decrease the following values:
[Maximum number of jobs per day]
Default value: 5.
[Maximum attachments size per job]
Default value: 100 MB.
[Maximum attachments size per day]
Default value: 500 MB.