
Click on the [Menu] button for the following options:
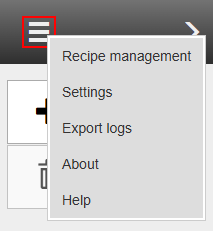
[Recipe management]
See Recipe management for detailed information about managing your recipes.
[Export Logs]
When clicking [Export logs], the logs are downloaded to your computer.
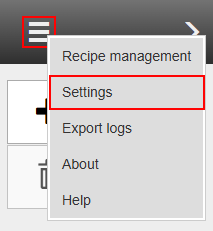
[Settings]
Define or check the system configuration settings. See next section for detailed information.
[About]
Information about the installed software.
[Help]
Opens the PRISMAguide XL Engine Online Help.
Select [Settings] to define or check the system configuration settings.

|
ONYX settings |
||
|
[ONYX API] |
ONYX Thrive |
Add the [Port] This is the port number that you defined in ONYX Thrive. |
|
ONYX Data Access |
Add the [Endpoint] This is the web address of the ONYX Data Access. The endpoint should not be empty. |
|
|
[Update printers and media] |
Click on [Update printers and media] to synchronize your port number, printers, media and print mode settings between the PRISMAguide XL Engine and ONYX Thrive (see Synchronize printers, media and print mode settings). |
|
|
[Default flatbed printer] |
Select the type of flatbed printer that will be used for all the built-in recipes by default. |
|
|
[Default roll printer] |
Select the type of roll to roll printer that will be used for all the built-in recipes by default. |
|
|
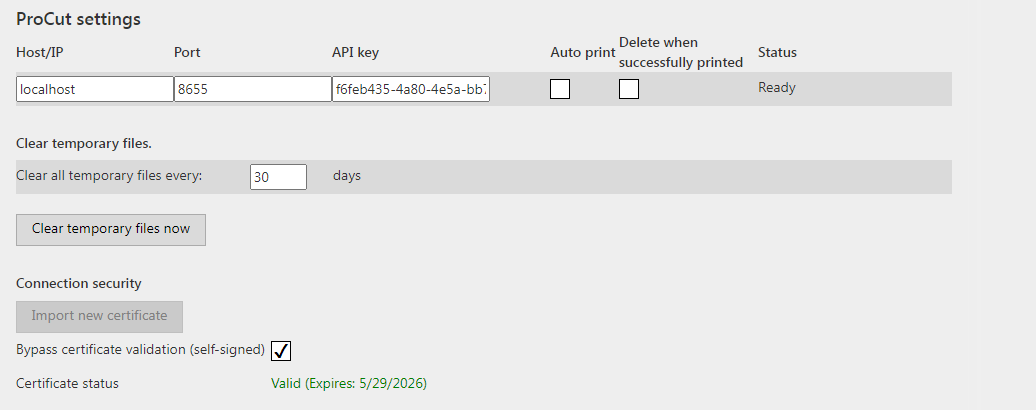
ProCut settings |
||
|
Settings for connecting with the ProCut server: |
[Host/IP] |
Add the IP address where PRISMAguide XL Connector is installed |
|
[Port] |
Add the port defined in PRISMAguide XL Connector) |
|
|
[API key] |
Copy the [API key] from the PRISMAguide Connector settings. |
|
|
[Clear temporary files.] |
[Clear all temporary files every:] |
Define after how many days the temporary files will be deleted. |
|
[Clear temporary files now] |
Click the button [Clear temporary files now] to delete the files now. |
|
|
[Connection security] |
[Import new certificate] |
Import a certificate, to enable a secure connection |
|
[Bypass certificate validation (self-signed)] |
Check the checkbox when no certificate is available and you want to create a (self signed) certificate. |
|

|
[Hot folders] |
||
|
Gives an overview of the defined hot folders. |
||
|
[Add new hot folder] |
To define a new hot folder click on [Add new hot folder]. More information about hot folders: Use hot folders. |
|

|
[Operator settings] |
||
|
[Enable advanced job editing] |
Uncheck the checkbox to limit edit possibilities. Without the advanced job editing option, the user is not be able to save recipes or alter major characteristics of a recipe such as adding or removing layers. |
|

|
[3D preview] |
||
|
[High resolution preview] |
When you use an older, low-end video card tick off the checkbox. |
|

|
[System of units] |
||
|
[Units] |
Select [Metric] or [Imperial]. |
|

|
[Cutting] |
||
|
[Cut X offset] |
The offsets must match the space needed by the ProCut driver in ONYX Thrive to prepare the barcodes and registration marks. |
|
|
[Cut Y offset] |
||
|
[Custom cut types] |
The PRISMAguide XL Engine offers a set of predefined, built-in cut types that you can use to make it easier to automatically map the PDF layers/spot colors/PDF boxes to layers in a ProCut media. Use the custom cut types when you cannot use the built-in cut types. |
|

|
[Active license] |
|
|
[Product code] |
The licenses that are available and used by PRISMAguide XL Engine. |
|
[License name] |
|
|
[License type] |
|
|
[Valid until] |
|
|
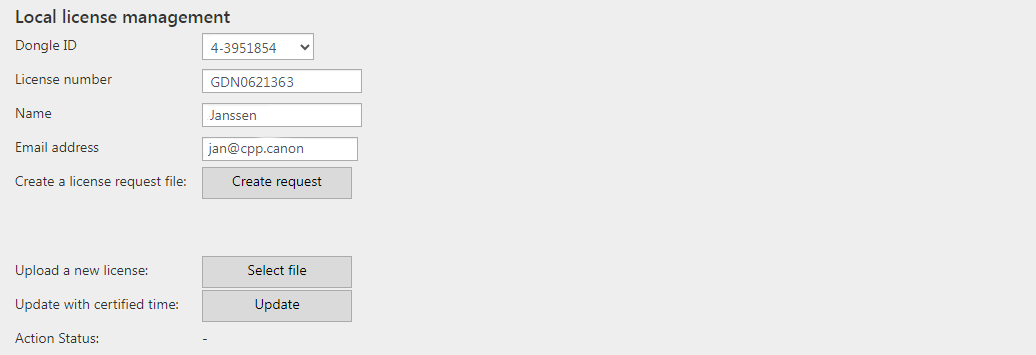
[Local license management] |
|
|
[Dongle ID] |
More information about licenses: Software licenses. |
|
[License number] |
|
|
[Name] |
|
|
[Email address] |
|
|
[Create a license request file] |
|
|
[Upload a new license] |
|
|
[Update with certified time] |
|