
The media-specific registration adjustment overwrites any automatic or manual media specific registration performed previously.
You cannot perform media-specific registration for temporary media. You must add the temporary media to the media catalogue first.
Print the verification chart to verify the media registration.
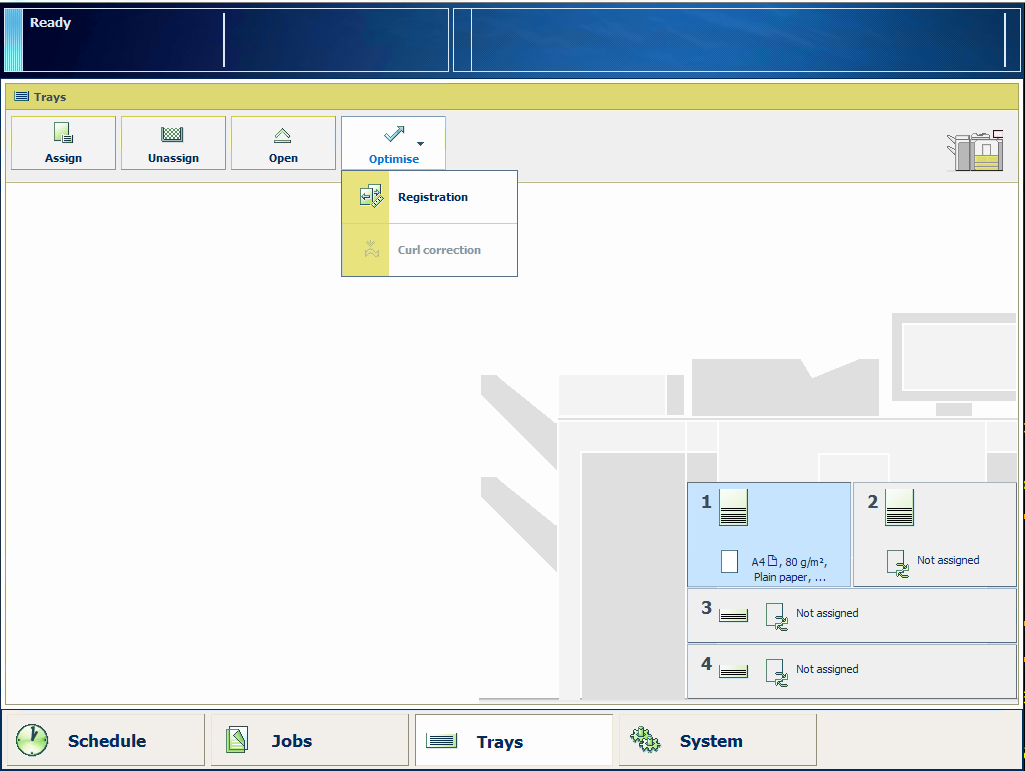
On the control panel, touch [Trays] to open the trays view.
Select the media for which you want to perform the media registration.
Touch [Optimize] -> [Registration].
When the media is larger than 420 mm (16.5") in X direction (feed direction), you get a reminder to enter the actual sheet size via the manual adjustment.
At [Manual registration], touch [Start].
When a maintenance PIN is defined in the Settings Editor, a numerical keyboard appears.
Enter the maintenance PIN to start the manual adjustment.
Touch [Next].
You can also select the media via the media catalogue, instead of via the trays view.
On the control panel, touch [System] -> [Media] to open the media catalog.
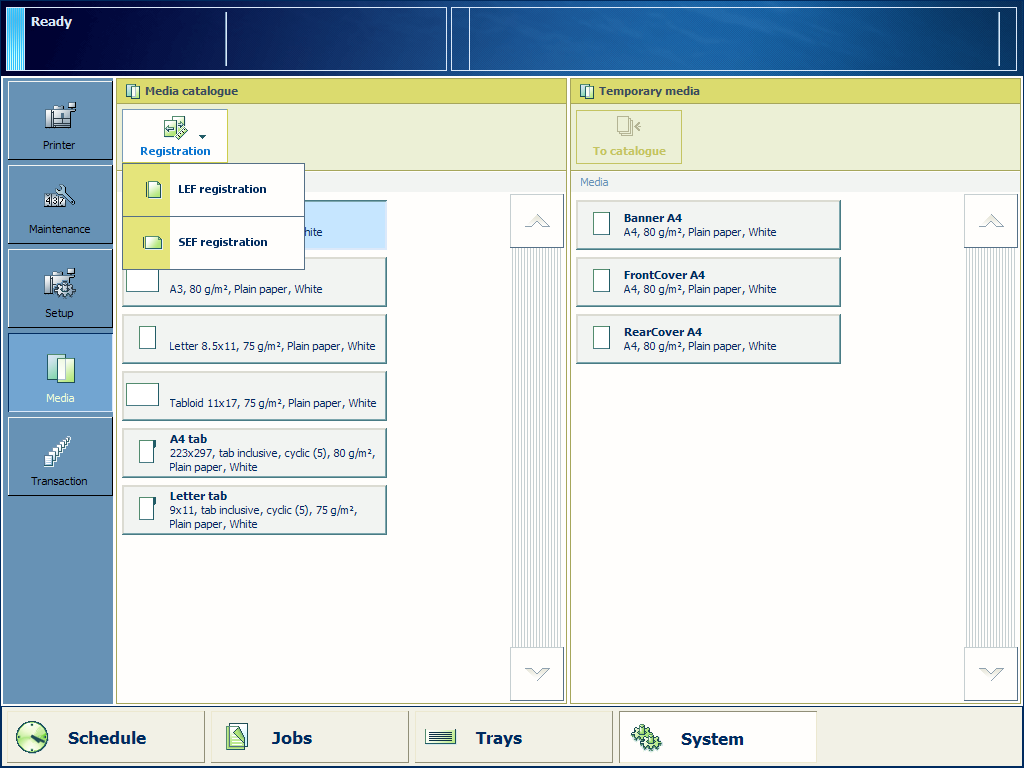
From the media catalog, select the media for which you want to perform the media registration.
Touch [Registration].
When the media is larger than 420 mm (16.5") in X direction (feed direction), you get a reminder to enter the actual sheet size via the manual adjustment.
Select the feed direction for which you want to perform the media registration.
At [Manual registration], touch [Start].
When a maintenance PIN is defined in the Settings Editor, a numerical keyboard appears.
Enter the maintenance PIN to start the manual adjustment.
Touch [Next].
|
Section |
What to enter |
|---|---|
|
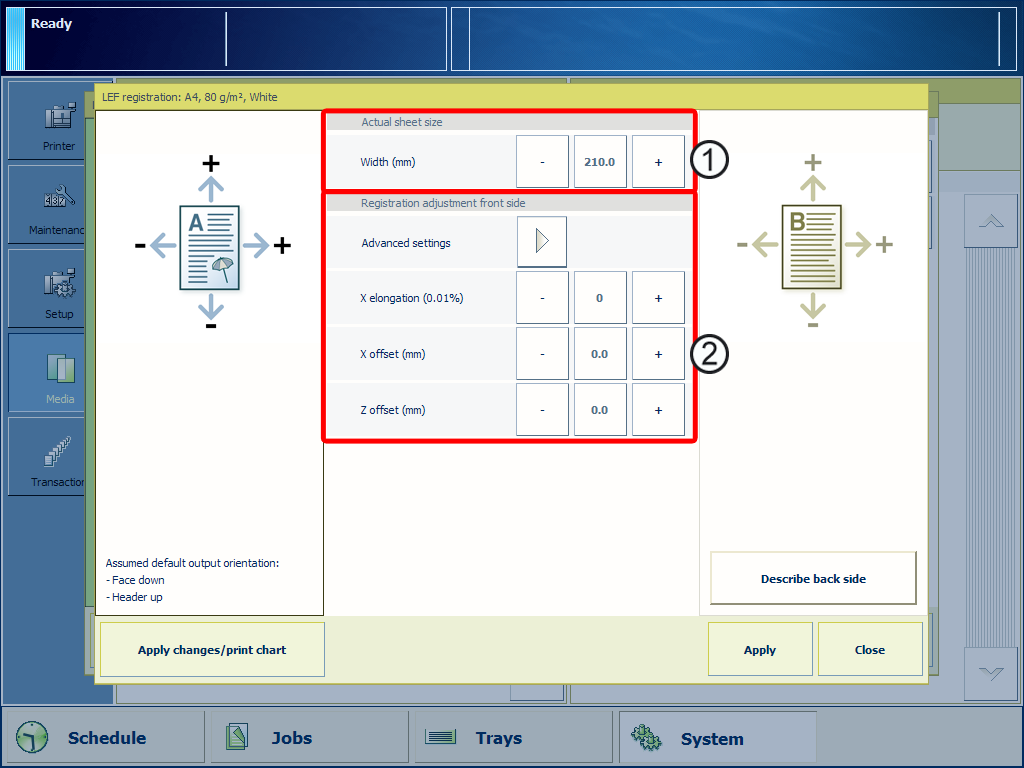
Upper section (1) |
The actual sheet size measured in the feed direction. It is recommended to measure several (6) sheets. Determine the average sheets size in the feed direction. For LEF, enter the sheet width.  For LEF, enter the sheet width
For SEF, enter the sheet length.  For SEF, enter the sheet length
The actual sheet size is used in the front-to-back registration. The actual sheet size has impact on the distance between the leading edge of the sheet and the leading edge of the image. |
|
Lower section (2) |
The required values. Use the verification chart to determine which value to change. The sections hereafter describe how to determine the values you must enter. For most situations you can correct the media registration with the standard settings. Only in exceptional cases, you need the advanced settings. |
You can touch the - and + buttons to change the values. You can also enter the required value directly. Touch the number to enter a value manually. The numeric keyboard appears. There you can enter the required value.
If you touch [Close] before you apply the changes, the values are not saved.
You must decide whether you want to correct the media registration of the front side or the back side or both. You can base this decision on the processing of the jobs that have an incorrect media registration, for example cutting, booklet making or folding. To correct the media registration of the front side touch [Describe front side]. For the back side, touch [Describe back side].
For 1-sided media you simply have to correct the media registration of the front side. Examples of 1-sided media are tab sheets and transparency media with paper backing. For 1-sided media you cannot use the verification chart because the verification chart is 2-sided. To perform the media registration you must use your own image to determine the required values.
In most cases, after automatic media registration you must only adjust the elongation and / or the image shift.
If there are two or more registration problems, you must solve the problems one by one. First you correct the registration of each side. Then you correct the front-to-back side registration. For example, if the image is skewed and there is a problem with the front-to-back side registration, then you must first adjust the skewed image. If the skewing is correct, you must improve the front-to-back side registration.
If you are unable to recognize which kind of media registration deviation you have (see Example 1 - Images and Text), perform the following actions:
Measure the value for the skewed image, diamond shape image and trapezoid image. See the corresponding sections.
Select the deviation with the largest value and correct the deviation. Use the corresponding manual actions described in this document.
Print the verification chart.
If the angles in the corners are straight then continue with the next step. If not, repeat step 1 - 3.
If needed, correct the image shift and / or elongation. Use the corresponding manual actions described in this document.