
The [Color tests] app allows you to create color validation tests tailored to a specific printer, substrate and test specification. The second property, substrate, refers to the media used to print the test chart on.
Next to pre-installed industry standard, you can also define your own or customized color tests using PRISMAcolor Manager test specification editor. This allows you to set your own targets for what you want to achieve.
The newly created color validation tests can be reused by the operator later to save time.
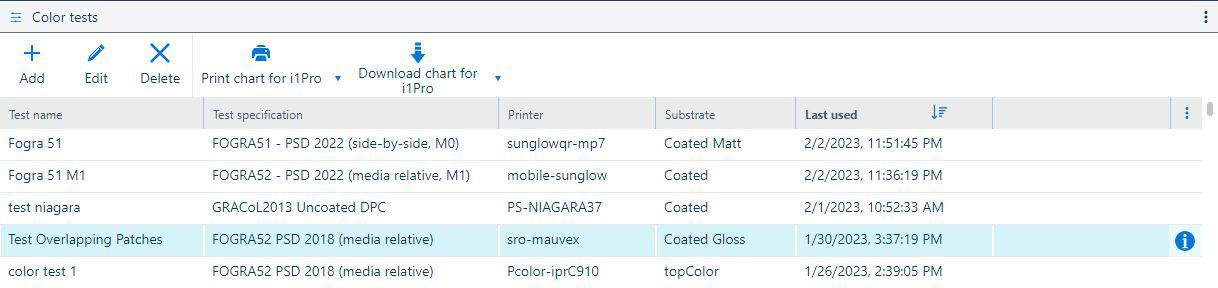 Workspace of the [Color tests] app
The last column contains a
![]() button which opens the [Print instructions for the downloaded chart]. The button is only visible when the mouse cursor is hovered above one item in the [Color tests] table.
button which opens the [Print instructions for the downloaded chart]. The button is only visible when the mouse cursor is hovered above one item in the [Color tests] table.
Use the
![]() [Add] button if you want to create a new color validation test.
[Add] button if you want to create a new color validation test.
The combination [Printer] + [Substrate] + [Test specification] has to be unique. You will not be able to add the same combination twice.
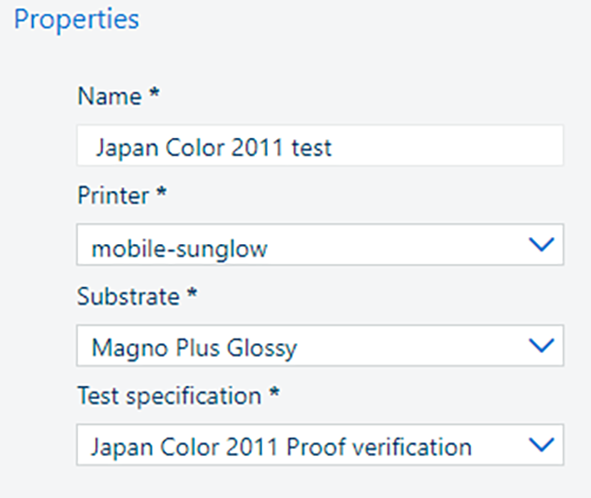 Properties of a new color validation test
When you add a new color validation test, you are asked to provide the following test properties:
[Test name];
[Printer];
[Substrate];
[Test specification].
After you defined the properties, click the [Save] button to save the color validation test.
Use the
![]() [Edit] button if you want to edit a color validation test. You can change the test name, printer, substrate or test specification.
[Edit] button if you want to edit a color validation test. You can change the test name, printer, substrate or test specification.
After you edit the test properties, click the [Save] button to save the changes.
The [Edit colour test] operation can only be performed on color tests not being used in any measurement. A pop-up will remind you when trying to edit one that is used.
Use the
![]() [Delete] button if you want to delete a color validation test.
[Delete] button if you want to delete a color validation test.
 Delete a color validation test
This action is irreversible. If you are sure that you want to delete the selected color validation test, click the [Delete] button.
The [Delete colour test] operation can only be performed on color tests not being used in any measurement. A pop-up will remind you when trying to delete one that is used.
Use the [Download chart for i1Pro] or [Download chart for i1iSis] buttons to download the i1Pro or i1iSis test chart to your workstation and print the test chart manually afterwards.
The test chart is generated when you click the [Download chart] button. When you click the [Download chart] button, a new window with print instructions appears. You must print the test chart according to these instructions.
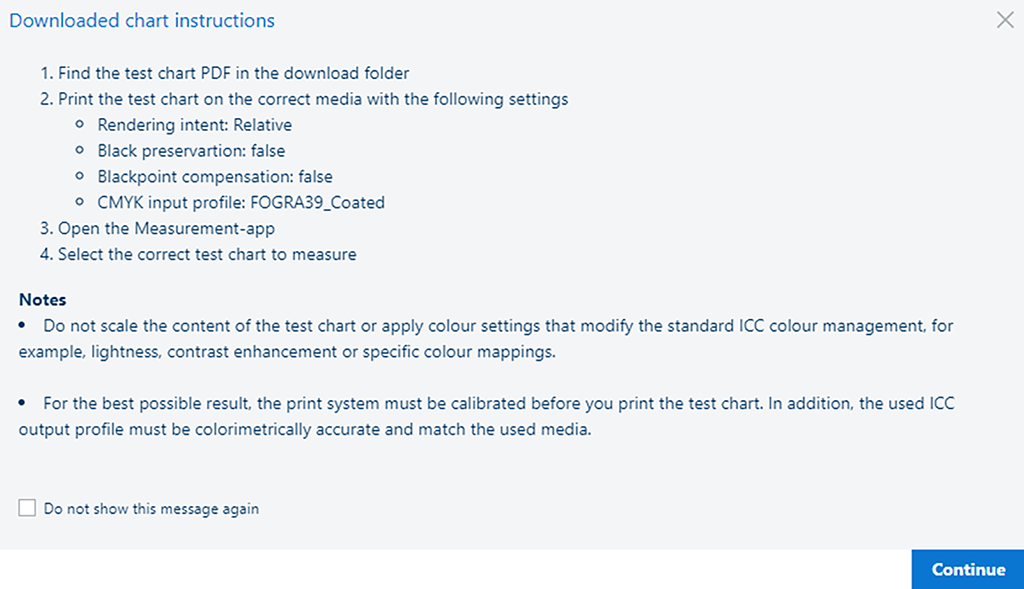 Downloaded chart instructions
Depending on the test specification, different instructions are shown.
The test chart is provided as a PDF file.
The print settings are also displayed in the test chart. If you have closed the window, you can check the print settings in the PDF file of the test chart.
Use the [Print chart for i1iSis] or [Print chart for i1Pro] buttons to print the i1Pro or i1iSis test chart.
The direct print functionality is useful when you have access to the printer.
The test chart is printed when you click the [Print chart] button. When you click the [Print chart] button, a new window with print instructions appears.
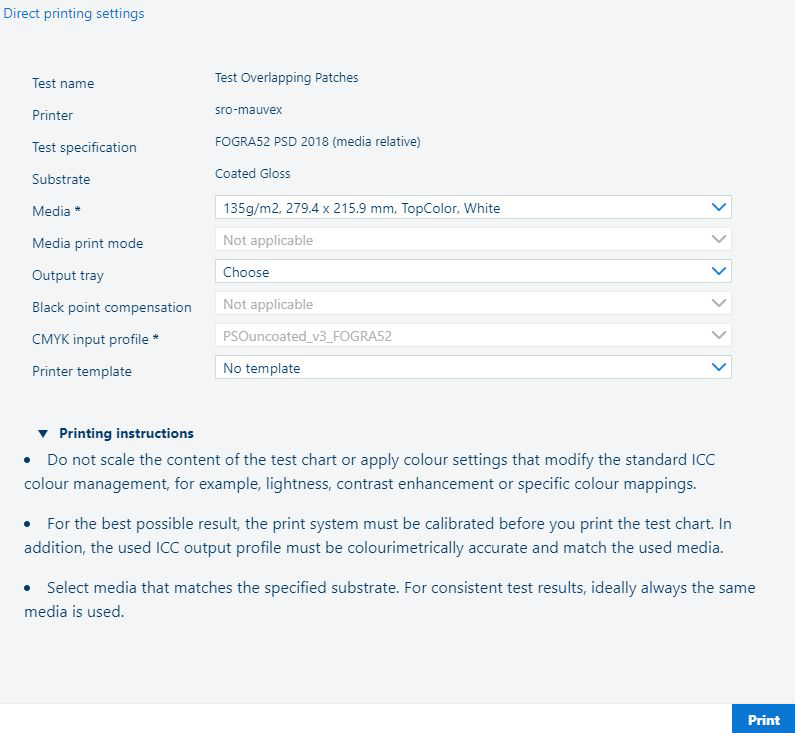 Direct print instructions
A series of fields come with the values already set:
[Test name];
[Printer];
[Test specification];
[Substrate].
All the editable values you set in this dialog are going to be used next time a direct print operation is triggered:
[Media]
Select the best matches the substrate from the test specification.
[Media print mode]
Is only selectable if function is supported by the print engine.
[Output tray]
Do not change if you want to let the printer pick the default. Override selecting any specific tray.
[Black point compensation]
Is only selectable if function is supported by the print engine.
[CMYK input profile]
This parameter's value is automatically selected from the print engine CMYK profiles if there is a match from the profile that is defined in the reference value set from the test specification.
If there is no match, you need to take action and install the specific profile on the printer or select the best match available.
[Printer template]
Using the printer template will not be persisted. A next direct print action for the specific test will not use the printer template for PRISMAsync.
Print instructions are shown as defined in the test specification.
Generic print settings are available to the test specification editor in the configuration app to ensure the same printing conditions are used for every test execution.
This operation is supported for all PRISMAsync based controllers, starting with Mark 8.3.6.
[Media print mode] is currently only available for certain printers belonging to the varioPRINT iX-Series family. The [Media print mode] selector becomes visible after selecting a [Media] (as print modes are related to the media).
Advanced option: it is possible to use AWF template which is selectable under [Printer template].
AWF settings will be used and could overwrite settings that are sent by PRISMAcolor Manager.
This operation is supported for some Fiery based controllers, starting with version 1.0.
It is possible to use a virtual printer as a template for settings and/or to support using black point compensation if the print engine does not support receiving JDF setting
Virtual printer settings will overwrite settings that are sent by PRISMAcolor Manager
Using a virtual printer setting will be persisted for the specific test next direct print action