
A Smart Inbox is used as a personal folder to print files from, scan files to, or store files in. In Océ Express WebTools you can create a Smart Inbox in:
The [Jobs] tab - Smart Inbox section.
The [Jobs] tab - Publisher Express section.
The [Configuration] tab - [ Smart Inbox ] section.
Note that the behaviour of the Smart Inbox can differ, depending on which of the three ways is used for creation.
When user authentication is enabled your Smart Inbox rights can differ.

The Smart Inboxes created in the Smart Inbox section are, while empty, only visible on your personal browser. Once there is a job in the specific Smart Inbox, that Smart Inbox also becomes visible on the user panel and in other browser sessions.
The Smart Inboxes created in the Smart Inbox section are not permanent. Once the Smart Inbox is empty, it will disappear from the user panel and from not-personal browser sessions.
|
Step |
Action |
|---|---|
|
1. |
Select the [Jobs] tab. |
|
2. |
Click on [Open Smart Inbox]. |
|
3. |
Click on the blank field to open a drop-down list with the Smart Inboxes available on your system. |
|
4. |
Enter the name of the new Smart Inbox and press Enter, or select the desired Smart Inbox from the list. |
|
5. |
The Smart Inbox is now displayed in the Smart Inbox section. |

With this procedure you not only create a Smart Inbox, but you also send a job to the printer.
The Smart Inboxes created in Publisher Express are, while empty, only visible on your personal browser. Once there is a job in the specific Smart Inbox, that Smart Inbox also becomes visible on the user panel and in other browser sessions.
The Smart Inboxes created in Publisher Express are not permanent. Once the Smart Inbox is empty, it will disappear from the user panel and from not-personal browser sessions.
|
Step |
Action |
|---|---|
|
1. |
Select the [Jobs] tab. |
|
2. |
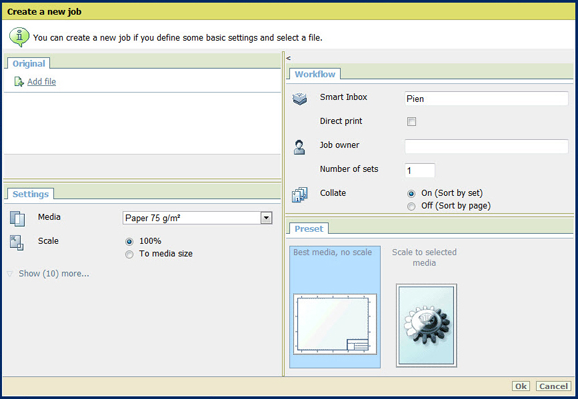
Click on [Create new job] in the Publisher Express section. |
|
3. |
In the [Workflow] section, click on the Smart Inbox field. A drop-down list with Smart Inboxes that contain one or more jobs opens. |
|
4. |
Enter the name of the new Smart Inbox and press Enter. |
|
5. |
Click [Ok] to send the print job to the printer via the new Smart Inbox. |
|
6. |
The Smart Inbox is now displayed in the Smart Inbox section and on the user panel. |

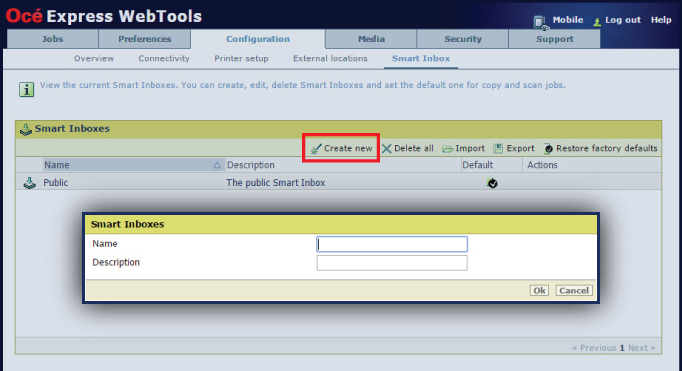
The Smart Inboxes created in the [Configuration] tab - [ Smart Inbox ] section are permanent. Even when the Smart Inbox is empty, it will be available on the user panel and in the browser sessions.
|
Step |
Action |
|---|---|
|
1. |
Open the [Configuration] - [ Smart Inbox ] tab. |
|
2. |
Click on [Create new]. A window opens. |
|
3. |
Enter a [Name] recognisable for the user. This name appears on the user panel. |
|
4. |
Enter a [Description]. |
|
5. |
Click Ok to confirm. |