
In the [Maintenance] screen you see actions and product specific notifications that are relevant during this service visit.
If you need to work with items related to peripherals, you can find them in the separate tab. Navigate to .
Grouped maintenance items are marked bold. You can click the group to see the individual maintenance items.
Maintenance items with a red icon are mandatory.
The rest are optional.
There are 2 types of groups:
Asynchronous groups
Synchronous groups
Items within an asynchronous group have their own individual counter/time reset possibility. All items which are not marked Done will be displayed in the work list again at the next visit.
Items within a synchronous group have one common counter/time reset. This is linked to the header of the group. If the header is marked Done, the counter/time is reset for all items that belong to the group, even if an individual item was not completed. If this is the case, a yellow warning with an exclamation mark will be displayed.
Click each line to indicate if and how you executed the maintenance action.
Enter what you did in the window and indicate:
If the maintenance action requires parts, they can be selected in the list "[Replaced parts] ".
Parts which are not related to predefined maintenance actions have to be added from a new issue.. Navigate to LINK
[Done]: you performed this maintenance action.
[Postpone]: postpone this maintenance action to the next visit.
When you selected "[Done] " there will be a checkmark next to the maintenance action.
The table with the modifications is organized as in a tree-like structure, and displays the following information:
[Name] of the maintenance item
[Type]:
Lifetime
Counter
Time
Single
Condition
Manual
[% Used]
[MRI]
The [MRI] (short for "Machine Resource Identifier") indicates the specific hardware that underwent modification. In this particular case, the entities involved are the printer and the controller.
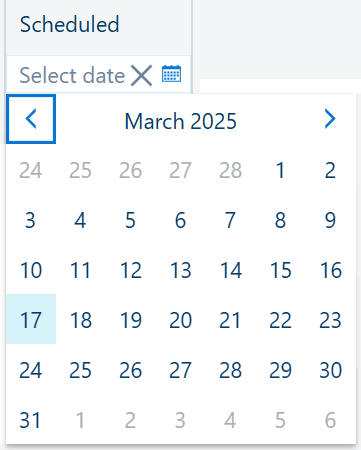
[Scheduled]
When an item on the worklist shows a scheduled date, this means that the item was scheduled via the maintenance scheduler in PRISMAservice (On Remote Service) of the CPP backoffice. An agreement with the customer has been made to execute the maintenance item on a fixed date.
This field denotes a date, allowing you can apply a filter by choosing your desired date from the calendar selector, which appears when you click the calendar icon
![]() :
:
Press the
![]() icon if you want to remove the date filtering.
icon if you want to remove the date filtering.
The toolbar offers a quick way of reaching the following functions:
![]()
Lets you add a new maintenance operation as an action for the visit activities.
![]()
Lets you delete one of the manual maintenance items.
This action is only available when the selected item in the worklist is a manually added maintenance operation.

The left-hand-side panel shows some extra details for the selected modification in the main list. The title is taken from the [Name], followed by read-only information like the [Type], the , the date (and overdue status). Down below, the initially collapsed section offers same details from the table.
You can:
(if available)
![]() [Add to worklist]
[Add to worklist]
Open the TSM page with relevant details.
(if available), open the dialog to adjust the quantity of the parts needing replacement
(if applicable) See the table with [Replaced parts]
Add an optional [Remark]
To the bottom of this panel, you can use the default actions
![]() [Postpone] and
[Postpone] and
![]() [Done] to close the maintenance item.
[Done] to close the maintenance item.
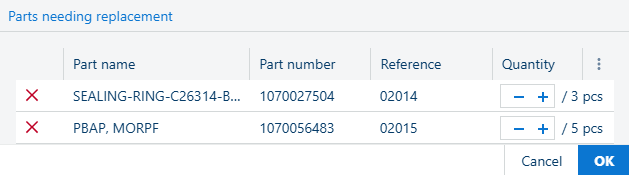
Use the + and - to increase/decrease the number of parts.
Use the
![]() to remove the part from the list
to remove the part from the list
Press the [OK] when done, or [Cancel] to exist and discard the changes.