
This topic describes the following instructions.
Go to the finisher settings
Define the default external finisher settings
Define the default stacker / stapler settings
Define the default high capacity stacker settings
Define the default perfect binder settings
Open the Settings Editor and go to: .
 [Print job defaults] tab
Go to: [External finisher].
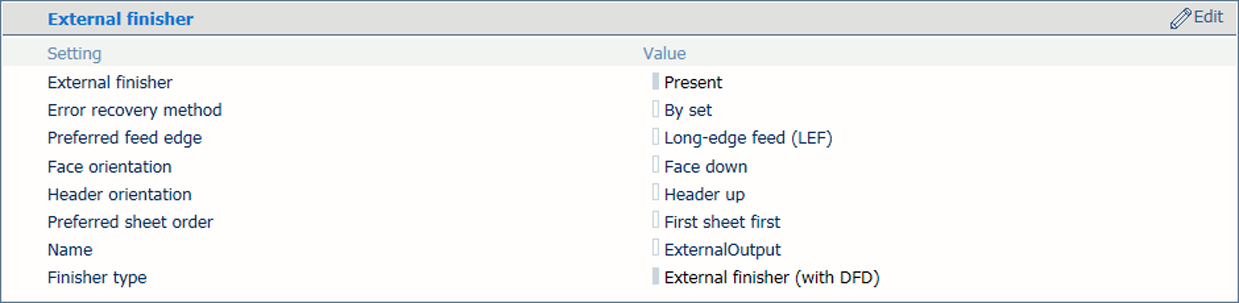 External finisher settings
Use the [Error recovery method] setting to define how to continue by default when an error occurs.
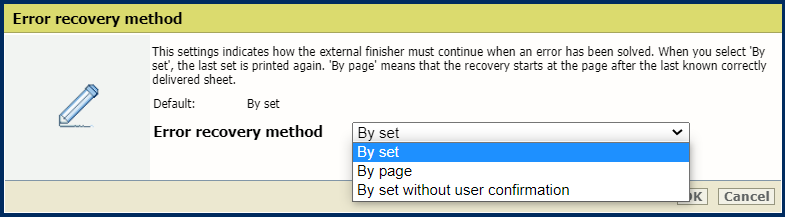
Use the [Error recovery method] to indicate if you want to print the last set again or to continue after the last correctly printed sheet by default when an error occurs.
[By page]: print the last set again.
[By set]: start at the page after the last known correctly delivered sheet. Printer restarts after user confirmation.
[By set without user confirmation]: print the last set again. Printer restarts automatically after error has been resolved, without user confirmation.
 [Error recovery method]
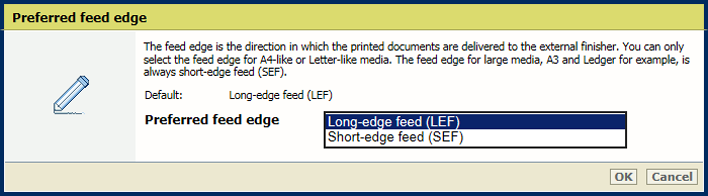
 Use the [Preferred feed edge] setting to indicate the default feed direction of the sheets to the external finisher by default.
[Long-edge feed (LEF)]: long-edge feed direction.
[Short-edge feed (SEF)]: short-edge feed direction.
 [Preferred feed edge]
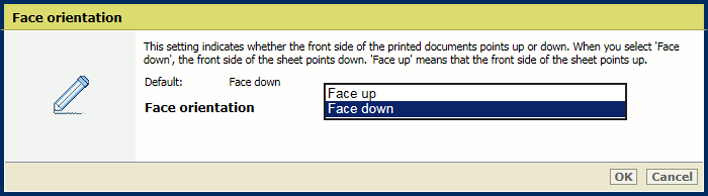
 Use the [Face orientation] setting to define the default face orientation.
[Face up]: the front side of the sheet points up.
[Face down]: the front side of the sheet points down.
 [Face orientation]
 Use the [Header orientation] setting to define the default orientation of the header.
[Header up]: the header points toward the back of the printer.
[Header down]: the header points toward the front of the printer.
 [Header orientation]
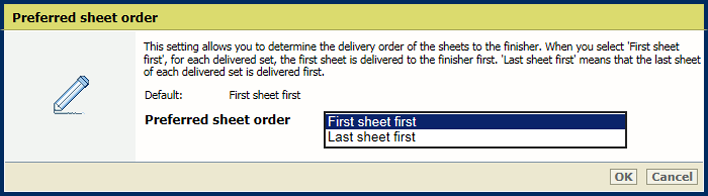
 Use the [Preferred sheet order] setting to define the default order of the printed sheets within a job.
[First sheet first]: deliver the first sheet of each set first.
[Last sheet first]: deliver the last sheet of each set first.
 [Preferred sheet order]
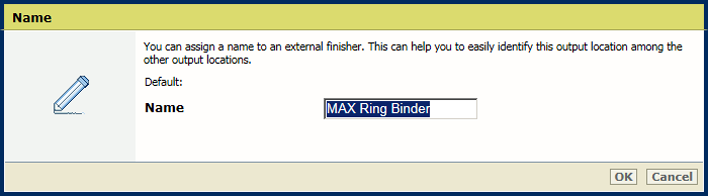
 Use the [Name] setting to define a meaningful name for the external finisher.
The name of the external finisher is visible in the job properties. Open the job properties and go to: .
 [Name]
Go to: [Stacker/stapler].
 Stacker / stapler settings
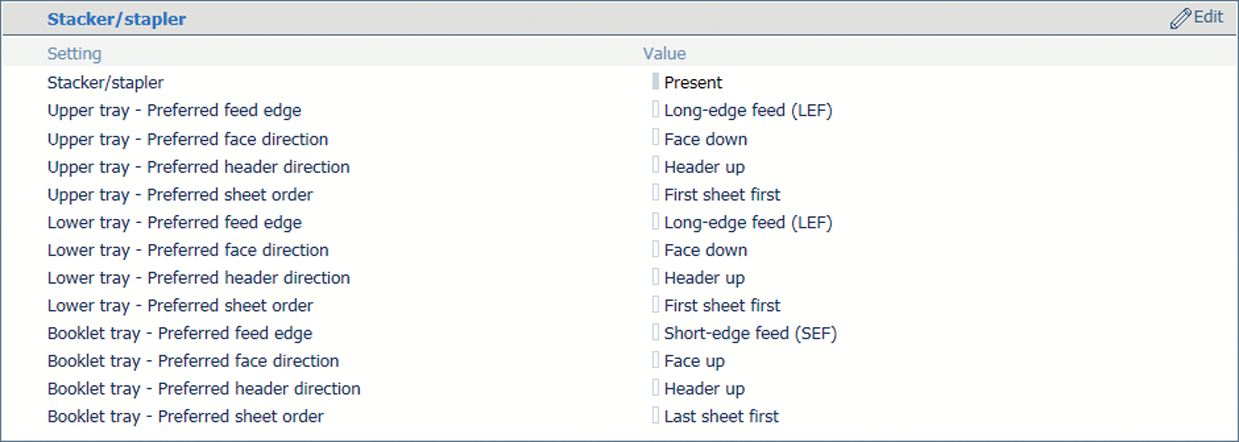
Use the [Upper tray - Preferred feed edge], [Lower tray - Preferred feed edge] or [Booklet tray - Preferred feed edge] setting to indicate the default feed direction of the sheets on the output tray.
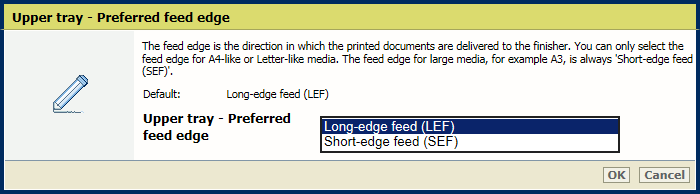 Preferred feed edge
Use the [Upper tray - Preferred face direction], [Lower tray - Preferred face direction] or [Booklet tray - Preferred face direction] setting to indicate if the front side of the sheets points up or down by default.
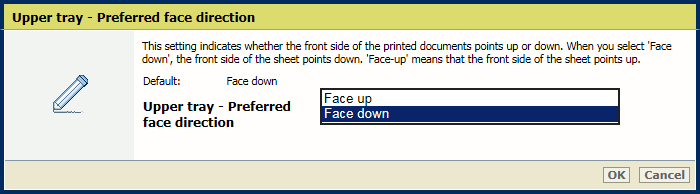 Preferred face direction
Use the [Upper tray - Preferred header direction], [Lower tray - Preferred header direction] or [Booklet tray - Preferred header direction] setting to indicate if the header points to the front side of the printer or to the back side of the printer by default.
 Preferred header direction
Use the [Upper tray - Preferred sheet order], [Lower tray - Preferred sheet order] or [Booklet tray - Preferred sheet order] setting to indicate the default order of the printed sheets within a job set.
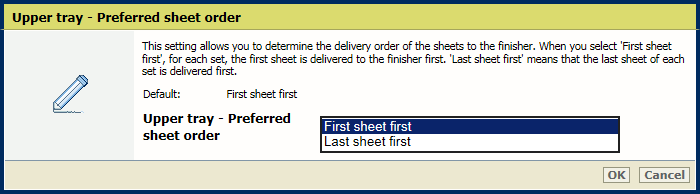 Preferred sheet order
Go to: .


Use the [High-volume mode] setting to link the output trays of the stacker / stapler or when a trimmer is connected by default for high-volume stacking.
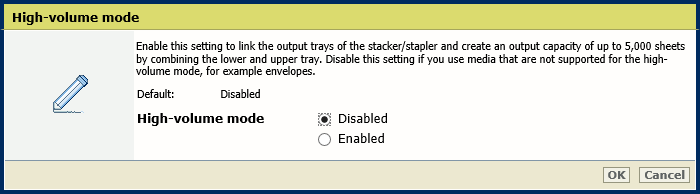
Make sure you disable this option when you use media that are not supported for high-volume stacking. Otherwise, the control panel will display a message that settings are conflicting.
Go to [Stacker].
 High capacity stacker settings
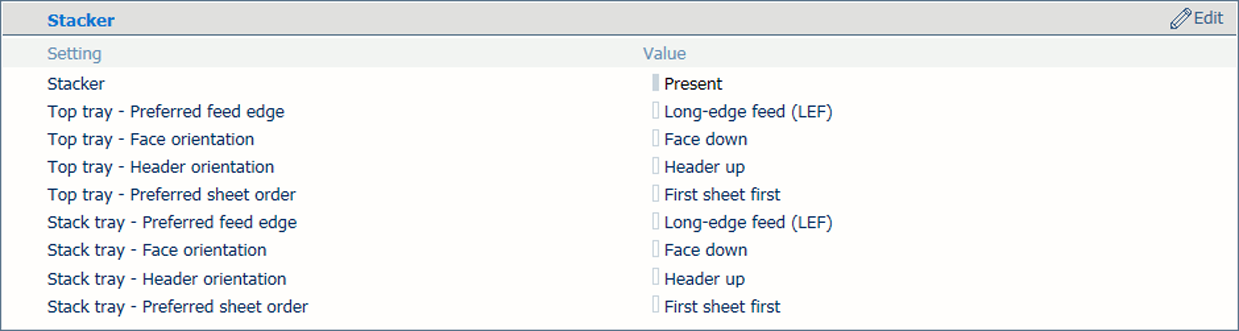
Use the [Top tray - Preferred feed edge] and [Stack tray - Preferred feed edge] setting to indicate if the long or short side of the sheet refers to the feed direction of the sheets by default.
[Long-edge feed (LEF)]: long-edge feed direction.
[Short-edge feed (SEF)]: short-edge feed direction.
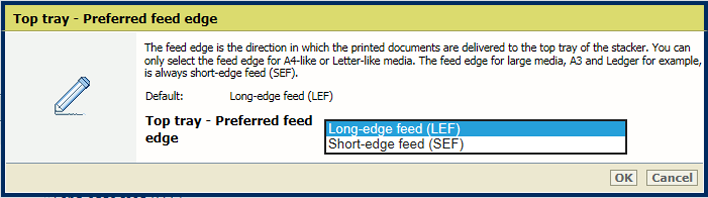 Default feed direction
Use the [Top tray - Face orientation] and [Stack tray - Face orientation] settings to indicate if the front side of the prints points up or down by default.
[Face up]: front side of first printed sheet is visible.
[Face down]: back side of last printed sheet is visible.
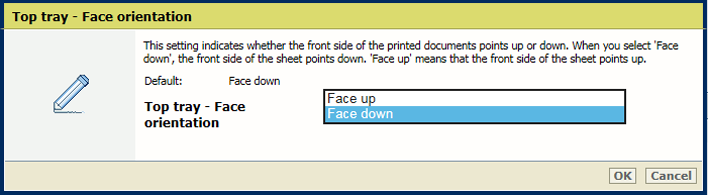 Default face orientation
Use the [Top tray - Header orientation] and [Stack tray - Header orientation] settings to indicate if the header of the prints points to the front side of the printer or to the back side of the printer by default.
[Header up]: header of printed document pages points to the back side of printer.
[Header down]: header of printed document pages points to the front side of printer
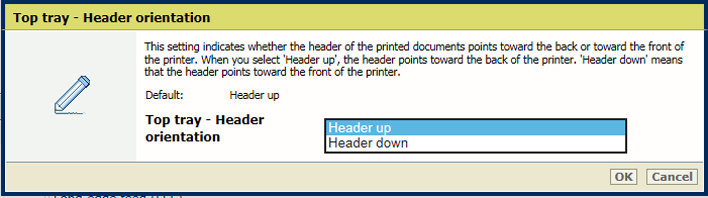 Default header orientation
Use the [Top tray - Preferred sheet order] and [Stack tray - Preferred sheet order] settings to define the default order of the prints.
[First sheet first]: the first source file page is printed first.
[Last sheet first]: the last source file page is printed first.
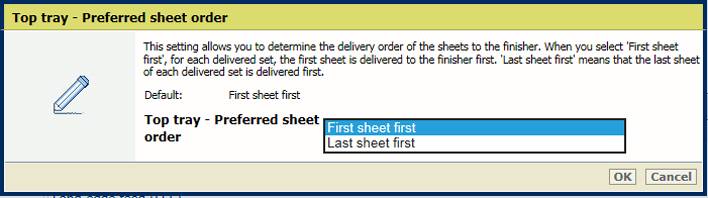 Default sheet order
Go to: .
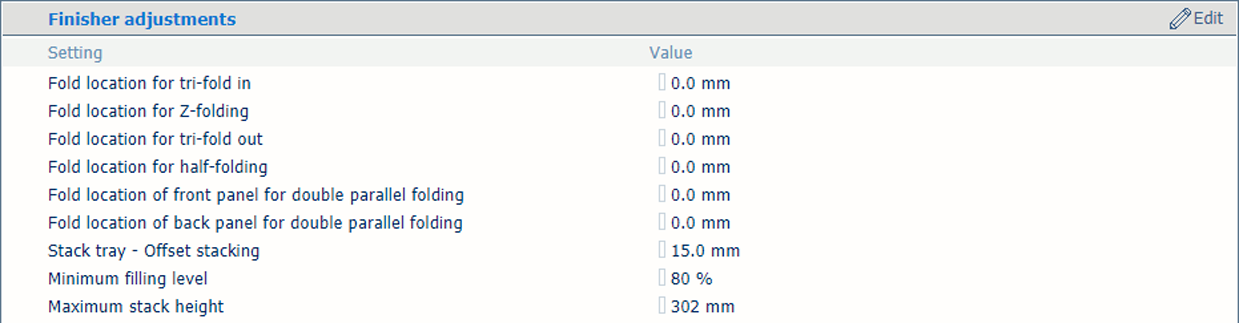
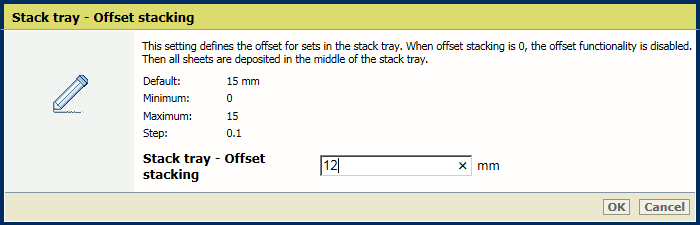
Use the [Stack tray - Offset stacking] setting to define the offset value. When the offset value is '0' offset stacking is disabled. The default offset value is 15 mm / 0.59".
 Offset stacking
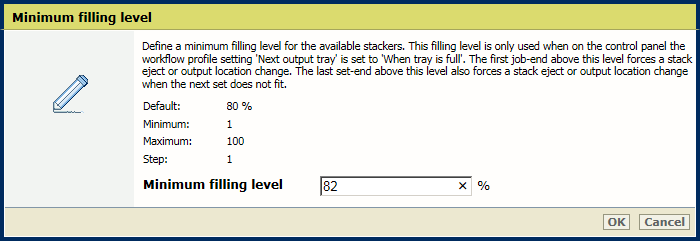
Use the [Minimum filling level] setting to define the filling level in the stack tray.
The minimum filling rate is a percentage of the maximum stack height. The default value is 80%. The high capacity stacker ejects the stack as soon as the stack height exceeds the minimum filling rate. The minimum filling rate is active in case the high capacity stacker ejects a stack when the stack tray is full.
 Minimum filling level
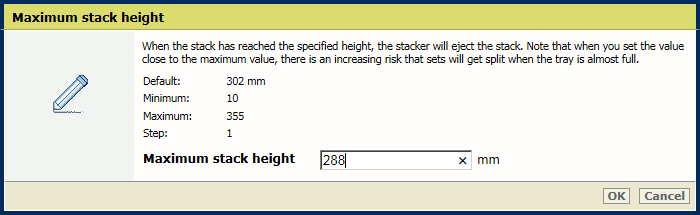
Use the [Maximum stack height] setting to define the maximum stack height in the stack tray.
The default stack height is 302 mm / 11.9". The minimum stack height is 10 mm / 0.39". The maximum stack height is 345 mm / 13.58". When the stack height is larger than the default stack height, there is a risk that sheets fall off the stack when the eject tray moves out.
 Maximum stack height
Go to [Perfect Binder].
 Perfect Binder settings
Use the [Stacker tray - Preferred feed edge] setting to define the feed direction of the sheets on the output tray.
[Long-edge feed (LEF)]: long-edge feed direction.
[Short-edge feed (SEF)]: short-edge feed direction.
 [Stacker tray - Preferred feed edge]
 Use the [Stacker tray - Preferred face direction] setting to define the default face direction.
[Face up]: front side of first sheet points up.
[Face down]: back side of last printed sheet points down.
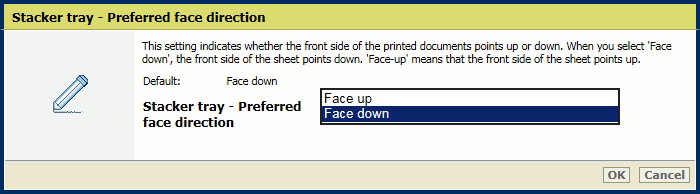 [Stacker tray - Preferred face direction]
 Use the [Stacker tray - Preferred header direction] setting to define the default header direction.
[Header up]: header of printed document pages points to the back side of printer.
[Header down]: header of printed document pages points to the front side of printer
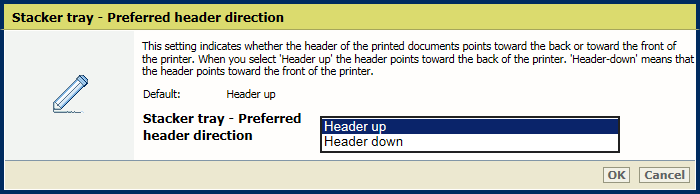 [Stacker tray - Preferred header direction]
 Use the [Stacker tray - Preferred sheet order] setting to define the default order of the printed sheets within a job set.
[First sheet first]: deliver the first sheet of each set first.
[Last sheet first]: deliver the last sheet of each set first.
 [Stacker tray - Preferred sheet order]