
This topic contains the following instructions:
Enable JMF message logging
Enable JDF ticket transformation logging
Create and download a JMF/JDF log file
You use JMF / JDF logging to examine the performed communication process between the JDF manager and the printer. You can use the JDF loggings to examine how the JDF tickets are adjusted by JDF ticket transformation.
When JMF message logging is enabled, all incoming and outgoing JMF messages are logged into a file. When the option is disabled and enabled again, the log file contents are cleared. The name of the log file is: JMFlog.trc.
Open the Settings Editor and go to: .
 [Troubleshooting] tab
In the [Logging and reports] option group, use the [JMF message logging] option to select [Enabled].
 JMF/JDF configuration
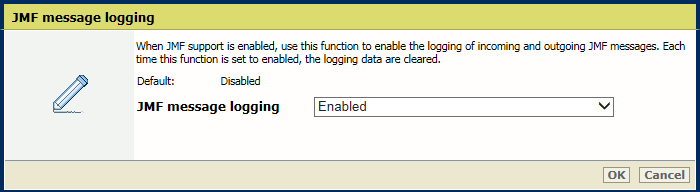 Enable JMF message logging
Click [OK].
When the JDF ticket transformation is enabled, use this setting to enable the logging of incoming JDF tickets and JDF ticket transformations. When the option is disabled and enabled again, the log file contents is cleared. The name of the log file is: DFlog.trc.
Open the Settings Editor and go to: .
[Troubleshooting] tabIn the [Logging and reports] option group, use the [JDF ticket transformation logging] option to select [Enabled].
JMF/JDF configuration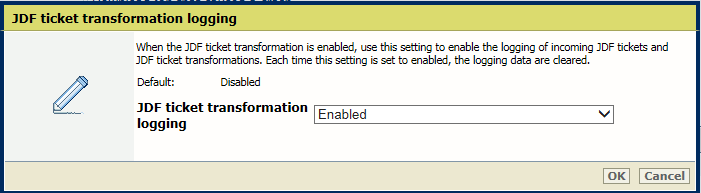 Enable JDF ticket transformation logging
Click [OK].
When you create a JMF/JDF log file, a ZIP file is created that contains the log files of the loggings that you have enabled: JMF message logging, JDF ticket transformation logging.
Open the Settings Editor and go to: .
[Troubleshooting] tabIn the [Logging and reports] option group, use the [Create and download JMF/JDF log file] option to click [Create log file with JMF/JDF loggings].
JMF/JDF configuration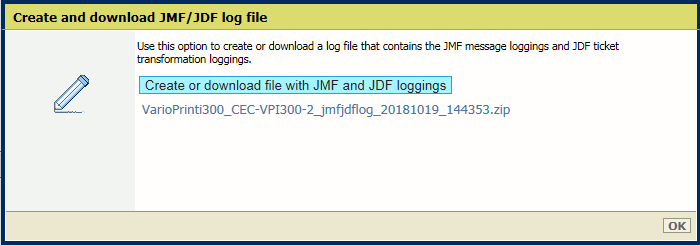
In the [Log file with JMF/JDF loggings (create and download)] dialog box, click [Log file with JMF/JDF loggings (create and download)] to create a new ZIP file.
The ZIP file contains the log files you have enabled.
In the dialog box, click the ZIP file you want to download and save it.
Click [OK].
Read the Technical Reference Manual (TRM) of your product for the following.
The JDF ticket specification of PRISMAsync Print Server.
Examples of XSLT style sheets.
Use of JMF/JDF logging in detail.