
A transaction setup with the status [Opened] can be adjusted.
Open the Settings Editor and go to: .
 [Transaction setups] tab
Check that the transaction setup you want to change has the status: [Opened].
Click the [PCL transaction setup] tab.
 [PCL transaction setup] tab
Change the settings one by one or click [Edit] in the title bar to adjust the settings of a group in one dialog box.
Validate the transaction setup.
Make sure that you reload a transaction setup that is active when you made the changes.
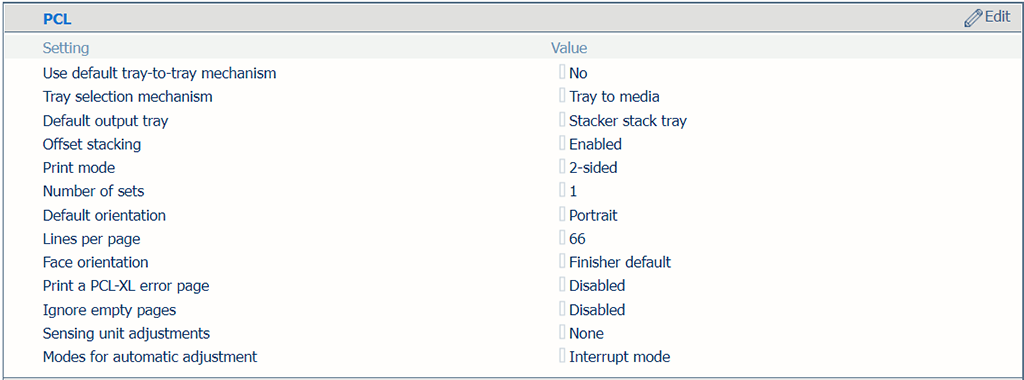
 PCL settings
|
[PCL] settings |
Description |
|---|---|
|
[Use default tray-to-tray mechanism] |
In [Tray to tray] mode, a default tray mapping table can be used. You cannot change the contents of this table. |
|
[Tray selection mechanism] |
A transaction printing job always uses the media definitions as specified in Settings Editor. Select [Tray to tray] or [Tray to media]. The PCL data stream contains a reference to a logical tray. There are 36 logical trays that can be assigned to a physical paper tray ([Tray to tray] ) or to media of the media catalog ([Tray to media] ). |
|
[Default output tray] |
Select the default output tray. |
|
[Offset stacking] |
Select if stacking occurs with or without an offset. |
|
[Print mode] |
Indicate if the printer prints the jobs one-sided, two-sided or two-sided with a rotated back side ([Tumble] ). |
|
[Number of sets] |
Enter the number of sets. |
|
[Default orientation] |
Select the document orientation. |
|
[Lines per page] |
Enter the number of lines on a page. More lines result in smaller line heights. The number of lines per page depends on the document orientation and the paper size. |
|
[Face orientation] |
Select the delivery orientation in the output tray: [Face up] or [Face down]. |
|
[Print a PCL-XL error page] |
Indicate the printer must print an error page when a PCL-XL error occurs. |
|
[Ignore empty pages] |
Indicate if the printer must ignore empty pages. |
|
[Sensing unit adjustments] [Modes for automatic adjustment] |
The sensing unit can automatically perform media registration and density adjustment via three ways. Use this setting to select the media registration, density or both for automatic adjustment in the sensing unit. The sensing unit can automatically perform media registration and density adjustment via two modes during printing. Use this setting to select one of the two modes. In continuous mode, every sheet in the print job is used for the media registration and density adjustment. In interrupt mode, a print job is interrupted to print a chart which is used for the media registration and density adjustment. |
 [PCL image shift] settings
|
[PCL image shift] settings |
Description |
|---|---|
|
[Image shift in feed direction of side 1] [Image shift in cross-feed direction of side 1] [Image shift in feed direction of side 2] [Image shift in cross-feed direction of side 2] |
Use these settings to define the image shift. When you use pre-printed media with marked areas for specific text, misalignments can occur. Also use this setting to better align variable data on pages, such as names or addresses. There are settings for the feed direction and the cross-feed direction in combination with the sheet side. You can also adjust the image shift on the control panel. |
 Color management settings
|
Color management settings |
Description |
|---|---|
|
[Default CMYK input profile], [Default monochrome CMYK input profile], [Default RGB input profile], [Default monochrome RGB input profile] |
Select a default input profile for the four types of input profiles. |
|
[Rendering intent] |
Select the rendering intent. |
|
[Print full color or black & white] |
Use this setting to define how jobs are printed: in black & white or in color. |
|
[Black preservation] |
Use the setting to apply pure black preservation when possible. Pure black preservation means that the color black is composed of 100% K ink. When pure black preservation is not possible or disabled, the color black is composed of a mixture of two or more C, M, Y, and K inks. |
|
[Halftone] |
Indicate the halftone. |
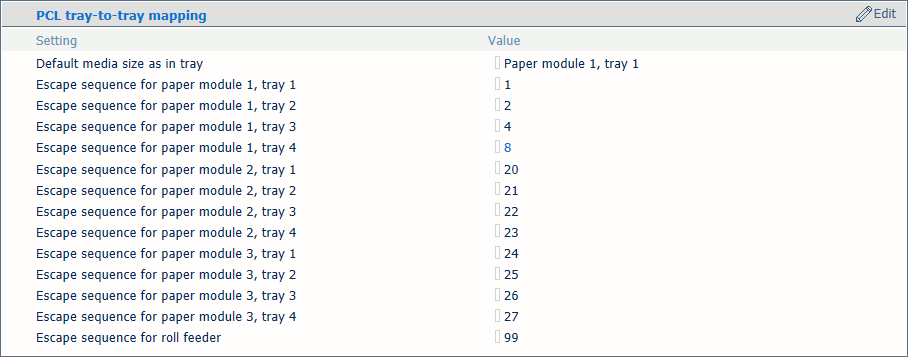
Use the [Default media size as in tray] setting to define which paper tray uses the default media size. Therefore, you select one of the available paper trays. You link logical trays (indicated by a number from 1 to 16) to physical paper trays. The printer uses media that are assigned to these physical paper trays. The schedule shows the media the job uses.
Define the logical tray values for all physical paper trays the jobs use.
 Tray selection for tray-to-tray mode
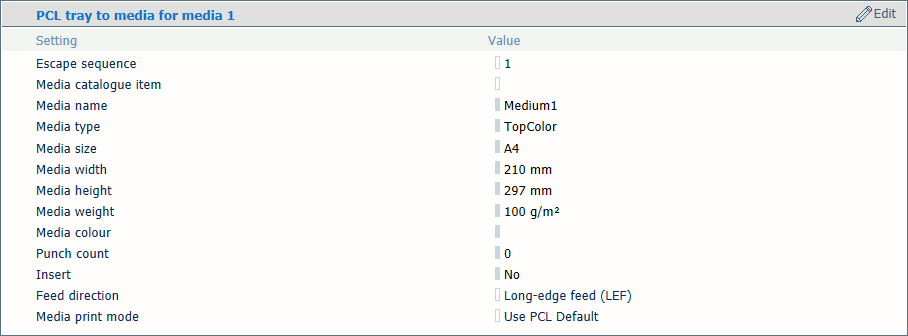
You link logical trays (indicated by a number from 1 to 36) to media of the media catalog. The printer maps the logical tray to the physical paper trays that hold these media. The schedule shows the media the job uses.
 Tray-to-media mapping
Use the [Default media size as in tray] setting to select which media defines the media size.
 [PCL tray to media]
 Use the [Media catalog item] setting to select media from the media catalog.
Use the [Feed direction] setting to select the feed direction of the media.
Use the [Media print mode] setting to select the media print mode of the selected media. The option [Use PCL Default] refers to the [Media print mode] setting in the list of PCL settings.
Input trays that contain the same media as the tray defined for the job are automatically linked. This means that when one of the paper tray is empty, printing continues from another paper tray that holds the same media.