
Remote Printer Driver enables you to prepare the complete print job. Remote Printer Driver is available in all applications for Microsoft Windows and Apple Macintosh operating systems. You use Remote Printer Driver to submit documents from applications, such as Microsoft Office and Adobe Acrobat.
Be aware that there are also other PRISMAsync locations from where you can define job settings at a later moment. In addition, workflow definitions can overrule settings you have made with Remote Printer Driver. (Choose a workflow profile)
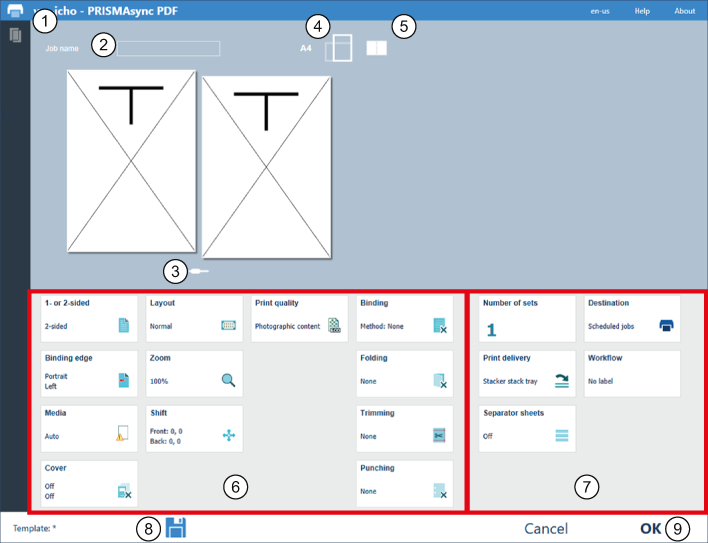
The printer and its finishing equipment determine which settings are available in Remote Printer Driver. Below you find an overview of the functions. The online help of Remote Printer Driver also provides detailed information on the available functions. Download Remote Printer Driver from the Settings Editor. Location: .
 Functions of PRISMAsync Remote Printer Driver
|
|
Job setting or icon |
Description |
|---|---|---|
|
1 |
Printer configuration |
Click the printer icon to see the finishing options of the printer. When the printer is not available for printing, the printer icon is red. When you see a red exclamation mark in this area the printer stopped. Click on the mark to see why the printer stopped. |
|
Available media |
Click the media icon to check which media are currently assigned in the paper trays of the printer. |
|
|
2 |
Job name |
When you change the default job name, the operator can easily identify the job on the PRISMAsync printer. (Maximum 100 characters) |
|
3 |
Slider |
Use the slider to browse the document pages. |
|
4 |
Document size and orientation |
The document size and orientation is taken over from the application. |
|
5 |
Document view or sheet view |
Select in which view you want to display the layout of the document with the current settings. |
|
6 |
Job settings |
The job settings refer to the layout, color / black and white, and finishing options. |
|
7 |
Job production settings |
The job production settings refer to several options: the number of sets, the use of separator sets, the job location on the control panel, the required output tray. The label option allows for an extra identification field. |
|
8 |
Job template |
Click the icon to save the current job settings for later reuse. It is also possible to open or delete an existing template. |
|
9 |
Submit job to printer |
Click [OK] to send the job with the chosen settings to the printer. |