
To enable JMF / JDF job submission, the access to the control panel must be without user authentication.
Go to: .
 [Users] tab
Click [Configure user login].
 [Users] menu
Use the option [Access to control panel] to select [Without user authentication].

Open the Settings Editor and go to: .
 [Connectivity] tab
Go to the [JMF support] section.
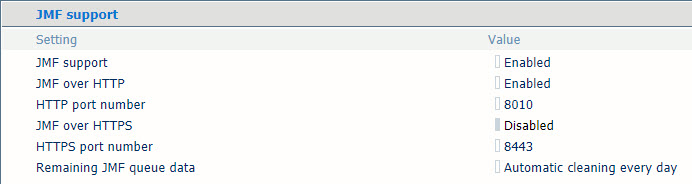 JMF / JDF support
Use the [JMF support] option to enable or disable JMF.
When you enable [JMF support], [JMF over HTTP] will be enabled too.
Use the [JMF over HTTP] option to enable or disable JMF over the HTTP protocol.
If required, change the HTTP port number to receive JMF messages.
The JMF messages are by default submitted to HTTP port: 8010. You can change the port number to another free port number.
To use [JMF over HTTPS] you need to install an Identity certificate which is valid for HTTPS. After you installed this Identity certificate [JMF over HTTPS] will be set to [Enabled].
To prevent warnings when you use HTTPS, import the two certificates of the PRISMAsync CA.
If required, change the HTTPS port number to receive JMF messages.
The JMF messages are by default submitted to HTTPS port: 8443. You can change the port number to another free port number.
Use the [Remaining JMF queue data] option to indicate the frequency of the automatic removal of completed or aborted JMF queue entries that were not removed by the JDF manager. You can also disable the automatic cleaning of JMF queue data.
The JDF manager enables you to abort JDF jobs, remove administration job identifiers, and remove print queue job entries. However, when not all information has been removed, this setting removes the remaining JDF job information according to the specified schedule.
Click [OK] to close the dialogue box.
Read the Technical Reference Manual (TRM) of your product for the following.
The JDF ticket specification of PRISMAsync Print Server.
Examples of XSLT style sheets.