
The payment providers offer a payment service for your customers. When you select one or more payment providers, each customer can pay for their orders directly.
This topic describes the complete configuration of the payment workflow.
You have to configure the payment settings in the [Configuration] workflow:
Check that the JDD service user has Internet access
The JDD service user is the user that runs the "Print Job Data Dispatcher" service. The user must have Internet access.
Select the payment providers for PRISMAdirect
You can select which payment providers are available for PRISMAdirect.
Configure the authentication to the SQL server instance. PRISMAdirect creates a payment report per payment provider on the SQL server when the authentication is correct.
The payment report is stored in the accounting database on the SQL server. You do not have to enable the accounting functionality to create and access the payment report. The accounting functionality and the payment report can be enabled independently.
Configure the payment providers per web server
You have to configure the payment providers for each web server once the payment service is enabled for PRISMAdirect.
Enable payment per web shop
You have to enable the payment service for each web shop where you want to offer the payment service.
Optionally, you can customize the payment settings per user group
You can customize the payment settings for each user group. The custom settings overrule the web shop settings for the concerning user group. The custom settings are used in all web shops for the corresponding user group.
The JDD service user is the user that runs the "Print Job Data Dispatcher" service. It is recommended that you change the user only when:
The user has a local system account. And
You want to use the file hosting services and/or the payment providers. The user must have Internet access.
A number of services will be restarted when the user is changed. Orders that are being submitted by customers will become corrupt. The following services will be restarted:
The Message Queuing service
The Print Job Data Dispatcher service
Click [System] - [Services settings] - [Advanced infrastructure].
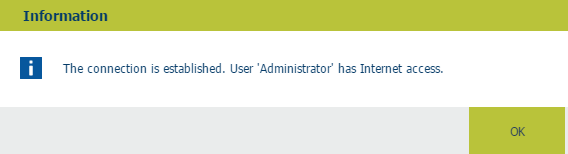
The read-only text box displays the current JDD service user. Click [Test connection] to test if the user has Internet access.
You can change the user:
Click the [Change] button.
Select the domain and user name. For example, you can select the user that runs the services of PRISMAdirect. The user must have Internet access if you want to use the file hosting services and/or the payment providers.
Type the password. Letters in passwords must be typed using the correct case.
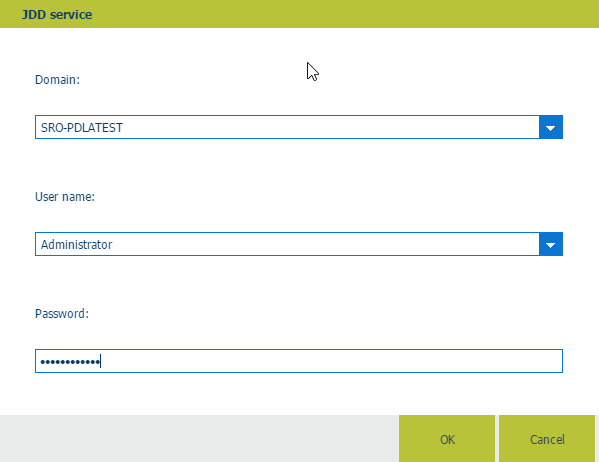
Click button [OK] and click [Test connection] to test if the user has Internet access.
Click [OK].
Click [Save].
Click [System] - [Connectivity] - [Payment providers].
Enable option [Use payment providers] to enable payment for PRISMAdirect.
Select which payment providers will be available for PRISMAdirect.
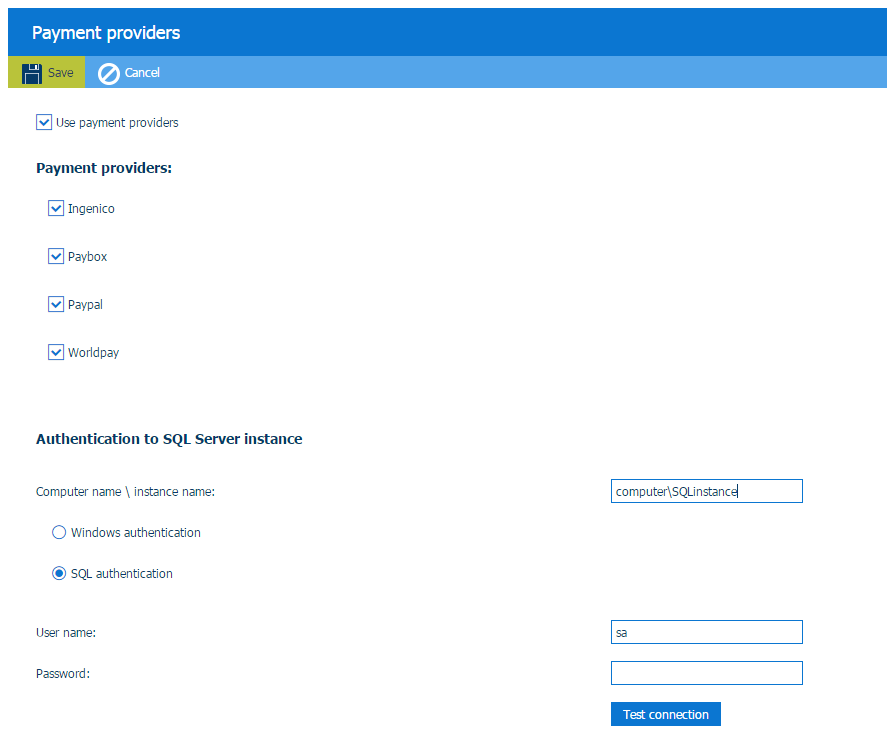
Configure the credentials for the SQL server. The application creates a payment report per payment provider and stores them on the SQL server.
The same SQL server is used for the accounting workflow, see [System] - [Accounting and reporting] - [Accounting] - [Accounting workflow]. When you change the settings for the SQL server in that dialog, the settings will also change in this dialog and vice versa.
Define the [Computer name \ instance name:].
With this option, you define where the payment reports are stored. For example: SQL_server_name\SQL_server_instance_name.
You have to define how the [Order processing] connects to the SQL server. The authentication type depends on the location of the SQL server:
|
Location of the SQL server |
Description |
|---|---|
|
Local SQL server |
SQL authentication (recommended) Type the account credentials of an existing login account for the SQL server. |
|
Remote SQL server inside the domain |
Windows authentication (recommended) The Windows user credentials are used for the authentication. The user is not prompted for a user name and password. |
|
SQL server outside the domain |
SQL authentication (mandatory) Type the account credentials as defined by the customer for the SQL server. |
Type the password of user sa. You have defined the password for user sa when you installed PRISMAdirect.
Accounting information can be collected when the user has system administration rights on the accounting database.
[Test connection]
Click this button to test the connection to the SQL server.
Click [Save].
You have to configure the [Payment providers] for each web server.
Click [System] - [Web submission] - <web server> - [Payment providers].
Option [Use payment providers]
Enabled
You can enable one or more payment providers for the concerning web server. For example: PayPal.
Disabled
For example, your company uses a local area network. You can disable the payment providers in this dialog since your Web server has no Internet access. The customer does not receive an "unable to connect" message from the payment provider.
Configure each payment provider.
Click on the bar of the payment provider that you want to configure. For example: PayPal. The bar expands and you can fill in the required settings. Each payment provider delivers the required settings to you when you create a merchant account.
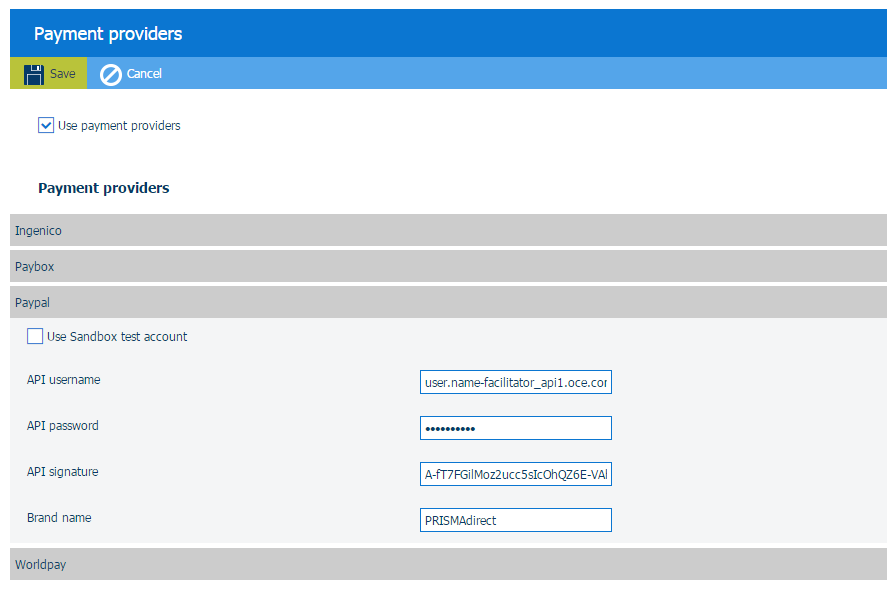
Click [Save].
Click [Web shop] - <web shop> - [Pricing] - [Payment].
Enable the [Enable payment] option. Customers have to pay their orders before they can submit their orders via the web shop. The payment providers as defined for the web server are available for the customers.
You can customise this setting for one or more user groups. See procedure Optionally, you can customize the payment settings per user group.

Click [Save].
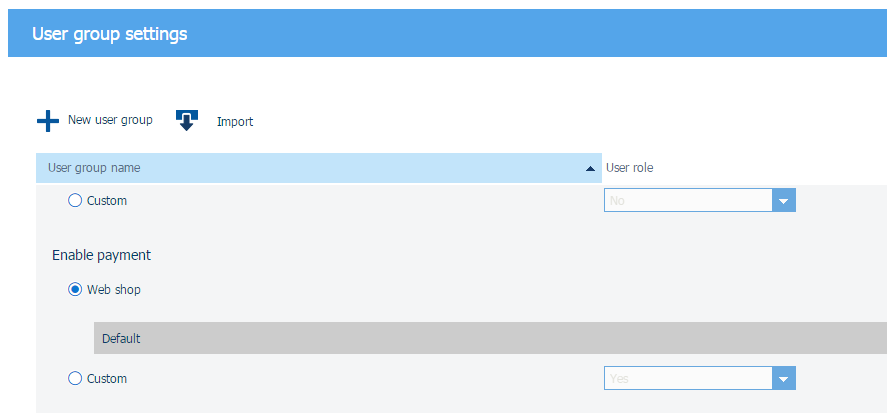
Click [User management] - [User groups] - [User group settings].
Click on the bar of the user group that you want to customize. The user group expands.
Scroll to section [Enable payment].
A customer can be part of a user group. The settings of the user group overwrite the payment settings of each web shop.
Web shop
The user group uses the value of setting [Enable payment] as defined for the web shop.
Custom = Yes
Payment is enabled for each web shop for the concerning user group. A requirement is that the payment providers are configured, see procedure Configure the payment providers per web server.
Custom = No
Payment is disabled for each web shop for the concerning user group.
Click [Save].