
An ODBC driver is an interface to a data source. The data source can be a database (SQL / MS Access) or a file (Excel / txt / csv). Ticket items of type "Lookup" use the driver and a query to read information from the data source and add that information to an order.
ODBC cannot be used from a remote machine. In a distributed system, the user must:
Create and configure the ODBC driver on the web servers in the distributed system. The name of the ODBC driver must be the same on each machine.
The data source must be identical on the web servers in the distributed system.
Determine the bit version of the application for which you want to create an ODBC driver. A 64-bit Windows operating system has two odbcad32.exe files:
%SystemRoot%\system32\odbcad32.exe for 64-bit applications
%SystemRoot%\SysWOW64\odbcad32.exe for 32-bit applications, including 32-bit applications that run on 64-bit operating systems.
Create a TXT or CSV file. The data in the file must be comma separated. For example:
1,Chai,10 boxes x 20 bags,$18.00,False
2,Chang,24 - 12 oz bottles,$19.00,False
3,Aniseed,12 - 550 ml bottles,$10.00,False
4,Chef Anton's Cajun Seasoning,48 - 6 oz jars,$22.00,False
5,Chef Anton's Gumbo Mix,36 boxes,$21.35,True
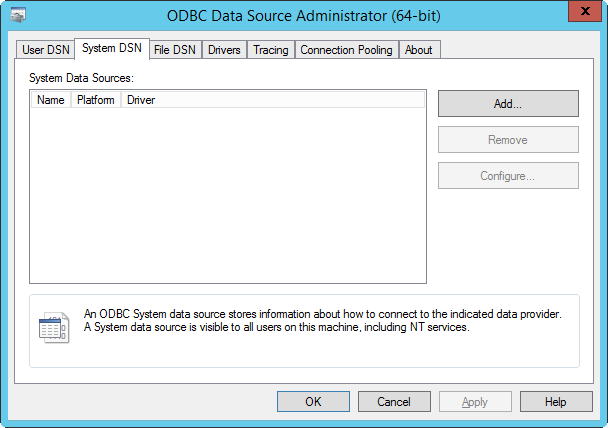
Open the Search dialogue of Windows and type "ODBC".
Select the "ODBC Data Sources (64-bit)".
Click the "System DSN" tab and click "Add…".
When you create a "System DSN", the data source is local to the computer but can be accessed by all users.
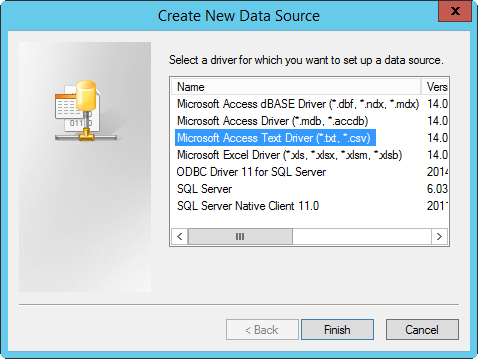
Select "Microsoft Text Driver (*.txt; *.csv)" and click "Finish".
Type a name for the data source in option "Data Source Name".
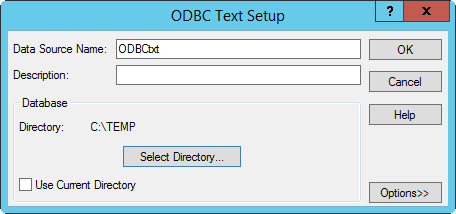
Deselect option "Use Current Directory".
Click "Select Directory" and browse to the directory that contains the TXT or CSV file that you want to use as data source. Close the "Select Directory" dialogue.
Click "Options>>" and select the correct extension for the file.
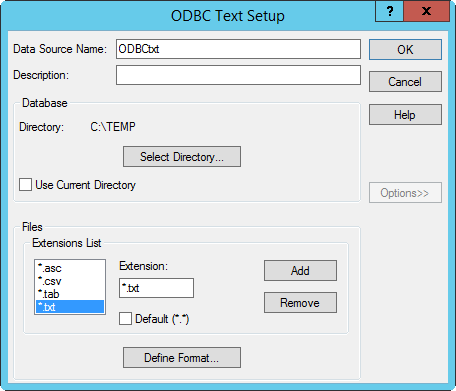
Click "Define Format…".
Select the file that you want to use as data source. Do this in section "Tables".
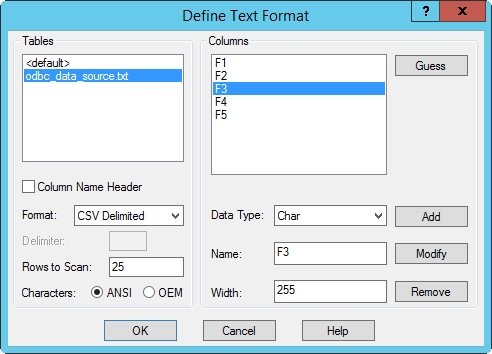
If your file uses a delimiter other than a comma, you have to configure option "Format" and "Delimiter".
Click "Guess" in section "Columns".
The wizard creates columns according to the data structure in the TXT or CSV file.
For each column, check the value for option "Data Type". Select "Char" for columns containing text, select "Integer" for columns with numbers, etc.
Optionally, you can rename the column headers using option "Name". You can use the column names in the query of a ticket item of type "Lookup" in PRISMAdirect. The lookup item uses the ODBC driver and a query to read information from the data source.
Click OK and OK.

The ODBC driver is now configured. Close the dialogue.
Continue with procedure "Create and use a lookup item in PRISMAdirect". You can find this procedure in the bottom of this article. You have to create a lookup item to read information from the data source using the ODBC driver and a query.
Create an Excel file. The data in the file must be available in a table. You can use the column names in the query of a ticket item of type "Lookup" in PRISMAdirect. The lookup item uses the ODBC driver and a query to read information from the data source.
For example:
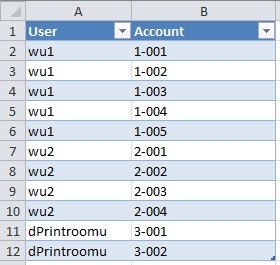
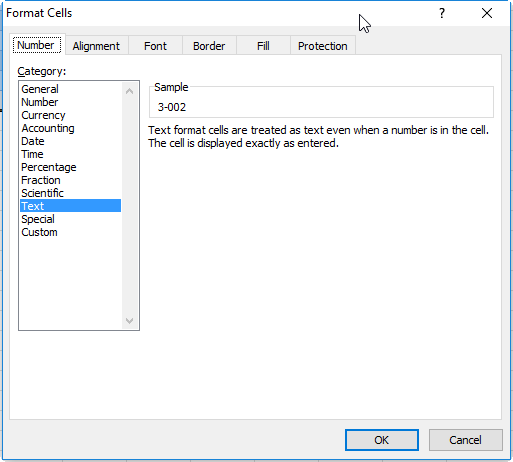
Select all cells in the table - including the headers - and set the cell format to "Text".
Open the Search dialogue of Windows and type "ODBC".
Select the "ODBC Data Sources (64-bit)".
Click the "System DSN" tab and click "Add…".
When you create a "System DSN", the data source is local to the computer but can be accessed by all users.
Select "Microsoft Excel Driver (*.xls, *.xlsx, *.xlsm, *.xlsb)" and click "Finish".

Type a name for the data source in option "Data Source Name".
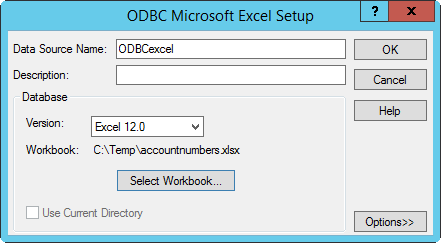
If required, select the Excel version.
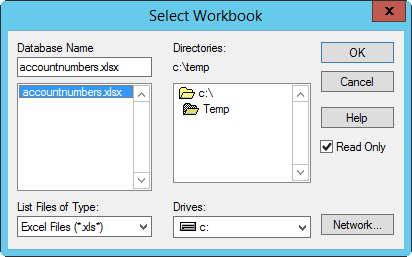
Click "Select Workbook…" and browse to the directory that contains the Excel file.
Select the Excel file that you want to use as data source. Do this in section "Database Name".
Click OK and OK.

The ODBC driver is now configured. Close the dialogue.
Continue with procedure "Create and use a lookup item in PRISMAdirect". You can find this procedure in the bottom of this article. You have to create a lookup item to read information from the data source using the ODBC driver and a query.
Check the login account for the SQL server of the customer
When you configure the ODBC driver, you have to select an authentication type. The authentication type depends on the location of the SQL server:
Local SQL server => SQL authentication (recommended)
Remote SQL server inside the domain => Windows authentication (recommended)
SQL server outside the domain => SQL authentication (mandatory)
For the selected authentication, a login account with the correct credentials must exist for the SQL server. Else, the ODBC driver cannot connect to the SQL server.
You have to check that a valid login account exists.
For example, you can use:
Account “<domain>\<Windows user>” when Windows authentication is selected.
Account “sa” when SQL authentication is selected for a local SQL server.
Create and configure an ODBC driver for a SQL data source
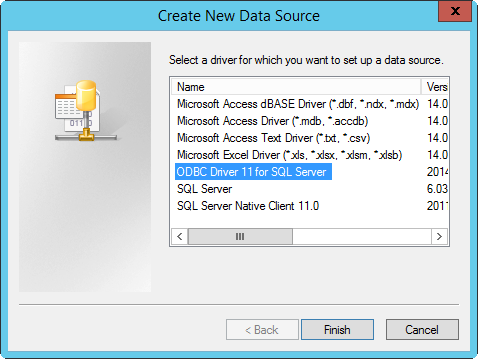
Open the Search dialogue of Windows and type "ODBC".
Select the "ODBC Data Sources (64-bit)".
Click the "System DSN" tab and click "Add…".
When you create a "System DSN", the data source is local to the computer but can be accessed by all users.
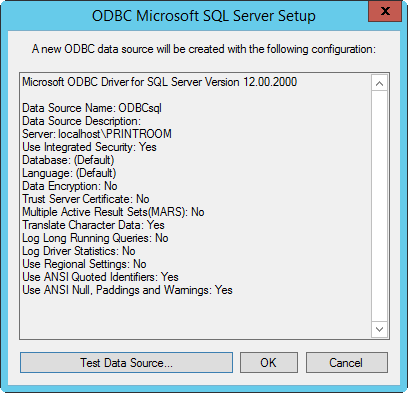
Select "ODBC Driver 11 for SQL Server" and click "Finish".
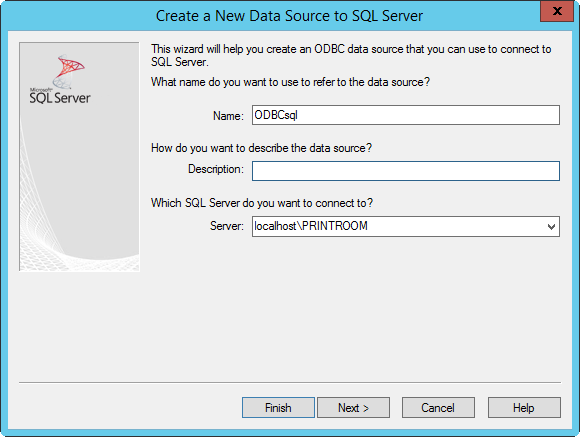
Type a name for the data source in option "Name", select the SQL server that you want to connect to and click "Next".
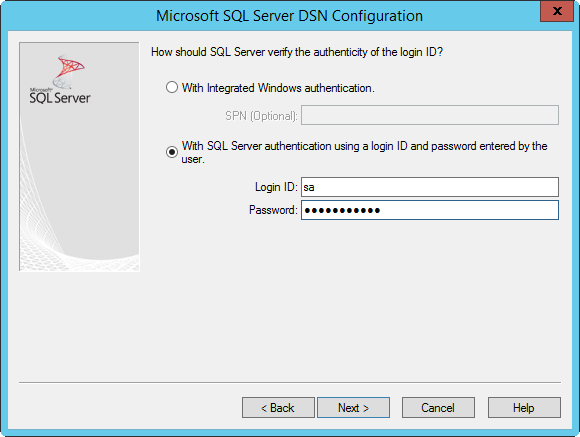
Select the authentication type. The authentication type depends on the location of the SQL server:
Local SQL server => SQL authentication (recommended)
Remote SQL server inside the domain => Windows authentication (recommended)
SQL server outside the domain => SQL authentication (mandatory)
In case of Integrated Windows authentication, leave option “SPN (Optional)” empty:

In case of SQL Server authentication, type the "Login ID" and the "Password":
Click "Next", click "Next" again and then click "Finish".
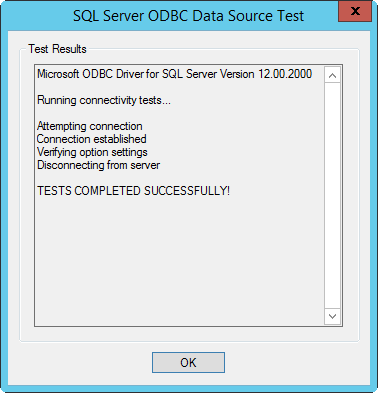
Click "Test Data Source…" to test the connection to the data source.
Click OK when the connection is successful.
Click OK.
The ODBC driver is now configured. Close the dialogue.

Continue with procedure "Create and use a lookup item in PRISMAdirect". You can find this procedure in the bottom of this article. You have to create a lookup item to read information from the data source using the ODBC driver and a query.
Open the Search dialogue of Windows and type "ODBC".
Select the "ODBC Data Sources (64-bit)".
Click the "System DSN" tab and click "Add…".
When you create a "System DSN", the data source is local to the computer but can be accessed by all users.
Select "Microsoft Access Driver (*.mdb, *.accdb)" and click "Finish".

Type a name for the data source in option "Data Source Name".
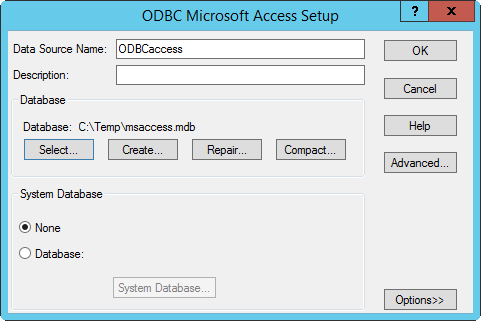
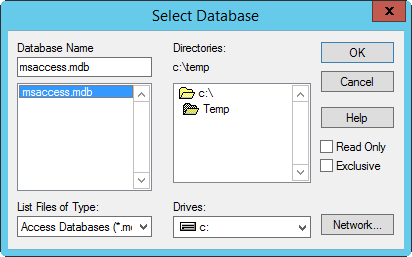
Click "Select…" and browse to the directory that contains the database file.
Select the database file in section "Database Name" and click OK.
Click OK and OK.
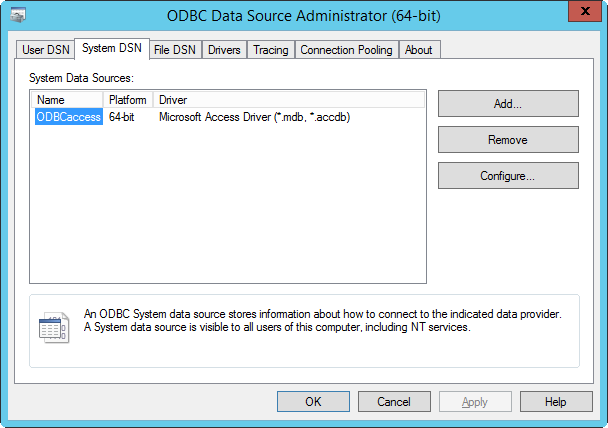
The ODBC driver is now configured. Close the dialogue.
Continue with procedure "Create and use a lookup item in PRISMAdirect". You can find this procedure in the bottom of this article. You have to create a lookup item to read information from the data source using the ODBC driver and a query.
Ticket items of type "Lookup" use an ODBC driver and a query to read information from a data source. You can add that information to an order.
Open the "Product & order editor" workspace of PRISMAdirect.
Select "Product items" and click "Add".
Type a name for the new item and select "Lookup" for the item type.
Type the name of the ODBC driver. This is the exact name that you defined in "Data Source Name", or "Name" for a SQL data source.
For a SQL data source or a MS Access data source:
Type the "User name" and the "Password" of the user account with access rights to the database.
The "User name" and "Password" of the lookup item overwrite the "Login ID" and "Password" of the ODBC driver, see step 6 of procedure "ODBC driver for a SQL data source". For example, if you leave the "User name" and "Password" empty, the user account tries to login with empty credentials.
For a TXT or CSV data source, or an Excel data source:
Leave the "User name" and the "Password" empty.
Create a SQL query to retrieve information from the data source. A valid query must take into account if the selected database is case sensitive for correct data retrieval.
In this example, the query is: SELECT F3 FROM ODBC_data_source.txt
This query returns all values of column “F3” of data source “ODBC_data_source.txt” to the lookup item “ODBC lookup”.
You can type $ in the query to display a list of profile items. You can use these profile items in the query.
Examples of queries:
SQL Driver: SELECT Column FROM Database.Table
Microsoft Access Driver: SELECT Column FROM Table
Microsoft Excel Driver: SELECT Account FROM [Sheet1$] WHERE User LIKE '$LastName$’
Microsoft Txt Driver: SELECT F2 FROM test.txt

Save the changes.
Select "Products" and add the lookup item to one of more products.
Publish the changes.
When you create an order, you can select a value from the data source for the lookup item:
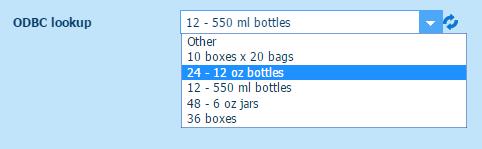
The first 999 values returned by the query are available in the drop-down list.