
This topic contains the following instructions.
Go to the colour presets
Add a colour preset
Edit a colour preset
Delete a colour preset
Define the colour preset attributes
Define the default colour preset for PRISMAprepare
A colour preset consists of a series of pre-defined colour settings. Colour presets help to easily select the correct colour settings during the job definition. The list of colour presets is available in PRISMAprepare, automated workflows, PRISMAsync Remote Manager, PRISMAsync Remote Printer Driver, and on the control panel.
The job properties on the control panel and in PRISMAsync Remote Manager allow you to change one or more attributes of the job colour preset. The changed colour preset can be stored with another name.
There are two factory defined colour presets.
Office documents
This colour preset is optimal for the colour reproduction of text and graphical lines in office documents. The printer converts the source file colours to more saturated output colours.
Photographic content
This colour preset is optimal for the reproduction of photographs and illustrations.
Open the Settings Editor and go to: .

 Colour presets
Click [Add].
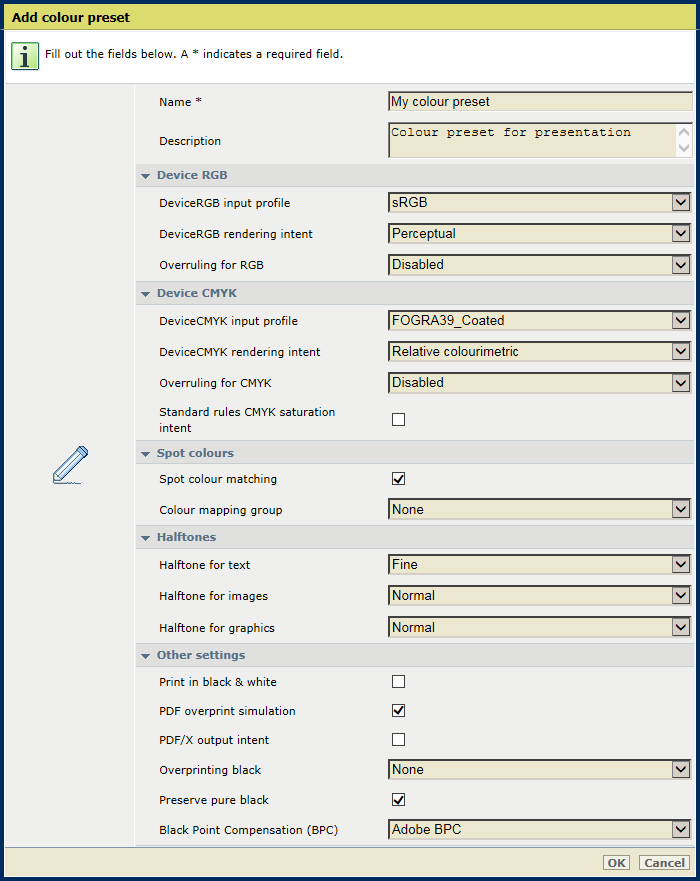
Define the attributes of the colour preset.
Use the table below for information on the options.
Click [OK].
Select a colour preset.
Click [Edit].
Define the required attributes of the colour preset.
Use the table below for information on the options.
Click [OK].
Select the colour preset.
Click [Delete].

|
Colour preset attributes |
Description |
|---|---|
|
[Name] |
Enter a unique name of the colour preset. |
|
[Description] |
Enter a description of the colour preset. |
|
[DeviceRGB input profile] |
Use this function to select the DeviceRGB input profile. |
|
[DeviceRGB rendering intent] |
Use this function to select the DeviceRGB rendering intent. |
|
[Overruling for RGB] |
Use this function to indicate if the embedded DeviceRGB input profile is overruled or not. |
|
[DeviceCMYK input profile] |
Use this function to select the DeviceCMYK input profile. |
|
[DeviceCMYK rendering intent] |
Use this function to select the DeviceCMYK rendering intent. |
|
[Overruling for CMYK] |
Use this function to indicate if the embedded CMYK input profile is overruled or not. |
|
[Standard rules CMYK saturation intent] |
Use this function to indicate if the standard ICC colour management rules of the CMYK saturation intent must be applied. For the CMYK saturation intent, the printer by default maps pure (100%) C, M, Y and K input colours into pure C, M, Y and K output colours. However, it can be required that the standard ICC colour management rules must be used without an improvement of the colour management of the printer. |
|
[Spot colour matching] |
Use this function to enable or disable spot colour matching. If a source file contains a spot colour, the printer must know the spot colour definition to exactly print the required colour. |
|
[Colour mapping group] |
If the [Spot colour matching] function is enabled, you can select a colour mapping group. With colour mapping you can redefine the colour values of a source colour (RGB, CMYK or spot colour). |
|
[Halftone for text] |
Use this function to define the halftone for text. |
|
[Halftone for images] |
Use this function to define the halftone for images. |
|
[Halftone for graphics] |
Use this function to define the halftone for graphics. |
|
[Print in black & white] |
Use this function to indicate how jobs are printed: in black & white or in colour. |
|
[PDF overprint simulation] |
Use this function to make opaque objects look transparent. Underlying objects become visible. If this function is disabled, the colours on top will knock out all underlying colours. |
|
[PDF/X output intent] |
Use this function to define that PDF files are printed according to their embedded output intent. PDF/X specifies the printing condition for which the PDF/X file was created. The Device CMYK input profile and the job ticket are ignored. |
|
[Overprinting black] |
Use this function to force the printer to print pure black text and graphics over the background colour. The [Overprinting black] prevents that white lines appear around black characters and graphics.
|
|
[Preserve pure black] |
Use the function to apply pure black preservation when possible. Pure black preservation means that the colour black is composed of 100% K ink. When pure black preservation is not possible or disabled, the colour black is composed of a mixture of two or more C, M, Y, and K inks. |
|
[Black Point Compensation (BPC)] |
Use this function applies to the relative colorimetric rendering intent. Details in dark regions of the document can be lost with the standard colour conversion. The Black Point Compensation aligns the darkest level of black achievable (black point) of the source to the darkest level of black achievable on the printer.
|
Open the Settings Editor and go to: .


Use the [Default colour preset for PRISMAprepare] option to define the default colour preset for PRISMAprepare.

Click [OK].