
The printer supports a wide range finishing optionals. For more information about finishing options, refer to Learn about finishing for your output.
There are two professional stacker / stapler configurations: the stacker / stapler with booklet maker (Saddle Finisher-AM2 ) and without booklet maker (Finisher-AM1 ). The booklet maker folds and staples booklets. Both finisher configurations can have the optional punch unit to punch two, three or four holes in the printed output.
The dashboard of the control panel displays the status of the staple cartridges. When the colour of the staple icon is orange or red, the staple cartridge needs replacement.
 Professional stacker / stapler with booklet maker (Saddle Finisher-AM2 ), without booklet maker (Finisher-AM1 ) and the saddle-stitch unit
|
Description stacker / stapler |
|
|---|---|
|
1 |
Cover, to access the paper path when a paper jam occurs. |
|
2 |
Cover, to access the area where you replace staple cartridges, clear a paper jam, or clear a staple jam. |
|
3 |
Booklet tray, to collect booklets. |
|
4 |
Auxiliary booklet tray, to collect large booklets. |
|
5 |
Lower tray, to collect finished output. The guides enable a correct placement of the printed output. |
|
6 |
Upper tray, to collect finished output. The guides enable a correct placement of the printed output. Extension guides for long sheets are attached to this tray. |
|
7 |
Punch waste tray, to collect the punch waste. |
|
8 |
Staple waste tray, to collect the staple waste. |
There are two standard stacker / stapler configurations: the stacker / stapler with booklet maker (Booklet Finisher-T1 ) and without booklet maker (Staple Finisher-T1 ). The booklet maker folds and staples booklets. Both finisher configurations can have the optional punch unit to punch two, three or four holes in the printed output.
The dashboard of the control panel displays the status of the staple cartridges. When the colour of the staple icon is orange or red, the staple cartridge needs replacement.
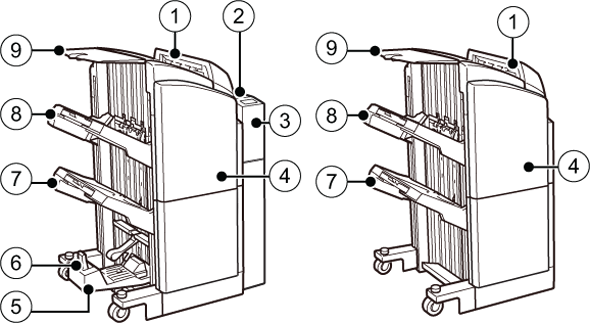 Standard stacker / stapler with booklet maker (Booklet Finisher-T1 ) and without booklet maker (Staple Finisher-T1 ).
|
Description stacker / stapler |
|
|---|---|
|
1 |
Cover, to access the paper path when a paper jam occurs. |
|
2 |
Punch unit cover, to access the paper path when a paper jam occurs. |
|
3 |
Punch unit cover, to remove the punch waste or to access the paper path when a paper jam occurs. |
|
4 |
Cover, to access the area where you replace staple cartridges, clear a paper jam, or clear a staple jam. |
|
5 |
Booklet tray, to collect booklets. |
|
6 |
Auxiliary booklet tray, to collect large booklets. |
|
7 |
Lower tray, to collect finished output. |
|
8 |
Upper tray, to collect finished output. Extension guides for long sheets are attached to this tray. |
|
9 |
Top tray, to collect finished output. |
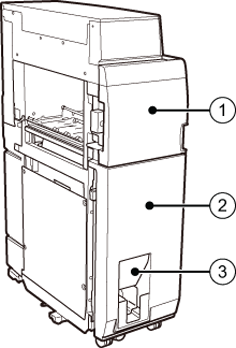
The professional puncher (Multi Function Professional Puncher-A1 ) can punch and crease printed output. There are different replaceable dies for each punch pattern and for creasing. Only one die can be active at the same time.
Use the operation guide of the Multi Function Professional Puncher-A1 for more information on how to use the professional puncher.
 Professional puncher (
Multi Function Professional Puncher-A1 )
Professional puncher (
Multi Function Professional Puncher-A1 )|
Description professional puncher |
|
|---|---|
|
1 |
Control panel, to view the status of the puncher and to operate the puncher when you need to replace a crease die or punch die. |
|
2 |
Front cover, to access the die sets and to access the paper path when a paper jam occurs. |
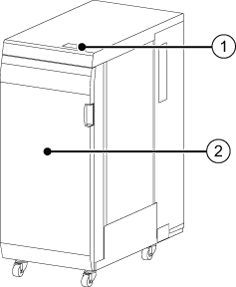
The folder (Paper Folding Unit-J1 ) can fold the printed output in various ways: Z-fold, half-fold, tri-fold in, tri-fold out, parallel fold.
 Folder (Paper Folding Unit-J1 )
|
Description folder |
|
|---|---|
|
1 |
Front cover, to access the paper path when a paper jam occurs. |
|
2 |
Folding unit cover, to access the paper path when a paper jam occurs. |
|
3 |
Tray, to collect folded output. |
The copy tray (Output Tray-A1 ) collects the printed output. The copy tray is part of the print module. Printed output goes to the copy tray when no other finishing optionals are part of the print system.
 Output tray (Output Tray-A1 )
|
Description |
|
|---|---|
|
1 |
Auxiliary tray, to collect large, printed output (A3 / 11" x 17" or A4R / LTRR). |
|
2 |
Output tray, to collect printed output. |