
This topic contains the following instructions.
1. Configure the PRISMAsync Print Server domain
2. Add the PRISMAsync Print Server domain user groups the PKI smart card users belong to
3. Import the smart card CA certificates
4. Connect the smart card reader
5. Configure the use of PKI smart cards
Perform the procedures in the order they are listed.
You start with the creation of PRISMAsync Print Server domains that refer to the LDAP domains where the PKI smart card user accounts are stored.
Therefore you open the Settings Editor and go to: .
 [Domains] tab
You add PRISMAsync Print Server domain user groups that refer to the LDAP user groups where the PKI smart card user accounts belong to.
Import the smart card CA certificates in the list of trusted certificates.
The PKI smart card configuration consists of a series of options and a test to check the configuration. Therefore, you and insert a PKI smart card.
Connect the reader to a free USB port at the back side of PRISMAsync Print Server.
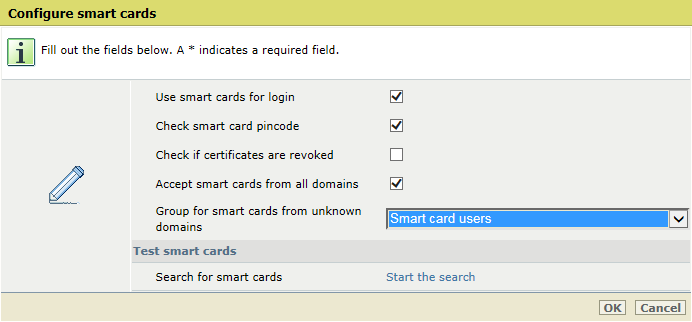 Configure smart cards
Open the Settings Editor and go to: .
 [Users] tab
Click [Configure PKI smart cards].
 [Users] menu
Select the [Use PKI smart cards for login] check box to enable the usage of PKI smart cards.
Select the [Check smart card PIN or password] check box to include a PIN or password verification.
When smart cards have a PIN or password protection, ensure you enable this option.
Select the [Check if certificates are revoked] check box to include the verification of the revocation status.
Select the [Accept smart cards from all domains] check box to indicate that you accept smart card users from unknown domain.
Use the [Group for smart cards from unknown domains] drop-down list to specify the user group for smart card users from unknown domain.
Click [OK] or proceed with the test to check the smart card configuration.