
Getting in touch for the first time with PRISMA Home involves a few preparation steps. The purpose of this chapter is to guide you step-by-step through the actions needed in order to have a fully functioning PRISMA Home.
Please read the steps below carefully to make sure you make optimal use of your PRISMA Home applications and tools.
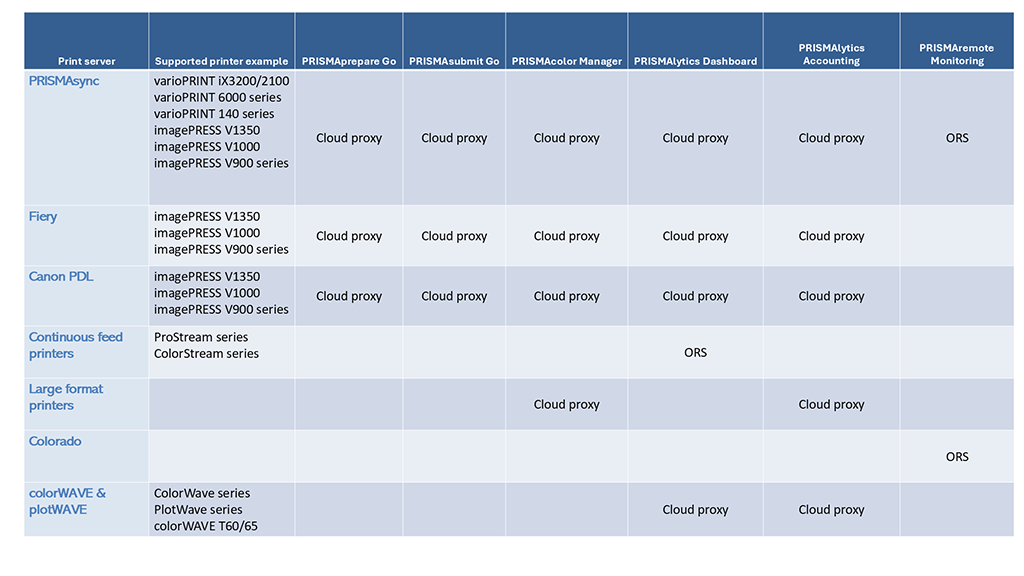
The following table contains the possible ways of onboarding a device into the PRISMA Home.
This is what you need to do to get started:
PRISMA Home lets you use a device in two separate ways. Some devices support a direct connection. Or you can let the Cloud proxy handle the connection.
Direct connection:
PRISMAsync devices require such a direct connection for PRISMAlytics Dashboard and PRISMAremote Monitoring.
Cloud proxy connection :
Setup Cloud proxy and add devices
Register devices in PRISMA Home with Cloud proxy
Cloud proxy will let you bridge the network connection between PRISMA Home and your devices, and offer a simple way to manage and troubleshoot them.
It is important to keep the Cloud proxy updated. When a new version is released, a notification will be shown in the header of the page, as well as in the card for starting the [Configuration].

Allow the applications to use the newly added device(s).
Invite other users to create accounts in your tenant in PRISMA Home.
When you send the invitation, you have to select what type of user role to assign for the PRISMA Home portal.
.
Two roles are available in PRISMA Home:
[Employee], which is an employee of the print company.
The employee is not able to change settings.
[Administrator] which is the administrator of the print company.
The administrator can change settings and can perform any of the available actions.
Assign a role to each registered users in the available applications.
In a similar way each application offers user roles tailored to their specific needs. If the application offers management settings, it will offer the [Administrator] role as option.